<p align="center">
<img src="https://user-images.githubusercontent.com/30084738/231727365-defc7606-59aa-48f5-b8c4-b7ec4664eac1.jpeg" alt="Image description" width="120" height="120">
</p>
# Terminal Media Player
[](https://crates.io/crates/tplay)
[](https://crates.io/crates/tplay)
[](LICENSE)
[](https://aur.archlinux.org/packages/tplay-git)
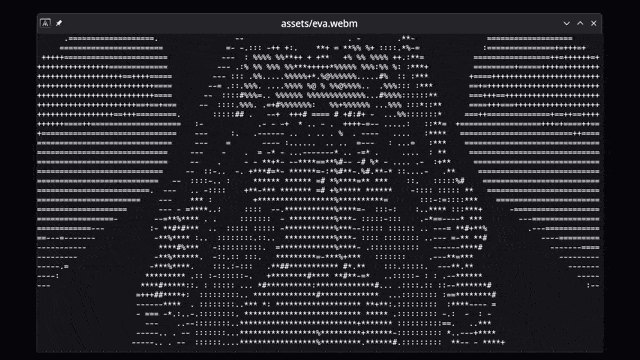
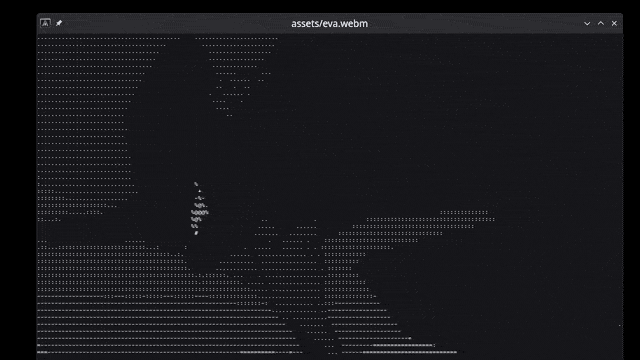
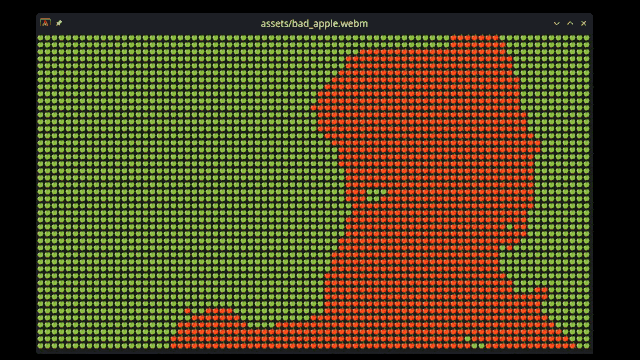
View images, videos (files or YouTube links), webcam, etc directly in the terminal as ASCII. All images you see [below](#features) are just made by characters on the terminal command line, drawn really fast.
<details>
<summary><b>Table of Contents</b></summary>
<p>
- [Terminal Media Player](#terminal-media-player)
- [Table of Contents](#table-of-contents)
- [Who is it for?](#who-is-it-for)
- [Features](#features)
- [Getting Started](#getting-started)
- [Prerequisites](#prerequisites)
- [Linux](#prerequisites-installation-on-ubuntu-linux)
- [macOS](#prerequisites-installation-on-macos-homebrew)
- [Windows](#prerequisites-installation-on-windows)
- [Installation](#installation)
- [For users](#for-users)
- [Arch Linux](#arch-linux)
- [NixOS](#nixos)
- [Other Distros](#other-distros)
- [Install Using Cargo](#install-using-cargo)
- [For developers](#for-developers)
- [Feature flags](#feature-flags)
- [Usage](#usage)
- [Contributing](#contributing)
- [License](#license)
- [Why](#why)
- [Credits](#credits)
</p>
</details>
# Who is it for?
- You _really_ don't like graphical applications or work on a computer without graphical capabilities.
- You are looking for a quick way to convert visual media to ASCII art.
- You want to watch a video in the terminal, but you don't want to use `mpv` or `vlc` because they're too mainstream.
- You want to show off your terminal skills to your friends and make them think you're a hacker.
# Features
This crate is still in early development, but it already has a lot of features. Here's a list of what it can or can't do:
- [x] Converts and shows any media to ASCII art in the terminal
- [x] Supports images/gifs/videos/webcam and **YouTube** links
- [x] Any resolution, aspect ratio, and framerate
- [x] Use any character set as supported by your terminal
- [x] Handy pause/unpause and char map selection [controls](#playback-commands)
- [x] RGB Colors (on terminals that support RGB colors)
- [x] Play sounds
- [x] Spark joy
- [x] Full media controls (forward, backwards, etc)
- [x] Subtitles
- [ ] Replace a fully-fledged media player
## RGB Colors

## Live update when updating character size

## On-the-fly character map selection
## Dynamic resize
## Emojis
## Webcam support

# Getting Started
These instructions will get you a copy of the project up and running on your local machine for development and testing purposes.
# Prerequisites
Being a Rust crate, you will need to have Rust installed on your system. You can find the installation instructions [here](https://www.rust-lang.org/tools/install).
The following dependencies are also required:
- [OpenCV 4](https://docs.opencv.org/4.11.0/d7/d9f/tutorial_linux_install.html) Tested with OpenCV 4.6, 4.10, 4.11.
- [LLVM](https://github.com/llvm/llvm-project/releases/tag/llvmorg-16.0.0)
- [ffmpeg](https://ffmpeg.org/download.html) Tested with FFmpeg 6.1 (Linux) and 7.x (macOS/Homebrew)
- [libmpv-dev](https://mpv.io/installation/) (development libraries for audio playback and subtitles)
- Optional dependency for YouTube playback support: [yt-dlp](https://github.com/yt-dlp/yt-dlp/wiki/installation)
They can be simply installed on Linux with your package manager. See [below](#prerequisites-installation-on-linux) for more details.
## Prerequisites Installation on Ubuntu Linux
If you're on Linux (Ubuntu), you can install all dependencies with your package manager. First install Rust:
```bash
sudo apt install curl
Then install `tplay`'s prerequisite dependencies:
```bash
sudo apt install libssl-dev libstdc++-12-dev clang libclang-dev ffmpeg libavfilter-dev libavdevice-dev libasound2-dev yt-dlp libmpv-dev
```
And install OpenCV following this guide https://docs.opencv.org/4.11.0/d7/d9f/tutorial_linux_install.html.
Do not install via apt `libopencv-dev` as it's out of date.
Note, I tested this by building openCV from source in the guide above, and at the end I invoked `sudo make install`. The guide doesn't recommend that and you may want to use an alternative method, but this is how I installed it.
After installing OpenCV from source you may also need to add the folder where you built OpenCV to LD_LIBRARY_PATH, for example: `export LD_LIBRARY_PATH=/home/<your user>/build/lib:$LD_LIBRARY_PATH`
## Prerequisites Installation on macOS (Homebrew)
Minimal setup on macOS using Homebrew. Commands below set the needed env vars, run quick checks, then install.
```bash
# 1) Install dependencies
brew install pkg-config cmake ninja opencv ffmpeg yt-dlp mpv
```
```bash
# 2) Session-only exports so pkg-config can find FFmpeg/OpenCV
export PKG_CONFIG_PATH="$(brew --prefix)/lib/pkgconfig:$(brew --prefix)/share/pkgconfig:$(brew --prefix ffmpeg)/lib/pkgconfig:$(brew --prefix opencv)/lib/pkgconfig:${PKG_CONFIG_PATH:-}"
export OPENCV_INCLUDE_PATHS="$(brew --prefix opencv)/include/opencv4"
export OPENCV_LINK_PATHS="$(brew --prefix opencv)/lib"
```
```bash
# 3) Quick checks (should print versions)
pkg-config --modversion libavutil
pkg-config --modversion opencv4
```
```bash
# 4) Install / update
cargo install tplay # fresh install
# or
cargo install tplay --force # update existing
```
**Troubleshooting (one-off FFmpeg selection):**
If the FFmpeg check fails, try Homebrew’s versioned formula for this command only:
```bash
brew install ffmpeg@7
PKG_CONFIG_PATH="$(brew --prefix ffmpeg@7)/lib/pkgconfig:$PKG_CONFIG_PATH" cargo install tplay
```
## Prerequisites installation on Windows
The crate can run on Windows and all prerequisites (opencv, ffmpeg) can be installed with vcpkg. However, the installation/setup process is lengthy and prone to errors. Performance is also very poor. Save yourself a headache: use WSL and follow the [Linux instructions](#prerequisites-installation-on-linux).
# Installation
## For users
### Arch Linux
You can install it on Arch Linux using [aur](https://aur.archlinux.org/packages/tplay-git) by running the following commands (using [paru](https://github.com/Morganamilo/paru)):
``` bash
paru -S tplay-git
```
### NixOS
https://search.nixos.org/packages?channel=24.05&show=tplay&from=0&size=50&sort=relevance&type=packages&query=tplay
### Other Distros
With your contribution and support it can be made available on other distros as well :).
### Install Using Cargo
You can install the `tplay` command line tool by running the following command:
```bash
# Install the tplay command line tool
cargo install tplay
```
So that you can run it from anywhere as
```bash
tplay <media> [options]
```
## For developers
```bash
# Clone the repository
git clone https://github.com/maxcurzi/tplay.git
# Change to the project directory
cd tplay
# (optional) Build the project
cargo build --release
# (optional) Run the tests
cargo test
# Run the project (use --release for faster performance)
cargo run --release -- <media> [options]
```
## Feature flags
By default, the crate uses MPV (`libmpv-dev`) for audio playback and subtitles.
For MPV 0.34 instead of 0.35+:
```bash
cargo build --release --no-default-features --features mpv_0_34
```
Alternative rodio backend (no playback speed control or pitch preserving):
```bash
cargo build --release --no-default-features --features rodio_audio
```
# Usage
`tplay <media> [options]`
| `media` | Name of the file or stream to be processed (required). |
| `-f`, `--fps` | Forces a specific frame rate (--fps 23.976). |
| `-c`, `--char-map` | Custom lookup character table to use for the output (default: ` .:-=+*#%@`). |
| `-g`, `--gray` | Start in grayscale mode |
| `-w`, `--w-mod` | Experimental width modifier for certain characters such as emojis (default: 1). Use a value of 2 if your char_map is composed of emojis. |
| `-a`, `--allow-frame-skip` | Experimental frame skip flag. Try to use it if the playback is too slow. |
| `-n`, `--new-lines` | Experimental flag. Adds newline and carriage return `\n\r` at the end of each line (except the last). Terminals wrap around and don't need new lines, but if you want to copy-paste the text outside the terminal you may want them. The output would be a single long string otherwise. Uses more CPU. |
| `-l`, `--loop-playback` | Loop video/gif forever (default: do not loop - play once) |
| `-b`, `--browser` | It's used when downloading videos from YouTube, maps to yt-dlp `cookies-from-browser` to prove YouTube you're not a robot. Defaults to "firefox". Supported browsers are: brave, chrome, chromium, edge, firefox, opera, safari, vivaldi, whale |
Substitute `tplay` with `cargo run --release --` if you plan to run from source.
```bash
# Run it
tplay <media> [options]
# Example: local image
tplay ./image.png
# Example: local gif
tplay ./image.gif
# Example: local video
tplay ./video.mp4
# Example: remote video (YouTube)
tplay https://www.youtube.com/watch?v=dQw4w9WgXcQ
# Example: remote video (Other)
tplay https://media.developer.dolby.com/Atmos/MP4/shattered-3Mb.mp4
# Example: YouTube video, with different char maps
tplay https://www.youtube.com/watch?v=fShlVhCfHig --char-map " ░▒▓█"
# Example: YouTube video, with different char maps (use w-mod to adjust width when using emoji-based char maps)
tplay https://www.youtube.com/watch?v=FtutLA63Cp8 --char-map "🍎🍏❤️😊" --w-mod 2
# Example: webcam on Linux (YMMV on other OSes)
tplay /dev/video0
```
# Playback commands
- `0-9` - change character map
- `space` - toggle pause/unpause
- `g` - toggle grayscale/color
- `m` - toggle mute/unmute
- `←` / `→` - seek backward/forward 5 seconds
- `[` / `]` - decrease/increase playback speed by 0.25x
- `,` / `.` - decrease/increase playback speed by 0.1x (fine control)
- `\` - reset playback speed to 1.0x
- `c` - cycle through subtitle tracks
- `C` (Shift+c) - toggle subtitles on/off
- `q` - quit
# Playback Speed Control
Speed range: 0.5x to 2.0x with pitch-preserving audio.
- `[` / `]` - 0.25x adjustments
- `,` / `.` - 0.1x fine adjustments
- `\` - reset to 1.0x
**Note:** Requires MPV backend (default). Rodio backend does not support speed control.
# Subtitle Support
Subtitles appear at the bottom of the terminal. Use `c` to cycle tracks and `Shift+C` to toggle visibility.
**Note:** Requires MPV backend (default). Rodio backend does not support subtitles.
# Known Issues
- Videos played through the Konsole terminal may have reduced performance. This is due to the way Konsole handles terminal output. If you experience this issue, try using a different terminal emulator. I recommend [Alacritty](https://alacritty.org/) for great performance.
- Media playback is CPU-intensive. To improve performance, increase the font size, reduce the terminal window size, or run with the `-a` / `--allow-frame-skip` flag.
# Alternatives
This is my ASCII media player: _there are many like it, but this one is mine._
For other ASCII media players, check out:
https://github.com/search?q=ascii+player&type=repositories
# Contributing
Contributions are welcome! Please open an issue or submit a pull request.
Some ideas:
- Reduce external dependencies and streamline the installation process.
- Investigate migration from OpenCV to FFmpeg.
- More media controls (jump forward, jump backwards, loop, etc.).
- Testing and feedback on installing and running it on other OSes.
- Let me know if you have any other ideas!
# License
This project is licensed under the MIT License - see the [LICENSE](LICENSE) file for details.
# Why?
_Your Scientists Were So Preoccupied With Whether Or Not They Could, They Didn’t Stop To Think If They Should_
Mostly did it for fun while learning Rust. I also wanted to see if it was possible to make a video player that could run in the terminal. I think it's pretty cool that you can play videos in the terminal now. I hope you enjoy it too!
# Credits
Thanks to the following people for their contributions and support:
<a href="https://github.com/maxcurzi/tplay/graphs/contributors">
<img src="https://contrib.rocks/image?repo=maxcurzi/tplay" />
</a>