# rustormy
Minimal and neofetch-like weather CLI with multiple data providers support, ASCI-icons, ANSI colors, localization and
various output modes.
[](https://github.com/Tairesh/rustormy/actions/workflows/tests.yml)
[](https://crates.io/crates/rustormy)
[](https://github.com/Tairesh/rustormy/commits/main)
[](https://github.com/Tairesh/rustormy/tree/main)

---
## Current features
- Fetch weather data from multiple providers: [OpenMeteo](https://open-meteo.com/) (default, no API key required),
[OpenWeatherMap](https://openweathermap.org/), [World Weather Online](https://www.worldweatheronline.com/),
and [WeatherAPI.com](https://www.weatherapi.com/).
- Automatically fall back to the next provider if the primary one is unavailable (e.g., due to API limits).
- Display current temperature, "feels like" temperature, weather conditions, wind speed and direction,
humidity, precipitation, atmospheric pressure, dew point, and UV index (if supported by the provider).
- Render ASCII art icons for weather conditions.
- Support ANSI colors in terminal output.
- Provide geocoding by city name or latitude/longitude input.
- Cache geocoding results to reduce API calls (optional).
- Support multiple languages (English, Russian, Spanish; more to come).
- Support automatic conversion between imperial and metric units.
- Provide various text output modes (full, compact, one-line) and JSON output.
- Support live mode for periodically updating weather data.
- Cross-platform (Linux, macOS, Windows).
## Planned features
- More weather-related information (e.g. sunrise/sunset times, moon phase, etc.)
- More ASCII art icons for different weather conditions (also different for day and night)
- More weather data providers
- More customization options (e.g. colors, layout, etc.)
- More languages
- Improved test coverage
- Homebrew, nix, rpm, deb packages
- Docker image (just for fun)
## Installation
You can install `rustormy` using `cargo`:
```sh
cargo install rustormy
```
Or download a precompiled binary from the [releases page](https://github.com/Tairesh/rustormy/releases).
## Configuration
`rustormy` can be configured using a configuration file in TOML format.
It will be created automatically on first run if it does not exist.
To select a location of this file, `rustormy` uses the standard platform-specific directories:
On Linux, it uses
the [XDG base directory](https://standards.freedesktop.org/basedir-spec/basedir-spec-latest.html)
and the [XDG user directory](https://www.freedesktop.org/wiki/Software/xdg-user-dirs/) specifications.
By default, the configuration file will be located at `~/.config/rustormy/config.toml`.
On macOS, it uses
the [Standard Directories](https://developer.apple.com/library/content/documentation/FileManagement/Conceptual/FileSystemProgrammingGuide/FileSystemOverview/FileSystemOverview.html#//apple_ref/doc/uid/TP40010672-CH2-SW6).
The configuration file will be located at `$HOME/Library/Application Support/rustormy/config.toml`.
On Windows, it uses
the [Known Folder](https://msdn.microsoft.com/en-us/library/windows/desktop/bb776911(v=vs.85).aspx) system.
The configuration file will be located at `%APPDATA%\Roaming\rustormy\config.toml`.
### API keys
Some weather data providers require an API key to access their services.
You can obtain free API keys by signing up on their websites:
- [OpenWeatherMap](https://home.openweathermap.org/users/sign_up)
- [World Weather Online](https://www.worldweatheronline.com/developer/)
- [WeatherAPI.com](https://www.weatherapi.com/signup.aspx)
### Default configuration file
```toml
# Rustormy Configuration File
# This file is in TOML format. See https://toml.io/ for details
# For more details, see the documentation at https://github.com/Tairesh/rustormy/tree/main?tab=readme-ov-file#configuration
# Possible providers: `open_meteo`, `open_weather_map`, `world_weather_online`, `weather_api`
# Note that all providers except `open_meteo` require an API key
# You can specify multiple providers in the `providers` array to try them in order
# Example: `providers = ["world_weather_online", "open_weather_map", "open_meteo"]`
providers = ["open_meteo"]
# API key for Open Weather Map (required if using `open_weather_map` provider)
# Get your free API key from https://home.openweathermap.org/users/sign_up
api_key_owm = ""
# API key for World Weather Online (required if using `world_weather_online` provider)
# Get your free API key from https://www.worldweatheronline.com/developer/
api_key_wwo = ""
# API key for WeatherAPI.com (required if using `weather_api` provider)
# Get your free API key from https://www.weatherapi.com/signup.aspx
api_key_wa = ""
# You can specify location either by `city` name or by `lat` and `lon` coordinates
# If both are provided, coordinates will be used
# city = "London"
# lat = 51.5074
# lon = -0.1278
# Units can be `metric` (Celsius, m/s) or `imperial` (Fahrenheit, mph)
units = "metric"
# Output format can be `text` or `json`
output_format = "text"
# Language codes: `en` (English), `es` (Spanish), `ru` (Russian)
# (more languages will be added in future)
language = "en"
# Text mode can be `full`, `compact`, or `one_line`
# `compact` mode shows same info as `full` but without labels and trailing empty lines
# `one_line` mode shows only temperature and weather condition in a single line
text_mode = "full"
# Show city name can be enabled with `show_city_name = true` to include the city name in the output
# (only works if `city` is provided, not coordinates)
show_city_name = false
# Use colors can be enabled with `use_colors = true` to colorize the text output with ANSI colors
use_colors = false
# Wind in degrees can be enabled with `wind_in_degrees = true` to show wind direction in degrees
wind_in_degrees = false
# Live mode can be enabled with `live_mode = true` to update weather data every
# `live_mode_interval` seconds (default is 300 seconds, i.e., 5 minutes)
live_mode = false
live_mode_interval = 300
# Align right can be enabled with `align_right = true` to align labels to the right
align_right = false
# Use geocoding cache can be enabled with `use_geocoding_cache = true` to cache
# previously looked up cities locally to avoid repeated API calls
use_geocoding_cache = false
# Verbosity level can be set with `verbose` (0 = errors, 1 = warnings, 2 = info, 3 = debug)
verbose = 0
# API HTTP client timeout in seconds (default is 10 seconds)
connect_timeout = 10
```
## Usage
```
rustormy [OPTIONS]
Options:
-c, --city <CITY>
City name (required if lat/lon not provided)
-y, --lat <LAT>
Latitude (required if city not provided)
-x, --lon <LON>
Longitude (required if city not provided)
-p, --provider <PROVIDER>
Weather data provider (OpenMeteo, OpenWeatherMap, WorldWeatherOnline, WeatherAPI.com) [possible values: om, owm, wwo, wa]
-u, --units <UNITS>
Units for temperature and wind speed [possible values: metric, imperial]
-o, --format <OUTPUT_FORMAT>
Output format [possible values: text, json]
-g, --lang <LANGUAGE>
Language for weather output [possible values: en, ru, es]
--name
Show city name in output
--colors
Use colors in output
--degrees
Use degrees for wind direction in output
--compact
Compact mode for text output (short for `--text-mode compact`)
--one-line
One-line mode for text output (short for `--text-mode one_line`)
-m, --text-mode <TEXT_MODE>
Text output mode [possible values: full, compact, one_line]
--align-right
Align labels to the right in text output
-l, --live
Live mode - continuously update weather data every 5 minutes (or specified interval)
-i, --interval <LIVE_MODE_INTERVAL>
Live mode update interval in seconds (default: 300)
--no-cache
Disable caching of geocoding results
--clear-cache
Clear cached geocoding results and exit
-v, --verbose...
Increase verbosity level (can be used multiple times)
-h, --help
Print help
-V, --version
Print version
```
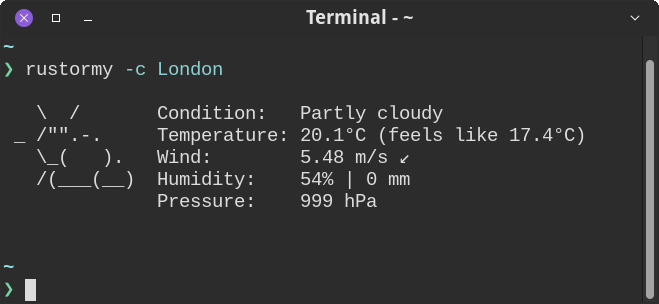
## Examples


## License
This project is licensed under the MIT License. See the [LICENSE](LICENSE) file for details.
## Contributing
Contributions are welcome! Please open an issue or submit a pull request on GitHub.
This project uses `just` for basic scripting. You can install it from cargo:
```sh
cargo install just
```
Use the following commands to run tests and lint the code before committing:
```sh
just check # Run tests and clippy
just before-commit # Run commands before committing (lint and check)
```
To run the application in development mode with specific options, use:
```sh
cargo run -- -c London --colors
```
## Acknowledgements
This project heavily inpired by [stormy](https://github.com/ashish0kumar/stormy). Actually, it started as a clone
of `stormy`, just in Rust. Then I added more features, but kept the name similar to honor the original project.
Also, [wttr.in](https://wttr.in) was a big inspiration for this project.