rust-animation 
rust-animation is an OpenGL-based graphics library written in Rust for creating hardware-accelerated user interfaces.
It is designed to implement a simple animated UI for embedded devices, inspired by GNOME Clutter project and Apple Core Animation.
The library supports the following features:
- 2D transforms: translate, scale, and rotate
- Animations with easing functions
- Flex UI
- Various examples
Note that rust-animation is still in the early stages of development, so some features may be missing, and there may be bugs. Feel free to file any bugs.
Installation
To use rust-animation, you need to install Rust first:
If you're building rust-animation on Windows or Mac, you'll need to install cmake as well:
For Max OSX,
$ brew install cmake
Note: rust-animation has been tested on Ubuntu 20.04, Windows10, and Mac OSX.
There are several examples so you can build them as follows:
Examples
rust-animation includes several examples to help you get started. To build and run them, you can use the following commands:
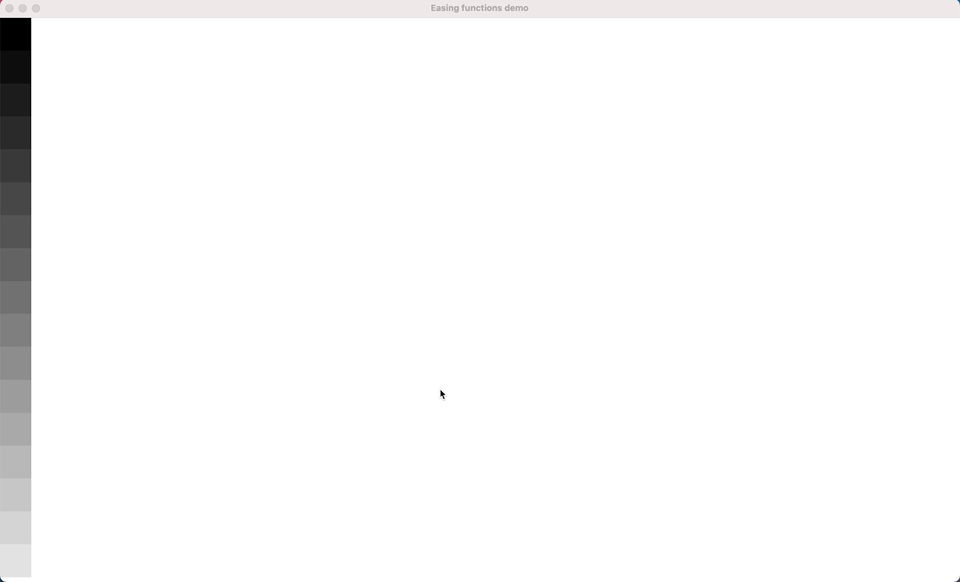
easing_functions.rs
This example shows all the available easing functions.
$ cargo build --example easing_functions
$ target/debug/examples/easing_functions
let mut play = Play::new("Easing functions demo".to_string());
  play.initialize();
  let mut stage = Stage::new("stage".to_string(), 1920, 1080,
      LayoutMode::UserDefine, None);
  stage.set_visible(true);

  let easing_functions = vec![
      EasingFunction::EaseIn,
      EasingFunction::EaseInCubic,
      EasingFunction::EaseInOut,
      EasingFunction::EaseInOutCubic,
      EasingFunction::EaseInOutQuad,
      EasingFunction::EaseInOutQuart,
      EasingFunction::EaseInOutQuint,
      EasingFunction::EaseInQuad,
      EasingFunction::EaseInQuart,
      EasingFunction::EaseInQuint,
      EasingFunction::EaseOut,
      EasingFunction::EaseOutCubic,
      EasingFunction::EaseOutQuad,
      EasingFunction::EaseOutQuart,
      EasingFunction::EaseOutQuint,
      EasingFunction::Linear,
      EasingFunction::Step
  ];
  let mut y = 0;
  let time = 5.0;
  let width  = 63;
  let height = width;
  for i in 0..17 {
    let actor_name = format!("actor_{}", i+1);
    let mut actor = Actor::new(actor_name.to_string(), width, height, None);
    actor.x = 0;
    actor.y = y;
    y += height as i32;
    actor.set_color(i as f32 / 18.0, i as f32 / 18.0, i as f32 / 18.0);
    actor.apply_translation_x_animation(0, (1920 - width) as i32, time, easing_functions[i]);
    actor.apply_rotation_animation(0, 360, time, EasingFunction::Linear);
    stage.add_actor(actor);
  }
  play.add_stage(stage);

  while !window.should_close() {
    process_events(&mut window, &events);
    play.render();
    window.swap_buffers();
    glfw.poll_events();
  }
}
flex_ui.rs
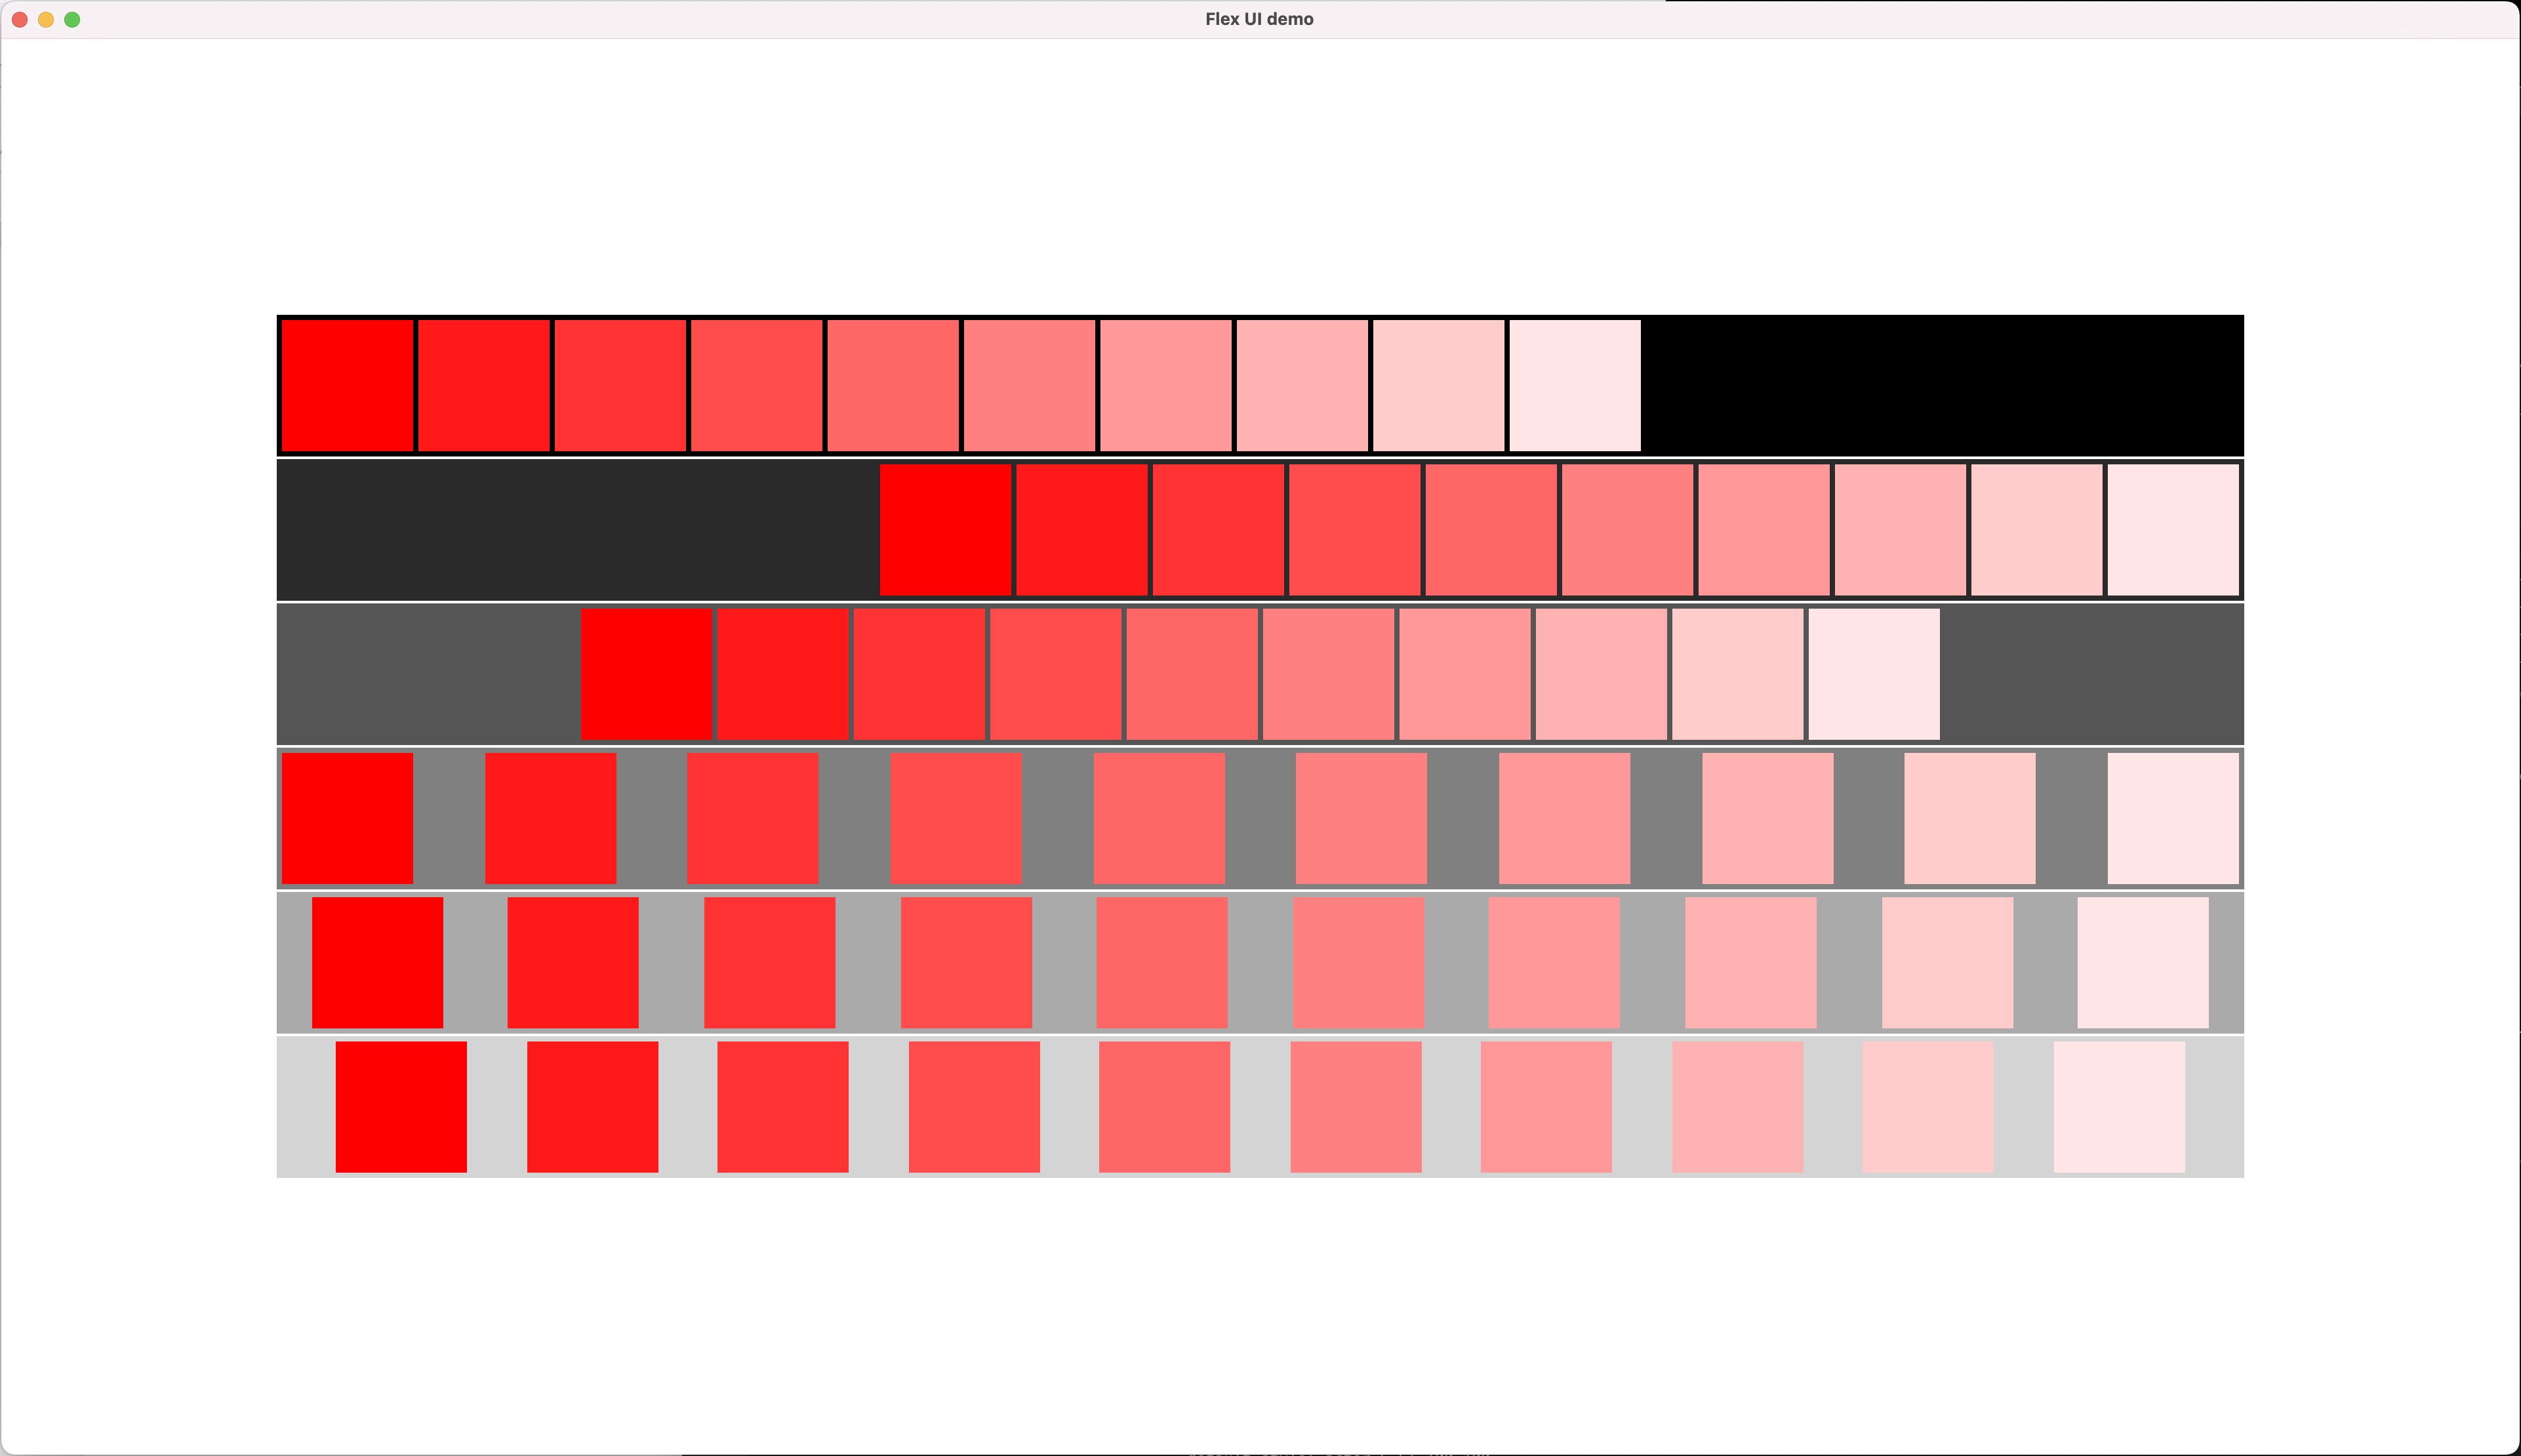 rust-animation experimentally uses Stretch to support Flex UI. You can apply a Stretch style to a stage or an actor. You can also implement your own layout using a Layout trait.
$ cargo build --example flex_ui
$ target/debug/examples/flex_ui
let mut play = Play::new("Flex UI test".to_string());
  play.initialize();
  let mut stage = Stage::new("stage".to_string(), 1920, 1080, LayoutMode::Flex, None);
  stage.set_style(Style {
          size: Size {
              width: Dimension::Points(1920.0),
              height: Dimension::Points(1080.0),
          }, justify_content: JustifyContent::Center,
          flex_direction: FlexDirection::Column,
          align_items: AlignItems::Center,
          margin: Rect {
              start: Dimension::Points(1.0),
              end: Dimension::Points(1.0),
              top: Dimension::Points(1.0),
              bottom: Dimension::Points(1.0),
              ..Default::default()
          },
          ..Default::default()
        }
  );
  stage.set_visible(true);

  let justify_content = vec![
      JustifyContent::FlexStart,
      JustifyContent::FlexEnd,
      JustifyContent::Center,
      JustifyContent::SpaceBetween,
      JustifyContent::SpaceAround,
      JustifyContent::SpaceEvenly,
  ];
  let width  = 1500;
  let height = 108;
  for i in 0..6 {
    let actor_name = format!("actor_{}", i+1);
    let mut actor = Actor::new(actor_name.to_string(), width, height, None);
    actor.set_color(i as f32 / 6.0, i as f32 / 6.0, i as f32 / 6.0);
    actor.set_style(Style {
           size: Size {
              width: Dimension::Points(width as f32),
              height: Dimension::Points(height as f32),
          },
          justify_content: justify_content[i],
          align_items: AlignItems::Center,
          margin: Rect {
              start: Dimension::Points(1.0),
              end: Dimension::Points(1.0),
              top: Dimension::Points(1.0),
              bottom: Dimension::Points(1.0),
              ..Default::default()
          },
          padding: Rect {
              start: Dimension::Points(2.0),
              end: Dimension::Points(2.0),
              ..Default::default()
          },
          ..Default::default()
        }
    );
    for j in 0..10 {
      let mut sub_actor = Actor::new(format!("actor_{}_{}", i+1, j+1).to_string(),
          100, 100, None);
      sub_actor.set_color(1.0, j as f32 / 10.0, j as f32 / 10.0);
      actor.add_sub_actor(sub_actor);
    }
    stage.add_actor(actor);
  }

  stage.set_needs_layout();
  play.add_stage(stage);
ani.rs
$ cargo build --example ani
$ target/debug/examples/ani
This examples shows the basic animation features.
let mut play = Play::new("Animation test".to_string());
play.initialize();
let mut stage = Stage::new("stage".to_string(), 1920, 1080, LayoutMode::UserDefine, None);
stage.set_visible(true);
let mut actor = Actor::new("actor_1".to_string(), 400, 225, None);
actor.x = 100;
actor.y = 100;
actor.set_image("examples/splash.png".to_string());
let time = 5.0;
actor.apply_scale_animation(1.0, 2.0, time, EasingFunction::Linear);
actor.apply_translation_x_animation(100, 1000, time, EasingFunction::EaseInOut);
actor.apply_translation_y_animation(100, 300, time, EasingFunction::EaseInOut);
actor.apply_rotation_animation(0, 360, time, EasingFunction::EaseInOut);
let mut actor_2 = Play::new_actor("actor_2".to_string(), 120, 120, None);
actor_2.x = 100;
actor_2.y = 100;
actor_2.scale_x = 1.5;
actor_2.scale_y = 1.5;
actor_2.set_color(0.0, 0.0, 1.0);
actor_2.apply_rotation_animation(0, 360, 5.0, EasingFunction::EaseInOut);
let mut actor_3 = Play::new_actor("actor_3".to_string(), 50, 50, None);
actor_3.x = 10;
actor_3.y = 10;
actor_3.set_color(1.0, 0.0, 0.0);
actor_2.add_sub_actor(actor_3);
stage.add_actor(actor);
stage.add_actor(actor_2);
stage.set_needs_layout();
play.add_stage(stage);
while !window.should_close() {
process_events(&mut window, &events);
play.render();
window.swap_buffers();
glfw.poll_events();
}
picture_viewer.rs
This example is still work in progress. The thumbnail view only works.
$ cargo build --example picture_viewer
$ target/debug/examples/picture_viewer
This code shows how to handle events and user-defined layout. More event handler methods would be added.
pub struct ActorEvent {
name: String,
}
impl ActorEvent {
pub fn new() -> Self {
ActorEvent {
name: "actor_event".to_string()
}
}
}
impl EventHandler for ActorEvent {
fn key_focus_in(&mut self, actor: &mut Actor) {
println!("key_focus_in: {} {}", self.name, actor.name);
actor.apply_scale_animation(1.0, 1.1, 0.3, EasingFunction::EaseInOut);
}
fn key_focus_out(&mut self, actor: &mut Actor) {
println!("key_focus_out: {} {}", self.name, actor.name);
actor.scale_x = 1.0;
actor.scale_y = 1.0;
}
fn key_down(&mut self, key: usize, actor: &mut Actor) {
println!("key_down: {} {} {}", self.name, key, actor.name);
if key == 262 { actor.select_next_sub_actor();
} else if key == 263 { actor.select_prev_sub_actor();
}
}
}
pub struct ActorLayout {
name: String,
cur_x: i32,
}
impl ActorLayout {
pub fn new() -> Self {
ActorLayout {
name: "actor_layout".to_string(),
cur_x: 0
}
}
}
impl Layout for ActorLayout {
fn layout_sub_actors(&mut self, sub_actor_list: &mut Vec<Actor>) {
println!("layout_sub_layer {}", self.name);
let mut index : i32 = 0;
for sub_actor in sub_actor_list.iter_mut() {
self.cur_x += sub_actor.width as i32;
sub_actor.x = index % 5 * IMAGE_WIDTH as i32;
let col = index / 5;
sub_actor.y = col * IMAGE_HEIGHT as i32;
index +=1;
}
}
}
