# rexpose
A reverse proxy to expose TCP and UDP services behind any NAT via a public server.
## Install
### Mac & Linux
You can use [Homebrew](https://brew.sh) to install rexpose:
```bash
brew install rexpose/tap/rexpose
```
### Windows
You can use [WinGet](https://learn.microsoft.com/en-us/windows/package-manager/winget/):
```shell
winget install rexpose.rexpose
```
### Download binary
You can use any precompiled binary from the [release section](https://github.com/k4i6/rexpose/releases).
### From sources
- install [rust and cargo](https://doc.rust-lang.org/cargo/getting-started/installation.html)
- run `cargo install rexpose`
## Usage
To start a client exposing a TCP service on port 80 run following command:
`rexpose -P <password> -a <hostname or IP of the server>`
If a self signed certificate is used, the path to the trusted certificate has to be provided: `-c <certificate path>`
To start a server accepting and forwarding TCP connections on port 80 to the client, run following command:
`rexpose -s -P <password> -c <certificate path> -k <key path>`
The server needs access to a valid certificate and the associated private key to communicate with the client over TLS.
An example for the generation of a self signed certificate for the hostname 'localhost' is provided as following:
`openssl req -nodes -new -x509 -days 7 -keyout /etc/ssl/private/key.key -out /etc/ssl/certs/cert.cert -addext "basicConstraints = CA:FALSE" -addext "subjectAltName = DNS:localhost" -subj "/CN=localhost" -addext "extendedKeyUsage = serverAuth, clientAuth" -addext "keyUsage = digitalSignature,keyAgreement"`
### rexpose.app
If you don't want to host a rexpose server by yourself, you can use the SaaS solution [rexpose.app](https://rexpose.app).
### Argument list
| `-s` | Start in server mode |
| `-a <string>` | Only used in client mode: IP address or hostname of the server |
| `-m <number>` | Server communication port, default: 8080 |
| `-p <number>` | Port which should be exposed (client mode) or forwarded to the client (server mode), default: 80|
| `-P <string>` | The password used for authorization between server and client |
| `-c <string>` | Path to the trusted certificate used for TLS communication between server and client |
| `-k <string>` | Only used in server mode: Path to the private key with which the certificate was created |
| `-u` | Indicate that the forwarded service is a UDP service |
| `-e` | Encrypt all traffic between client and server |
| `-v` | Enable verbose logging |
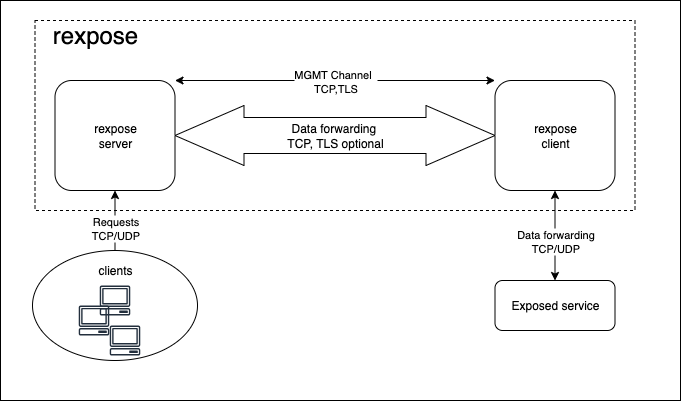
## Architecture
For the first connection, the client opens a TLS connection to the server and sends the provided password to the server.
If the server accepts the connection, UDP/TCP traffic on the configured port is forwarded to the client via TCP.
With the optional argument `-e`, the forwarded traffic is enrypted using TLS.