Tutorial
======
**Table of Contents**
- [Coding](#coding)
- [Compiling](#compiling)
- [Running](#running)
- [Testing](#testing)
# Coding
QuEST can be integrated into your C or C++ project, simply by including
```C
#include <QuEST.h>
```
Your simulation code will look the same and compile with the same build system, regardless of whether run in multithreaded, GPU and distributed modes.
For example, here is a platform agnostic simulation of a very simple circuit which produces and measures state 
```C
#include <QuEST.h>
int main() {
// load QuEST
QuESTEnv env = createQuESTEnv();
// create a 2 qubit register in the zero state
Qureg qubits = createQureg(2, env);
initZeroState(qubits);
// apply circuit
hadamard(qubits, 0);
controlledNot(qubits, 0, 1);
measure(qubits, 1);
// unload QuEST
destroyQureg(qubits, env);
destroyQuESTEnv(env);
return 0;
}
```
Of course, this code doesn't output anything!
----------------------
Let's walk through a more sophisticated circuit.
We first construct a QuEST environment with [`createQuESTEnv()`](https://quest-kit.github.io/QuEST/group__type.html#ga8ba2c3388dd64d9348c3b091852d36d4) which abstracts away any preparation of multithreading, distribution or GPU-acceleration strategies.
```C
QuESTEnv env = createQuESTEnv();
```
We then create a quantum register, in this case containing 3 qubits, via [`createQureg()`](https://quest-kit.github.io/QuEST/group__type.html#ga3392816c0643414165c2f5caeec17df0)
```C
Qureg qubits = createQureg(3, env);
```
and [initialise](https://quest-kit.github.io/QuEST/group__init.html) the register.
```C
initZeroState(qubits);
```
We can create multiple `Qureg` instances, and QuEST will sort out allocating memory for the state-vectors, even over networks! If we wanted to simulate noise in our circuit, we can replace `createQureg` with [`createDensityQureg`](https://quest-kit.github.io/QuEST/group__type.html#ga93e55b6650b408abb30a1d4a8bce757c) to create a more powerful density matrix capable of representing mixed states, and simulating [decoherence](https://quest-kit.github.io/QuEST/group__decoherence.html).
We're now ready to apply some [unitaries](https://quest-kit.github.io/QuEST/group__unitary.html) to our qubits, which in this case have indices `0`, `1` and `2`.
When applying an operator, we pass along which quantum register to operate upon.
```C
hadamard(qubits, 0);
controlledNot(qubits, 0, 1);
rotateY(qubits, 2, .1);
```
Some gates allow us to specify a general number of control qubits
```C
int controls[] = {0, 1, 2};
multiControlledPhaseGate(qubits, controls, 3);
```
We can specify general single-qubit unitary operations as 2x2 matrices
```C
// sqrt(X) with a pi/4 global phase
ComplexMatrix2 u = {
.real = {{.5, .5}, { .5,.5}},
.imag = {{.5,-.5}, {-.5,.5}}};
unitary(qubits, 0, u);
```
or more compactly, foregoing the global phase factor,
```C
Complex a = {.real = .5, .imag = .5};
Complex b = {.real = .5, .imag =-.5};
compactUnitary(qubits, 1, a, b);
```
or even more compactly, as a rotation around an arbitrary axis on the Bloch-sphere
```C
Vector v = {.x=1, .y=0, .z=0};
rotateAroundAxis(qubits, 2, 3.14/2, v);
```
We can controlled-apply general unitaries
```C
controlledCompactUnitary(qubits, 0, 1, a, b);
```
even with multiple control qubits!
```C
multiControlledUnitary(qubits, (int[]) {0, 1}, 2, 2, u);
```
There are many questions and [calculations](https://quest-kit.github.io/QuEST/group__calc.html) we can now ask of our quantum register.
```C
qreal prob = getProbAmp(qubits, 7);
printf("Probability amplitude of |111>: %lf\n", prob);
```
Here, `qreal` is an alias for a real floating point number, like `double`. This is to keep our code precision agnostic, so that we may change the numerical precision at compile time (by setting build option `PRECISION`) without any changes to our code. Changing the precision can be useful in verifying numerical convergences or studying rounding errors.
How probable is measuring our final qubit (with index `2`) in outcome `1`?
```C
prob = calcProbOfOutcome(qubits, 2, 1);
printf("Probability of qubit 2 being in state 1: %f\n", prob);
```
We can also perform [non-unitary gates](https://quest-kit.github.io/QuEST/group__normgate.html) upon the state. Let's destructively measure the first qubit, randomly collapsing into outcome `0` or `1`
```C
int outcome = measure(qubits, 0);
printf("Qubit 0 was measured in state %d\n", outcome);
```
and now measure our final qubit, while also learning of the probability of its outcome.
```C
outcome = measureWithStats(qubits, 2, &prob);
printf("Qubit 2 collapsed to %d with probability %f\n", outcome, prob);
```
We could even apply [non-physical operators](https://quest-kit.github.io/QuEST/group__operator.html) to our register, to break its normalisation, which can often allow us to take computational shortcuts like [this one](https://arxiv.org/abs/2009.02823).
At the conclusion of our circuit, we should free up the memory used by our quantum registers.
```C
destroyQureg(qubits, env);
destroyQuESTEnv(env);
```
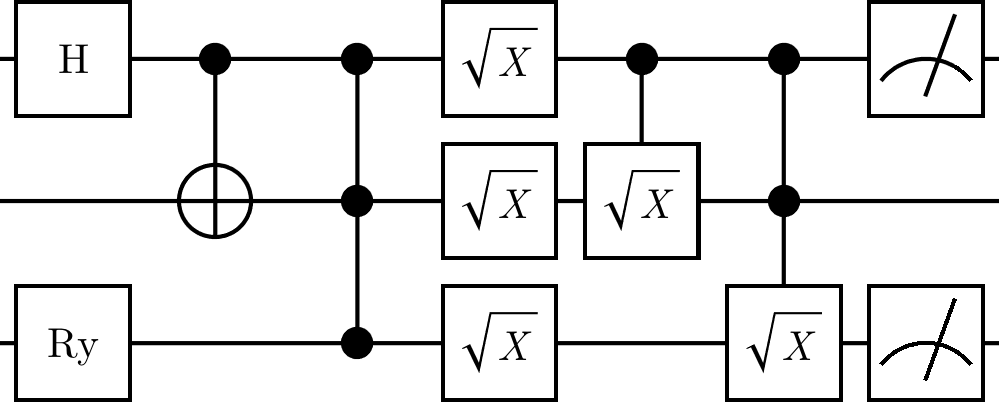
The effect of the [code above](tutorial_example.c) is to simulate the circuit below
<img src="https://github.com/QuEST-Kit/QuEST/raw/master/examples/tutorial_circuit.png" width="50%"> <br>
and after compiling (see section below) and running, gives psuedo-random output
> ```
> Probability amplitude of |111>: 0.498751
> Probability of qubit 2 being in state 1: 0.749178
> Qubit 0 was measured in state 1
> Qubit 2 collapsed to 1 with probability 0.998752
> ```
> ```
> Probability amplitude of |111>: 0.498751
> Probability of qubit 2 being in state 1: 0.749178
> Qubit 0 was measured in state 0
> Qubit 2 collapsed to 1 with probability 0.499604
> ```
QuEST uses the [Mersenne Twister](http://www.math.sci.hiroshima-u.ac.jp/~m-mat/MT/MT2002/emt19937ar.html) algorithm to generate random numbers used for randomly collapsing quantum states. The user can seed this RNG using [`seedQuEST()`](https://quest-kit.github.io/QuEST/group__debug.html#ga555451c697ea4a9d27389155f68fdabc), otherwise QuEST will by default create a seed from the current time and the process id.
> In distributed mode (see below), all code in your source files will be executed independently on every node.
> To execute some code (e.g. printing) only on one node, use
> ```C
> QuESTEnv env = createQuESTEnv();
>
> if (env.rank == 0)
> printf("Only one node executes this print!");
> ```
> Such conditions are valid and always satisfied in code run on a single node.
----------------------------
# Compiling
See [this page](https://quest.qtechtheory.org/download/) to obtain the necessary compilers.
QuEST uses [CMake](https://cmake.org/) (version `3.7` or higher) as its build system. Configure the build by supplying the below `-D[VAR=VALUE]` options after the `cmake ..` command. You can alternatively compile via [GNU Make](https://www.gnu.org/software/make/) directly with the provided [makefile](makefile).
> **Windows** users should install [CMake](https://cmake.org/download/) and [Build Tools](https://visualstudio.microsoft.com/downloads/#build-tools-for-visual-studio-2019), and run the below commands in the *Developer Command Prompt for VS*
To compile, run:
```console
mkdir build
cd build
cmake .. -DUSER_SOURCE="[FILENAME]"
make
```
where `[FILENAME]` is the name of your source file, including the file extension, relative to the root QuEST directory (above `build`).
> Windows users should replace the final two build commands with
> ```bash
> cmake .. -G "NMake Makefiles"
> nmake
> ```
> If using MSVC and NMake in this way fails, users can forego GPU acceleration, download
> [MinGW-w64](https://sourceforge.net/projects/mingw-w64/), and compile via
> ```bash
> cmake .. -G "MinGW Makefiles"
> make
> ```
> Compiling directly with `make` and the provided [makefile](makefile), copied to the root directory, may prove easier.
If your project contains multiple source files, separate them with semi-colons. For example,
```console
-DUSER_SOURCE="source1.c;source2.cpp"
```
- To set the compilers used by cmake (to e.g. `gcc-6`), use
```console
-DCMAKE_C_COMPILER=gcc-6
```
and similarly to set the C++ compiler (as used in GPU mode), use
```console
-DCMAKE_CXX_COMPILER=g++-6
```
- If you wish your executable to be named something other than `demo`, you can set this too by adding argument:
```console
-DOUTPUT_EXE="myExecutable"
```
- To compile your code to use multithreading, for parallelism on multi-core or multi-CPU systems, use
```console
-DMULTITHREADED=1
```
Before launching your executable, set the number of participating threads using `OMP_NUM_THREADS`. For example,
```console
export OMP_NUM_THREADS=16
./myExecutable
```
- To compile your code to run on distributed or networked systems use
```console
-DDISTRIBUTED=1
```
Depending on your MPI implementation, your executable can be launched via
```console
mpirun -np [NUM_NODES] [EXEC]
```
where `[NUM_NODES]` is the number of distributed compute nodes to use, and `[EXEC]` is the name of your executable. Note that QuEST *hybridises* multithreading and distribution. Hence you should set `[NUM_NODES]` to equal exactly the number of distinct compute nodes (which don't share memory), and set `OMP_NUM_THREADS` as above to assign the number of threads used on *each* compute node.
- To compile for GPU, use
```console
-DGPUACCELERATED=1 -DGPU_COMPUTE_CAPABILITY=[CC]
```
where `[CC]` is the compute cabability of your GPU, written without a decimal point. This can can be looked up at the [NVIDIA website](https://developer.nvidia.com/cuda-gpus), and to check you have selected the right one, you should run the [unit tests](#testing).
> Note that CUDA is not compatible with all compilers. To force `cmake` to use a
> compatible compiler, override `CMAKE_C_COMPILER` and `CMAKE_CXX_COMPILER`.
> For example, to compile for the [Quadro P6000](https://www.pny.com/nvidia-quadro-p6000)
> with `gcc-6`:
> ```console
> cmake .. -DGPUACCELERATED=1 -DGPU_COMPUTE_CAPABILITY=61 \
> -DCMAKE_C_COMPILER=gcc-6 -DCMAKE_CXX_COMPILER=g++-6
> ```
QuEST can also leverage NVIDIA's [cuQuantum](https://developer.nvidia.com/cuquantum-sdk) and [Thrust](https://developer.nvidia.com/thrust) libraries for optimised GPU simulation on modern GPUs. You must first install cuQuantum (which includes sub-library `cuStateVec` used by QuEST) [here](https://developer.nvidia.com/cuQuantum-downloads). When compiling QuEST, in addition to the above compiler options, simply specify
```console
-DUSE_CUQUANTUM=1
```
QuEST can also run on AMD GPUs using HIP. For the HIP documentation see [HIP programming guide](https://docs.amd.com/bundle/HIP-Programming-Guide-v5.3/page/Introduction_to_HIP_Programming_Guide.html). To compile for AMD GPUs, use
```console
-DGPUACCELERATED=1 -DUSE_HIP=1 -DGPU_ARCH=[ARCH]
```
where `[ARCH]` is the architecture of your GPU, for example `gfx90a`. A table for AMD GPU architectures can be looked up [here](https://llvm.org/docs/AMDGPUUsage.html#amdgpu-processor-table). To check you have used the correct `GPU_ARCH`, you should run the [unit tests](#testing).
- You can additionally customise the floating point precision used by QuEST's `qreal` type, via
```console
-DPRECISION=1
-DPRECISION=2
-DPRECISION=4
```
which uses single (`qreal = float`), double (`qreal = double`) and quad (`qreal = long double`) respectively.
Using greater precision means more precise computation but at the expense of additional memory requirements and runtime.
Checking results are unchanged when switching the precision can be a great test that your calculations are sufficiently precise.
After making changes to your code, you can quickly recompile using `make` directly, within the `build/` directory.
For a full list of available configuration parameters, use
```console
cmake -LH ..
```
For manual configuration (not recommended) you can change the `CMakeLists.txt` in the root QuEST directory. You can also directly modify [makefile](makefile), and compile using GNUMake directly, by copying [makefile](makefile) into the root repository directory and running
```console
make
```
----------------------------
# Running
## Locally
Once compiled as above, the compiled executable can be locally run from within the `build` directory.
```console
./myExecutable
```
- In multithreaded mode, the number of threads QuEST will use can be set by modifying `OMP_NUM_THREADS`, ideally to the number of available cores on your machine
```console
export OMP_NUM_THREADS=8
./myExecutable
```
- In distributed mode, QuEST will uniformly divide every `Qureg` between a power-of-2 number of nodes, and can be launched with `mpirun`. For example, here using `8` nodes
```console
mpirun -np 8 ./myExecutable
```
If multithreading is also enabled, the number of threads used by each node can be set using `OMP_NUM_THREADS`. For example, here using `8` nodes with `16` threads on each (a total of `128` processors):
```console
export OMP_NUM_THREADS=16
mpirun -np 8 ./myExecutable
```
In some circumstances, like when large-memory multi-core nodes have multiple CPU sockets, it is worthwhile to deploy _multiple_ MPI processes to each node.
- In GPU mode, the executable is launched directly via
```console
./myExecutable
```
## On supercomputers
There are no special requirements for running QuEST through job submission systems, like [SLURM](https://slurm.schedmd.com/documentation.html). Just call `./myExecutable` as you would any other binary.
For example, the [tutorial code](tutorial_example.c) can be run with on `4` distributed nodes (each with `8` cores) on a SLURM system using the following SLURM submission script
```console
#SBATCH --nodes=4
#SBATCH --ntasks-per-node=1
module load mvapich2
mkdir build
cd build
cmake .. -DDISTRIBUTED=1 -DMULTITHREADED=1
make
export OMP_NUM_THREADS=8
mpirun ./myExecutable
```
A [PBS](https://www.openpbs.org/) submission script like is similar
```console
#PBS -l select=4:ncpus=8
module purge
module load mvapich2
mkdir build
cd build
cmake -DDISTRIBUTED=1 ..
make
export OMP_NUM_THREADS=8
aprun -n 4 -d 8 -cc numa_node ./myExecutable
```
Running QuEST on a GPU is just a matter of specifying resources and the appropriate compilers
```console
#SBATCH --nodes=1
#SBATCH --ntasks-per-node=1
#SBATCH --gres=gpu:1
#SBATCH --partition=gpu ## name may vary
module purge
module load cuda ## name may vary
mkdir build
cd build
cmake -DGPUACCELERATED=1 -DGPU_COMPUTE_CAPABILITY=[Compute capability] ..
make
./myExecutable
```
On each platform, there is no change to our source code or our QuEST interface. We simply recompile, and QuEST will utilise the available hardware (a GPU, shared-memory or distributed CPUs) to speedup our code.
----------------------------
# Testing
QuEST includes a comprehensive set of unit tests, to assure every function performs correctly. These are located in the [tests](../tests) directory (documented [here](https://quest-kit.github.io/QuEST/group__unittest.html)), and compare QuEST's optimised routines to slower, algorithmically distinct methods (documented [here](https://quest-kit.github.io/QuEST/group__testutilities.html)). It is a good idea to run these tests on your machine to check QuEST is properly configured, and especially so in GPU mode, to check you have correctly set [`GPU_COMPUTE_CAPABILITY`](https://developer.nvidia.com/cuda-gpus).
Tests should be compiled in a build directory within the root QuEST directory.
```console
mkdir build
cd build
```
To compile, run:
```console
cmake .. -DTESTING=ON
make
```
You can include additional CMake arguments to target your desired hardware, such as `-DDISTRIBUTION=1`.
Next, to launch all unit tests, run:
```console
make test
```
You should see each function being tested in turn; some will be very fast, and some very slow.
> This is because the tests run functions with every one of their possible inputs
> (where possible).
> Functions with more possible inputs will hence take longer to test.
> The difference in testing time between different functions can hence be very large, and does not indicate a testing nor performance problem.
For example:
```
Start 1: calcDensityInnerProduct
1/117 Test #1: calcDensityInnerProduct ............. Passed 0.16 sec
Start 2: calcExpecDiagonalOp
2/117 Test #2: calcExpecDiagonalOp ................. Passed 0.07 sec
Start 3: calcExpecPauliHamil
3/117 Test #3: calcExpecPauliHamil ................. Passed 0.64 sec
Start 4: calcExpecPauliProd
4/117 Test #4: calcExpecPauliProd .................. Passed 94.88 sec
```
You can also run the executable `build/tests/tests` directly, to see more statistics, and to make use of the Catch2 [command-line](https://github.com/catchorg/Catch2/blob/devel/docs/command-line.md)
```console
./tests/tests
===============================================================================
All tests passed (99700 assertions in 117 test cases)
```
This is necessary to run the tests in distributed mode:
```console
mpirun -np 8 tests/tests
```
Using the [command-line](https://github.com/catchorg/Catch2/blob/devel/docs/command-line.md) is especially useful for contributors to QuEST, for example to run only their new function:
```console
./tests/tests myNewFunction
```
or a sub-test within:
```console
./tests/tests myNewFunction -c "correctness" -c "density-matrix" -c "unnormalised"
```
Ideally, a new function should have its unit test run in every configuration of hardware (including #threads and #nodes) and precision. The below bash script automates this.
```bash
export f=myNewFunction # function to test
export cc=30 # GPU compute-capability
export nt=16 # number of CPU threads
test() {
cmake .. -DTESTING=ON -DPRECISION=$p \
-DMULTITHREADED=$mt -DDISTRIBUTED=$d \
-DGPUACCELERATED=$ga -DGPU_COMPUTE_CAPABILITY=$cc
# insert additional cmake params here, if needed
make
export OMP_NUM_THREADS=$nt
if (( $d == 1 )); then
mpirun -np $nn ./tests/tests $f
else
./tests/tests $f
fi
}
# precision
for p in 1 2 4; do
# serial
mt=0 d=0 ga=0 test
# multithreaded
mt=1 d=0 ga=0 test
# gpu
mt=0 d=0 ga=1 test
# distributed (+multithreaded)
for nn in 2 4 8 16; do
mt=1 d=1 ga=0 test
done
done
```