## Writing properties for ink! contracts
### Adding properties
#### Inside your `Cargo.toml`
First, you need to add the `phink` feature to your `Cargo.toml`, such as:
```toml
[features]
phink = []
```
#### Inside your `file.rs`
Then, you can use the following example to create invariants. Create another `impl` in your contract, and
put
it under the feature of `phink`. Use `assert!` or `panic!` for your properties.
```rust
#[cfg(feature = "phink")]
#[ink(impl)]
impl DomainNameService {
// This invariant ensures that nobody registed the forbidden number
#[ink(message)]
#[cfg(feature = "phink")]
pub fn phink_assert_dangerous_number(&self) {
let forbidden_number = 42;
assert_ne!(self.dangerous_number, forbidden_number);
}
}
```
You can find more informations in the page dedicated to [invariants](INVARIANTS.md).
## Running Phink
### 1. Instrument the contract
First things first: Let's enable your contract for fuzzing. Run the following command to instrument your ink! smart
contract:
```sh
cargo run -- instrument my_contract/
```
This step modifies the contract to include necessary hooks for Phink's fuzzing process. It creates a fork of the
contract, so you don't have to make a copy before.
### 2. Generate seeds (optionnal but highly recommended)
The `cargo run -- generate-seed` command is an optional but powerful feature that enhances your fuzzing experience by
generating initial seeds from your existing unit and end-to-end (E2E) tests.
#### What it Does
`cargo run -- generate-seed` executes the unit tests and E2E tests of your ink! smart contract, extracting seeds based
on
executed messages. These seeds are saved in the `corpus/` directory, which highly helps to reach good coverage, as long
as you have good tests.
**Therefore, we encourage to have good and various unit-tests and E2E tests in your contract.**
#### How It Works
- **Unit Tests**: The command runs through all defined unit tests and captures the invoked messages, with Alice as the
origin and a value of 0.
- **End-to-End Tests**: For E2E tests, Phink modifies the `Cargo.toml` to point to
a [custom ink! repository](https://github.com/kevin-valerio/ink/commit/5869d341ff13a454c22a6980fd232f4520721b97). This
step
ensures necessary modifications are included to print debug messages containing the message's 4-byte hash and
scale-encoded parameters to stdout.
- If a test invokes at least one message, Phink extracts them all as seeds for use during fuzzing.
#### Usage
```sh
cargo run -- generate-seed <CONTRACT> [COMPILED_DIRECTORY]
```
- `<CONTRACT>`: The root directory path of your ink! smart contract.
- `[COMPILED_DIRECTORY]`: Optional path for where the temporary contract will be compiled. Defaults to `tmp` if
unspecified.
This will generate a set of initial inputs, derived from your current tests, to kickstart fuzzing.
#### Why using `generate-seed`?
Generating seeds from your existing test suite can increase the efficiency of fuzz testing by:
- Providing a good starting point for fuzzing inputs.
- Ensuring that the fuzzing process begins with valid and meaningful test cases.
For more information on how seeds work with Phink, refer to
the [seeds documentation](SEEDS.md).
### 3. Run the fuzzer
After **instrumenting** your contract and **writing** properties and **configuring** your `phink.toml`, let's get our
hands on the fuzzing process:
```sh
cargo run -- fuzz
```
After executing this command, your fuzzing tests will begin based on the configurations specified in your `phink.toml`
file. You should see a user interface appear.
If you’re utilizing the advanced UI, you'll receive _real-time_ updates on the fuzzed messages at the bottom of the
screen. For more detailed log information, you can use the following command:
```sh
watch -c -t -n 0.5 "clear && cat output/phink/logs/last_seed.phink" # `output` is the default, but it depends of your `phink.toml`
```
This will provide you with clearer logs by continuously updating them every **0.1** seconds.
## Analyzing results
### Crashes
In case of crashes, you should see something like the following.
<img src="https://raw.githubusercontent.com/srlabs/phink/refs/heads/main/assets/crashed.png" alt="crash"/>
To analyze the crash, you can run `cargo run -- execute <your_crash>`, for instance
`cargo run -- execute output/phink/crashes/1729082451630/id:000000,sig:06,src:000008,time:627512,execs:3066742,op:havoc,rep:2`
| 1729082451630 | Timestamp representing when the crash was recorded |
| id:000000 | Unique identifier for the crash |
| sig:06 | Signal number that triggered the crash |
| src:000008 | Source test case number |
| time:627512 | Execution time since the start of the testing process |
| execs:3066742 | Cumulative number of executions performed until the crash |
| op:havoc,rep:2 | Type of fuzzing operation (havoc) and its repetition number |
By running the above command, you should get an output similar to the screenshot below:
<img src="https://raw.githubusercontent.com/srlabs/phink/refs/heads/main/assets/backtrace.png" alt="crash"/>
### Coverage
**This feature is in alpha and unstable.**
#### Generating a coverage report
First, you need to create a `traces.cov` file. For this, execute the command below.
```sh
cargo run -- run
```
Once done, generate coverage reports to analyze which parts of the contract were tested:
```sh
cargo run -- coverage my_contract/
```
Some HTML files should then be generated in the path you've configured inside your `phink.toml`. The coverage report
provides a visual representation of the tested code areas. As a rule of thumb, the more green lines you can see there,
the better it is for the code.
### Coverage report example
**Green Lines**: Code that has been tested.
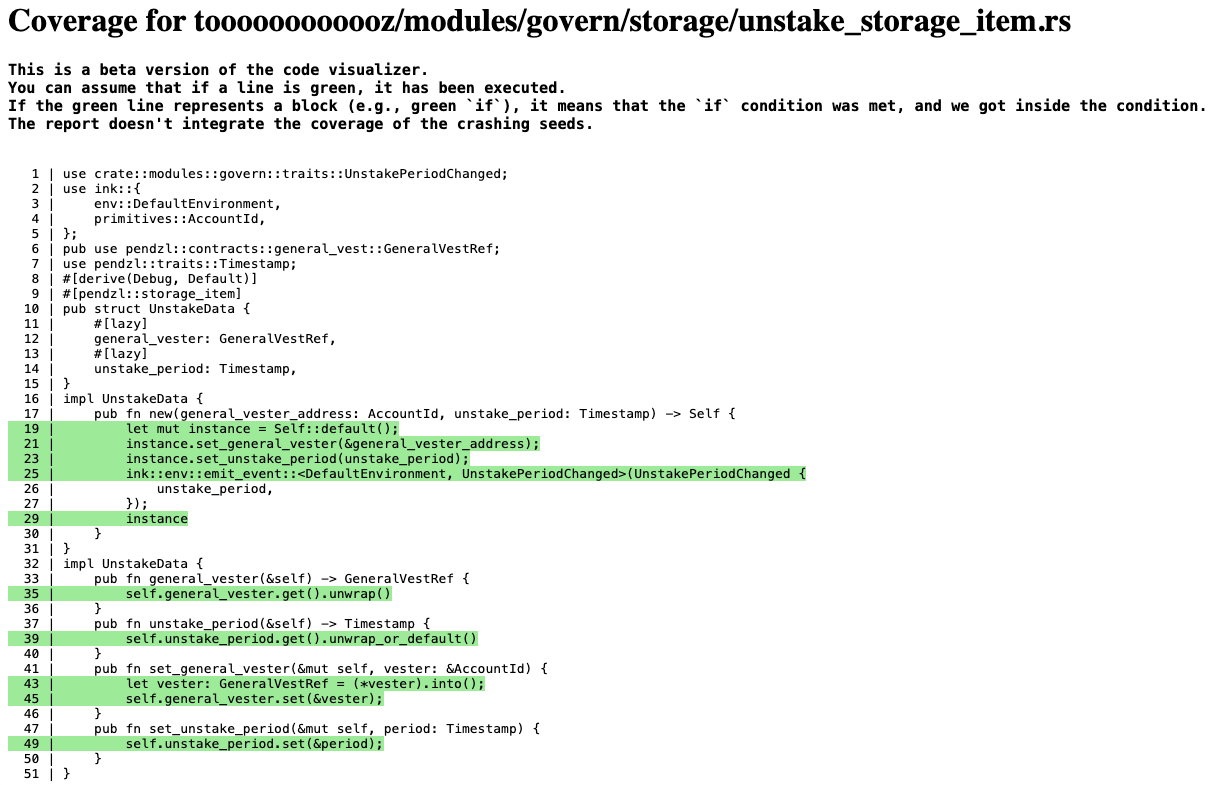
*Figure 1: Coverage Report of one specific file.*
<img src="https://raw.githubusercontent.com/srlabs/phink/refs/heads/main/assets/coverage_2.png" alt="coverage_2" width="400"/>
*Figure 2: List of fuzzed Rust files from the ink! smart-contract.*