
peekme
Peek me. Pick me. Select text in Codex CLI output, press Alt+P, and a short explanation opens right next to that text, inside the terminal. The other lines move to make room, like Peek in VS Code. Esc closes it and the screen is exactly as before.
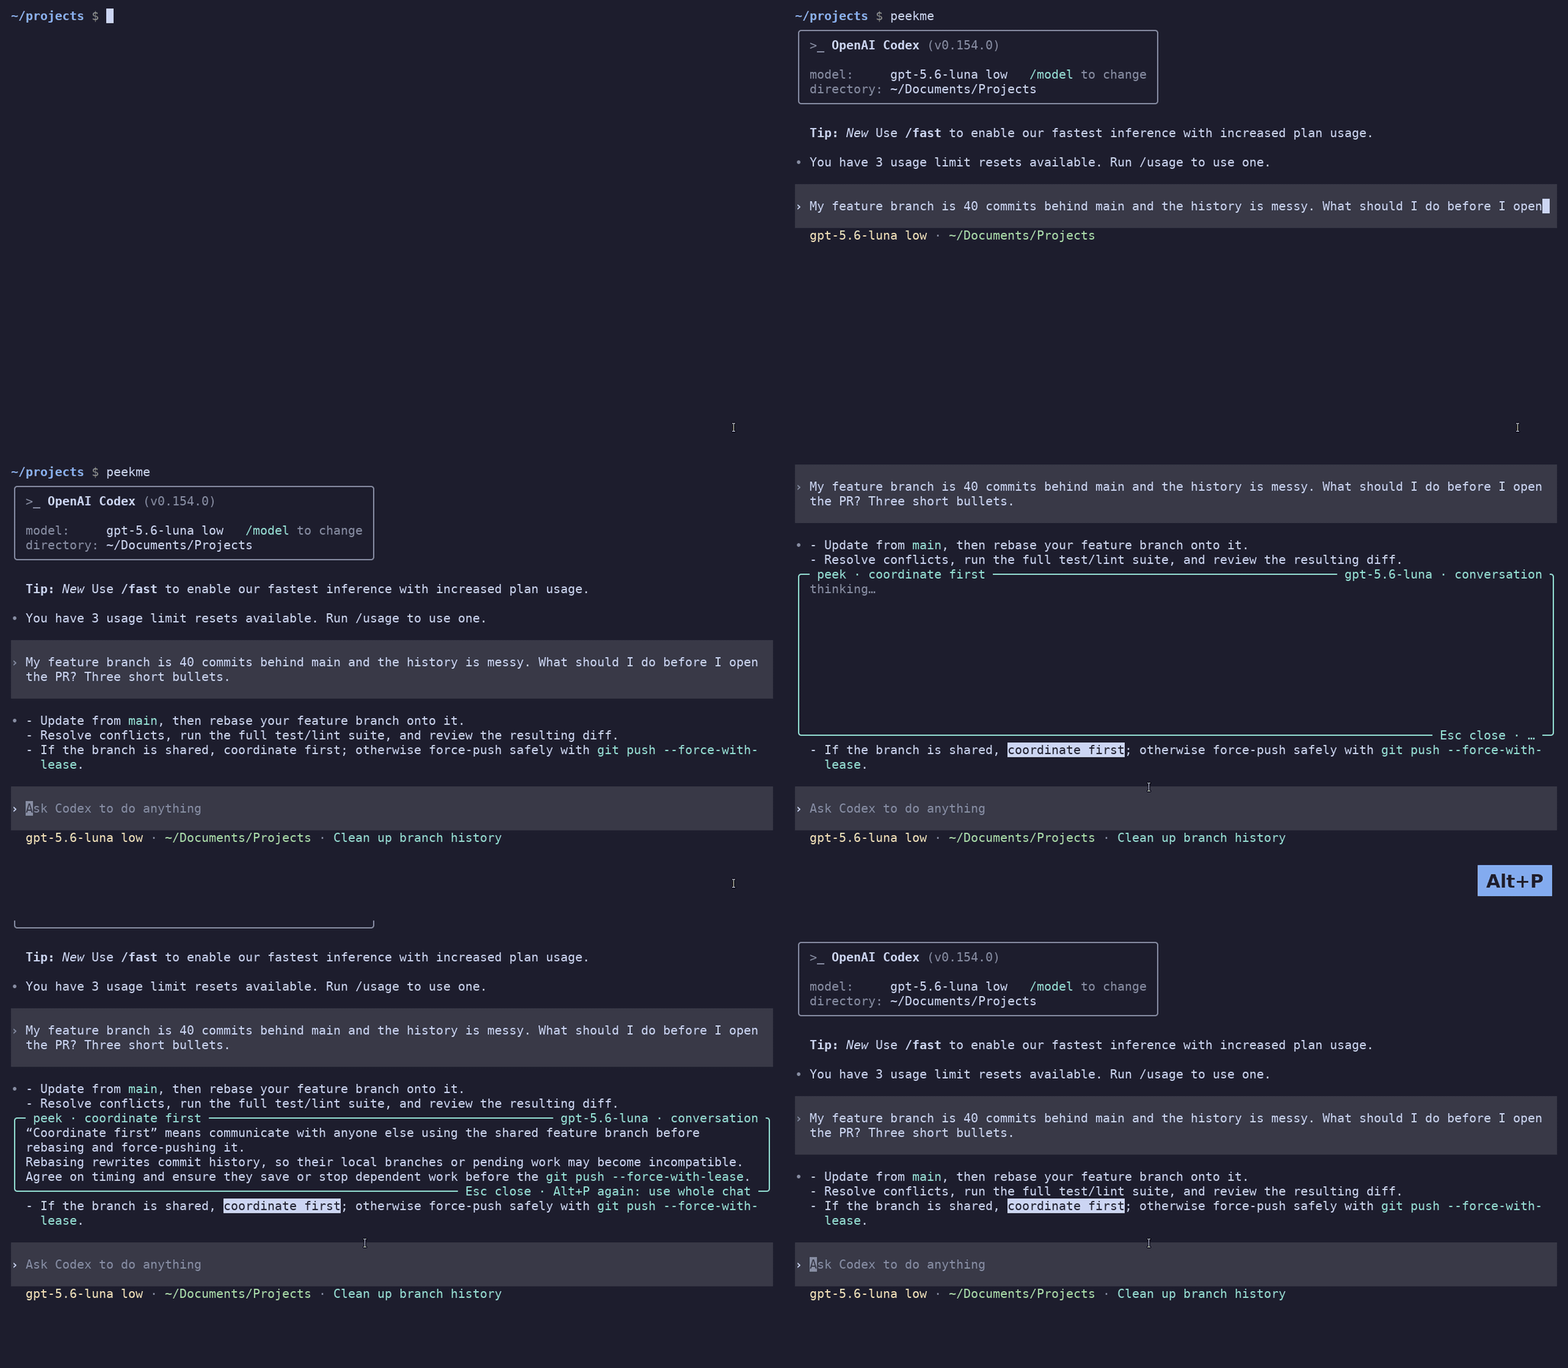
The explanation comes from a small, fast model and it knows the conversation. If you select "its split panes" in an answer that recommends Kitty, it tells you it is about Kitty.
Status: 0.1.0. Tested on Linux with X11 and bash.
Install
You need Rust and Codex CLI (logged in).
cargo install peekme
peekme install
After this, codex opens Codex with peekme in every new terminal. You keep typing codex, and
your aliases and scripts that call codex keep working. peekme install adds a short, marked
block to your ~/.bashrc or ~/.zshrc (for fish, a file in ~/.config/fish/conf.d).
peekme doctor      # check the setup, and see what is in the way if something is
peekme uninstall   # remove the block, your files are as before
command codex      # run plain Codex once
The first time you run peekme on its own, it asks if it should do peekme install for you.
Use
Start Codex as always. Select text with the mouse as you normally do, then press Alt+P.
| Key | When | What it does |
|---|---|---|
| Alt+P | any time | explain the selected text |
| Alt+P again | box is open, same selection | explain again using the whole conversation |
| PgUp / PgDn | box is open | scroll a long explanation |
| Esc | box is open | close the box |
| typing | box is open | goes to the Codex input line, the box stays open |
| Enter | box is open | sends your message to Codex and closes the box |
No API key is needed. peekme asks Codex's own app-server with your existing Codex login.
It uses a temporary thread that is not saved, so nothing appears in your session history. It
does use your Codex plan, a little for each explanation.
Only Codex's interactive screen gets peekme: codex, codex "prompt", codex resume and
codex fork. Commands like codex exec, codex login or codex mcp, and anything with output
going to a pipe or a file, run plain Codex directly.
How it works
Codex runs in a pseudo-terminal. Its output goes to your terminal unchanged, and the same bytes
also go to a terminal emulator in memory (alacritty_terminal). So peekme always knows what
is on your screen.
On Alt+P it reads your mouse selection (the X11 PRIMARY selection) and finds it on the screen. Then it redraws only the rows next to the selection, with the box between them. Nothing is cleared and there is no switch to another screen, so there is no flicker. The Codex input line and status line under the box keep updating, so you can type while you read. Other Codex output that arrives while the box is open is kept aside.
On Esc it draws those rows again from a copy taken when the box opened. After that it sends the kept output, so the terminal ends in the same state as if the box never existed. Tests check this cell by cell on real Codex output.
What the model gets
A few words alone are not enough ("Desktop app", which one?). The whole chat is too much and too slow. So the model gets small parts, each with a size limit:
- One line saying this is Codex CLI and in which directory. This is enough for text from Codex itself, like the startup tips.
- The text around the selection, with the selection marked in place like
⟦this⟧. peekme finds it in the conversation by searching for the selection together with the words next to it on screen. This way it finds the right place when the same words appear many times. If the text is not in the conversation, it uses the screen. - Your request that this text answers, and one line for each of your earlier requests.
- The first places in the conversation where the same words were used before.
Usually this is 1 to 7 KB of text. When it is not enough, press Alt+P again and the model gets the whole conversation.
Settings
| Variable | Meaning |
|---|---|
PEEKME_MODEL |
model for explanations. Default is the model your account lists as fast |
PEEKME_CODEX_BIN |
codex binary to use for explanations. Default is codex |
PEEKME_SELECTION |
use this text instead of the mouse selection, for testing |
How codex gets peekme
peekme install does two things:
- It defines a shell function
codexin your shell setup. A function wins over anything on PATH, so it keeps working when nvm, mise, Homebrew or the Codex installer change PATH later. Aliases that callcodexgo through it too. - It puts a
codexlink to peekme in~/.local/share/peekme/binat the front of PATH, so scripts that runcodexalso get peekme. If some tool puts its own directory in front of it later, only scripts lose peekme, andpeekme doctortells you which directory it is.
Both find the real Codex on PATH themselves, so updating Codex changes nothing. If you remove
peekme, the function falls back to plain codex.
Limits
- Only text that is on screen now. Text that scrolled up into the terminal history can't be selected yet.
- The mouse selection is read on Linux with X11. On Wayland it works only through XWayland. On macOS it reads the clipboard instead, and this is not tested. Over SSH there is no mouse selection.
- An explanation takes about 3 seconds to arrive.
peekme installis tested with bash. zsh uses the same block and should work the same way, but it is not tested yet. The fish setup is not tested either.
Development
cargo test
cargo clippy --all-targets
cargo run --example vtdump -- capture.bin 120 40 [offset]
cargo run --example peek_text -- "<screen text>" "<selection>" [--deep]
python3 spikes/flicker_test.py
python3 spikes/explain_probe.py
vtdump replays a captured byte stream and prints the screen. peek_text runs one explanation
without a terminal and prints the exact prompt. flicker_test.py shows if your terminal flickers
when a program switches screens. explain_probe.py makes one explanation request to
codex app-server and prints timings.
License
MIT or Apache-2.0, at your choice.