# Quickstart
## JACK Background
The `jack` crate provides Rust bindings to the [JACK](http://jackaudio.org)
API. Typically, a JACK server is started and clients connect to it to gain
access to audio and midi inputs and outputs, along with synchronization
mechanisms and APIs.

The JACK server is responsible for:
- Discovering and exposing audio and midi devices.
- Synchronizing audio and midi data.
- Managing the processing graph.
JACK clients are responsible for:
- Registering themselves with JACK.
- Registering callbacks to provide audio/midi data to the JACK server.
## JACk Server
There are two Linux implementations tested with the `jack` crate.
- JACK2 - The primary implementation of JACK. Can use realtime scheduling and
alsa under the hood to provide the best latency. The JACK2 server may be
started through the `jackd` CLI or `qjackctl` GUI.
- Pipewire - The most commonly used audio & video stream server for Linux. May
not provide the best latency, but is very convenient to use. Pipewire itself
has its own API, but it also exposes a JACK server. `pw-jack` is often used to
patch in Pipewire's JACK implementation. For example, you can run your Rust
JACK app with: `pw-jack cargo run`.
## JACK Clients
This is where the `jack` crate comes in. Once a JACK server is running on the
system, you can run your client to produce audio. Here is a simple `jack`
program that can take inputs and forward them to outputs.
```rust
fn main() {
// 1. Create client
let (client, _status) =
jack::Client::new("rust_jack_simple", jack::ClientOptions::default()).unwrap();
// 2. Register ports. They will be used in a callback that will be
// called when new data is available.
let in_a: jack::Port<jack::AudioIn> = client
.register_port("rust_in_l", jack::AudioIn::default())
.unwrap();
let in_b: jack::Port<jack::AudioIn> = client
.register_port("rust_in_r", jack::AudioIn::default())
.unwrap();
let mut out_a: jack::Port<jack::AudioOut> = client
.register_port("rust_out_l", jack::AudioOut::default())
.unwrap();
let mut out_b: jack::Port<jack::AudioOut> = client
.register_port("rust_out_r", jack::AudioOut::default())
.unwrap();
let process_callback = move |_: &jack::Client, ps: &jack::ProcessScope| -> jack::Control {
let out_a_p = out_a.as_mut_slice(ps);
let out_b_p = out_b.as_mut_slice(ps);
let in_a_p = in_a.as_slice(ps);
let in_b_p = in_b.as_slice(ps);
out_a_p.clone_from_slice(in_a_p);
out_b_p.clone_from_slice(in_b_p);
jack::Control::Continue
};
let process = jack::contrib::ClosureProcessHandler::new(process_callback);
// 3. Activate the client, which starts the processing.
let active_client = client.activate_async((), process).unwrap();
// 4. Wait for user input to quit
println!("Press enter/return to quit...");
let mut user_input = String::new();
io::stdin().read_line(&mut user_input).ok();
// 5. Not needed as the async client will cease processing on `drop`.
if let Err(err) = active_client.deactivate() {
eprintln!("JACK exited with error: {err}");
}
}
```
## Connecting Ports
1. Run the JACK client using the Pipewire JACK server.
```sh
pw-jack cargo run
```
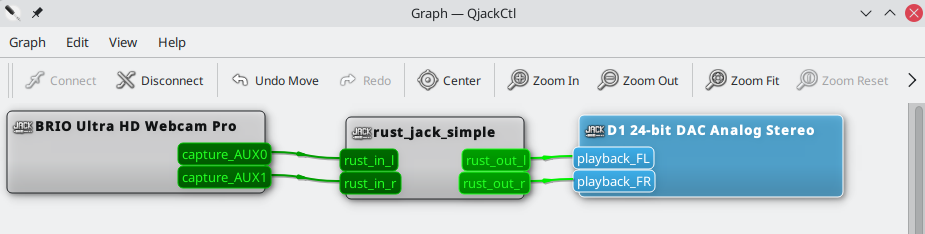
2. View the JACK processing graph. This can be done by using the `qjackctl` GUI
and clicking Graphs.
```sh
pw-jack qjackctl
```
3. Connect the ports as you see fit! In the below, a webcam microphone is
connected to the speakers. Warning, do not try this at home! Connecting a
microphone input to a speaker output may produce a terrible echo.