
Please check the build logs for more information.
See Builds for ideas on how to fix a failed build, or Metadata for how to configure docs.rs builds.
If you believe this is docs.rs' fault, open an issue.
device-kit
An embedded Rust library for Raspberry Pi Pico, Pico W, and Pico 2 that explores composable, async device abstractions using the Embassy framework.
Note: This library requires the latest Embassy features from GitHub. Use this crate from the GitHub repository rather than crates.io:
[] = { = "https://github.com/CarlKCarlK/device-kit" }
Status
⚠️ Alpha / Experimental
device-kit is an experimental library exploring composable device abstractions
for embedded Rust. The API is evolving and will change.
The crate is currently focused on Raspberry Pi Pico–class hardware and is intended for experimentation, examples, and discussion rather than production use.
Background: See How Rust & Embassy Shine on Embedded Devices by Carl M. Kadie and Brad Gibson.
Features (current)
- Async peripheral drivers - Non-blocking I/O using Embassy async framework
- Device abstraction pattern - Hardware abstraction with message-passing channels
- 2D LED Matrices - Addressable LED strip displays with text rendering, animation, and embedded-graphics support
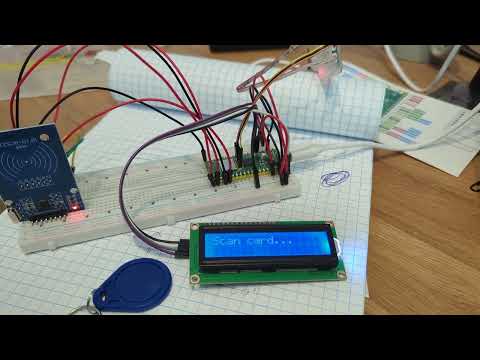
- RFID Reader - MFRC522 SPI reader with card detection events
- IR Remote - NEC protocol decoder with GPIO interrupt edge detection
- LCD Display - HD44780 I2C async driver with timed messages and two-line support
- Servo Control - Hardware PWM-based servo positioning (0-180°)
- WiFi (Pico W) - CYW43439 WiFi with TCP/UDP networking and NTP time sync
Examples
Full Demo (examples/full.rs)
Complete demonstration integrating all peripherals:
- RFID cards assigned letters A-D, control servo position
- IR remote buttons 0-9 set servo angles (0°-180° in 20° steps)
- LCD displays real-time status with two-line messages
- Card mapping with automatic assignment
Clock LCD (examples/clock_lcd.rs)
Pico W WiFi clock with automatic time sync:
- On-device captive portal provisions WiFi credentials and timezone (stored in flash)
- Fetches local time with DST support via WorldTimeAPI
- Displays time in 12-hour format with AM/PM on LCD
- Keeps local time, syncs with internet hourly
Wireless/NTP (examples/wireless.rs)
Pico W WiFi connectivity example:
- Captive portal collects WiFi credentials before starting the network stack
- Fetches current time via WorldTimeAPI (HTTP)
- Displays local time every minute
IR NEC Decoder (examples/ir.rs)
IR remote receiver using the NEC protocol decoder library
Hardware Setup
Pico Pinout (examples/full.rs)
- GP0: Servo PWM signal (PWM0 Channel A)
- GP4: LCD SDA (I2C0)
- GP5: LCD SCL (I2C0)
- GP15-19: RFID MFRC522 (SPI0: CS, MISO, SCK, MOSI, RST)
- GP28: IR receiver signal (pulled high, edge detection)
Pico W Additional (examples/wireless.rs, examples/clock_lcd.rs)
- GP23: CYW43 power enable
- GP24: CYW43 SPI data (via PIO)
- GP25: CYW43 SPI chip select
- GP29: CYW43 SPI clock (via PIO)
EMI Mitigation Notes
For reliable IR operation alongside SPI RFID:
- Use GP28 for IR (away from SPI cluster GP15-19)
- Add 22pF capacitor between IR signal and GND
- Reduce RFID polling to 500ms intervals
- MIN_IDLE filter rejects <5ms noise pulses
Testing
The project includes host-side tests for font rendering that run on your development machine (no hardware required).
# Run all host tests (font rendering comparisons against reference PNGs)
# Regenerate reference PNGs for visual inspection
# Then visually inspect the generated PNGs and copy to tests/data/text_render/ if correct
See tests/data/text_render/README.md for details on the font rendering tests.
Building
Requires Rust nightly with appropriate target for your board:
Or use the cargo aliases:
# Pico 1 (default, ARM, no WiFi)
# Pico 1 with WiFi
# Pico 2 ARM
# Pico 2 RISC-V (experimental)
See ARCHITECTURE.md for detailed information about board and architecture features.
Windows/WSL Debug Probe Helper
scripts/probeusb.ps1 automates moving the CMSIS-DAP probe between Windows and WSL:
# Show current owner ("Windows" vs "WSL")
powershell -ExecutionPolicy Bypass -File .\scripts\probeusb.ps1

# Give WSL exclusive access (Windows COM port disappears)
powershell -ExecutionPolicy Bypass -File .\scripts\probeusb.ps1 wsl

# Return the probe to Windows
powershell -ExecutionPolicy Bypass -File .\scripts\probeusb.ps1 win
It detects the bus ID automatically (assumes a single probe is connected). If you
have multiple USB entries, set PROBEUSB_PATTERN to part of the device name.
Configuration
WiFi credentials and timezone offset are provisioned on-device. When the Pico W
boots without stored settings it automatically starts in captive-portal mode
(www.picoclock.net) and hosts a captive portal at http://192.168.4.1. Use that page
to enter your SSID, password, and UTC offset in minutes. The submission is saved
to flash (blocks 0/1) and the device reboots into client mode. Clear those flash
blocks or use the UI option in the clock demos to return to provisioning mode.
Demo
License
Licensed under either:
- MIT license (see LICENSE-MIT file)
- Apache License, Version 2.0
at your option.