# codex-helper(Codex CLI 本地助手 / 本地代理)
> 让 Codex CLI 走一层本地“保险杠”:
> 集中管理所有中转站 / key / 配额,在额度用完或上游挂掉时自动切换,并提供会话与脱敏辅助工具。
当前版本:`v0.11.0`
> English version: `README_EN.md`
---
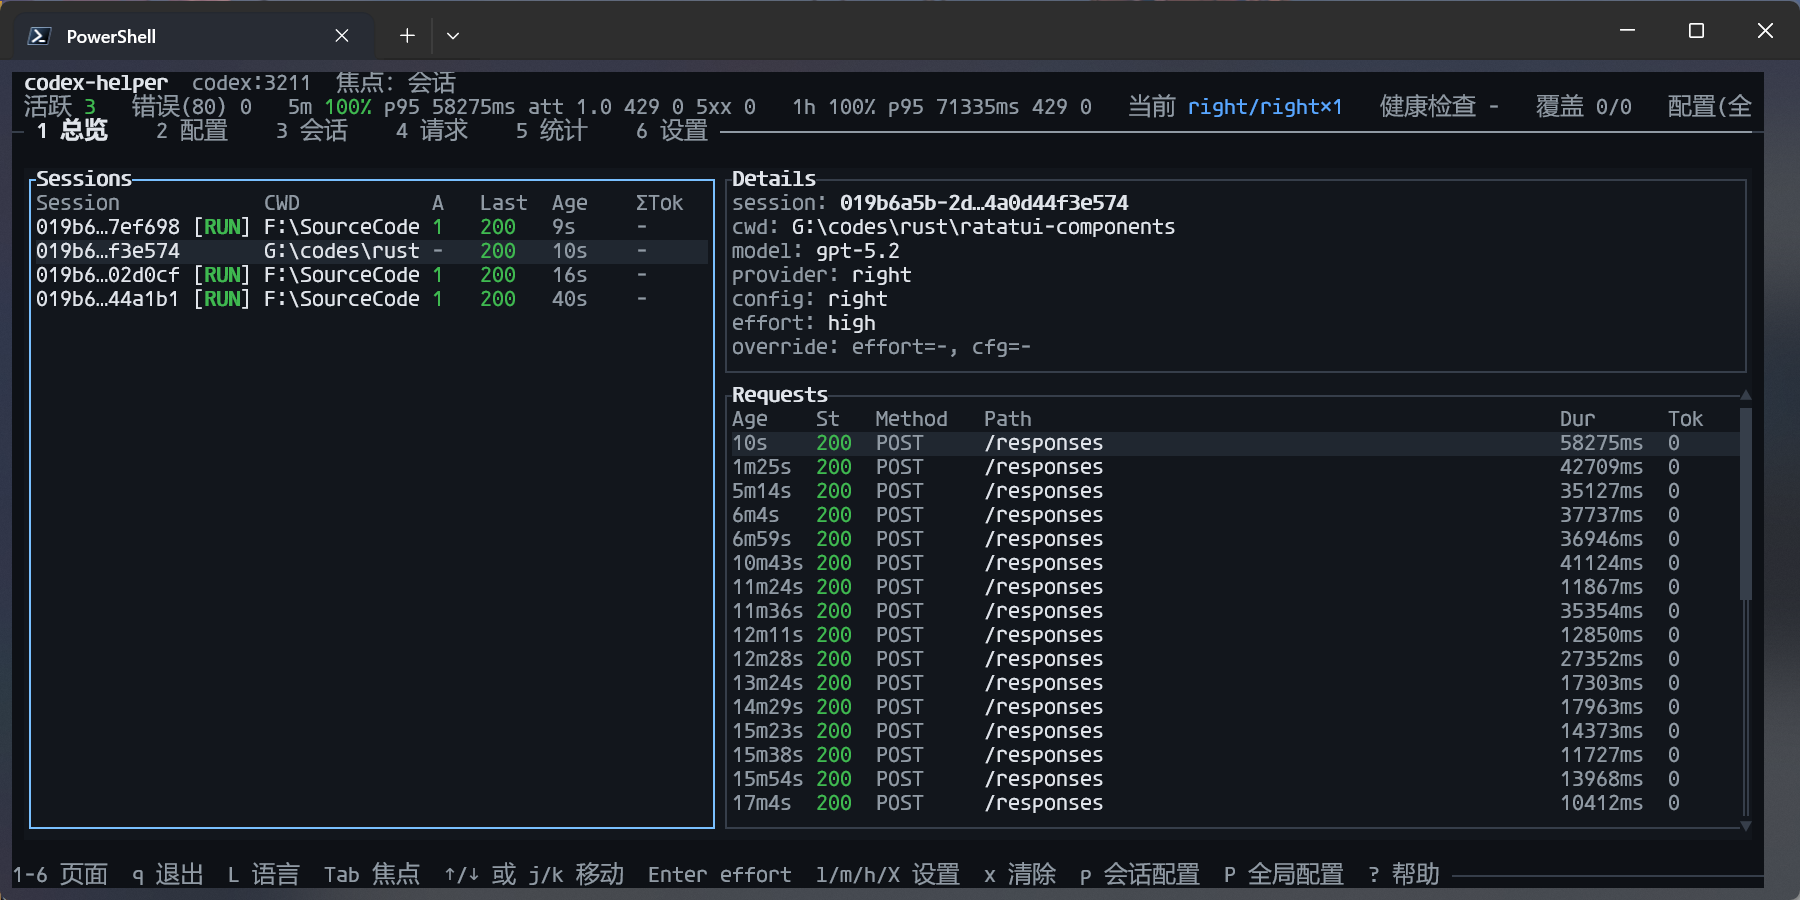
## 截图
## 为什么需要 codex-helper?
如果你有下面这些情况,codex-helper 会很合适:
- **不想手改 `~/.codex/config.toml`**
手工改 `model_provider` / `base_url` 容易写坏,也不好恢复。
- **有多个中转 / 多个 key,要经常切换**
想把 OpenAI 官方、Packy 中转、自建中转都集中管理,并一条命令切换“当前在用”的那一个。
- **经常到 401/429 才发现额度用完**
希望上游额度用尽时能自动切到备用线路,而不是人工盯着报错。
- **命令行里希望“一键找回 Codex 会话”**
例如“给我当前项目最近一次会话,并告诉我怎么 resume”。
- **想给 Codex 加一层本地脱敏和统一日志**
请求先本地过滤敏感信息,再发到上游;所有请求写进一个 JSONL 文件,方便排查和统计。
---
## 一分钟上手(TL;DR)
### 1. 安装(推荐:cargo-binstall)
```bash
cargo install cargo-binstall
cargo binstall codex-helper # 安装 codex-helper,可得到 codex-helper / ch 两个命令
```
安装成功后,`codex-helper` / `ch` 会被放到 Cargo 的 bin 目录(通常是 `~/.cargo/bin`),只要该目录在你的 `PATH` 里,就可以在任意目录直接运行。
> 如果你更习惯从源码构建:
> `cargo build --release` → 使用 `target/release/codex-helper` / `ch` 即可。
### 2. 一条命令启动 Codex 助手(最推荐)
```bash
codex-helper
# 或更短的:
ch
```
它会自动帮你:
- 启动 Codex 本地代理,监听 `127.0.0.1:3211`;
- 如果在交互终端运行,会默认显示一个内置 TUI 面板(可用 `--no-tui` 关闭;按 `q` 退出;`1-7` 切页;`7` 查看历史会话;在 Sessions/History 页按 `t` 查看对话记录);
- 对 429/5xx/网络抖动等瞬态错误,以及常见上游认证/路由类错误(例如 401/403/404/408)在**未开始向客户端输出响应**前进行有限次数的自动重试/切换(可配置);
- 在修改前检查 `~/.codex/config.toml`,如已指向本地代理且存在备份,会询问是否先恢复原始配置;
- 必要时修改 `model_provider` 与 `model_providers.codex_proxy`,让 Codex 走本地代理,并只在首次写入备份;
- 写入 `model_providers.codex_proxy` 时,默认设置 `request_max_retries = 0` 以避免“Codex 重试 + codex-helper 重试”叠加(你也可以在 `~/.codex/config.toml` 中手动覆盖);
- 如果 `~/.codex-helper/config.toml` / `config.json` 还没初始化,会尝试根据 `~/.codex/config.toml` + `auth.json` 推导一个默认上游(首次自动落盘默认生成 TOML);
- 用 Ctrl+C 或在 TUI 中按 `q` 退出时,尝试从备份恢复原始 Codex 配置。
从此之后,你继续用原来的 `codex` 命令即可,所有请求会自动经过 codex-helper。
---
## 常见配置:多上游自动切换
最常见、也是最“物有所值”的用法,是让 codex-helper 在多个上游之间自动切换:
- 某条线路频繁失败(例如 5xx / 连接失败);
- 或被用量提供商标记为“额度用尽”(`usage_exhausted = true`);
- 在这种情况下,LB 会优先选择同一配置下的其他 upstream 作为备份。
**关键点:主线路 + 备份线路优先放在同一个配置的 `upstreams` 里。**
> 提示:如果你把每个供应商都拆成一个 config,并且它们的 `level` 都是默认的 `1`(例如 `config list` 全是 `L1 on ...`),codex-helper 仍会**优先**使用 `active`,但同级其他 config 也会参与 failover(避免 `active` 单点)。
> 如果你想要明确的“跨配置降级”(例如 `L1=中转优先`、`L2=官方兜底`),请至少设置两档不同的 `level`(见下文),或把备份线路放回同一 config 的 `upstreams`。
>
> 注意:如果你设置了 **pinned override**(例如 TUI 的 `p`:session provider override/pinned;旧版本也可能存在全局 pinned),路由会进入 `pinned` 模式,只会使用那一个 config,因此**不会跨 config failover**。
> 想要“首选 + 可 failover”,请使用 `active`(TUI:`P` 选择全局 active,或在 Configs 页 `Enter` 设 active),并清除 pinned override。
### 配置场景速查表
把配置理解成两层就不容易迷路:
1) **分组(routing)**:每个 config 有 `level`(1..=10),`active` 是首选,`enabled=false` 可把它排除出自动路由(但如果它是 active 仍会参与)。
2) **策略(retry)**:决定失败时怎么重试/怎么冷却/是否“回切探测”。
如果你已经用 `codex-helper config overwrite-from-codex --yes` 同步过账号信息(最常见),通常不需要手写 `[[...upstreams]]`;你只需要:
- 分组:`codex-helper config set-level <name> <level>` + `codex-helper config set-active <name>`
- 策略:`codex-helper config set-retry-profile <balanced|same-upstream|aggressive-failover|cost-primary>`
> 注意:`set-retry-profile` 会覆盖整个 `[retry]` 段;如果你要高级微调(例如 `retry.upstream.max_attempts`、`retry.provider.on_status`、`transport_cooldown_secs`,以及用于兜底的 `never_on_status` / `never_on_class`),可以在执行 profile 后再手改配置文件(旧版扁平字段仍兼容,但建议迁移到两层配置)。
| 单账号多 endpoint 自动切换 | 需要把多个 endpoint 合并到同一个 config 的 `upstreams`(见模板 A) | `balanced` | 最简单、最稳定;优先推荐 |
| 多供应商同级互为备份(避免 active 单点) | 让多个 config 都是同一个 `level`(默认就是 1),并设置一个 `active`(见模板 B) | `balanced` | 同级会优先 `active`,但其他同级也会参与 failover |
| 中转优先,官方/直连兜底 | 把中转设 `level=1`,把直连/官方设 `level=2`(见模板 C) | `balanced` | 失败时跨 level 降级;有其他候选时会跳过处于 cooldown 的 config |
| 包月中转为主,按量备选为从(省钱+回切探测) | 同上(`L1=包月中转`,`L2=按量直连`),并把包月中转设为 `active`(见模板 D) | `cost-primary` | 主线路不稳会降级到备选,并通过冷却/退避“隔一段时间探测回切” |
#### 模板 A:单账号多 endpoint(同一个 config 多 upstream)
适合你希望“同一类账号/同一中转商”的多个 endpoint 自动切换(最快最稳)。这需要你手动把多个 endpoint 放进同一个 config 的 `upstreams`:
```toml
version = 1
[codex]
active = "codex-main"
[codex.configs.codex-main]
name = "codex-main"
enabled = true
level = 1
[[codex.configs.codex-main.upstreams]]
base_url = "https://codex-api.packycode.com/v1"
auth = { auth_token_env = "PACKYCODE_API_KEY" }
tags = { provider_id = "packycode", source = "codex-config" }
[[codex.configs.codex-main.upstreams]]
base_url = "https://co.yes.vg/v1"
auth = { auth_token_env = "YESCODE_API_KEY" }
tags = { provider_id = "yes", source = "codex-config" }
```
说明:
- `active` 指向这个 config,LB 会在多个 upstream 之间自动切换。
- 当某个 upstream 失败/被标记为 `usage_exhausted` 时,会尽量选择其他 upstream;全部不可用时会兜底返回第一个,避免硬断流。
#### 模板 B:多供应商同级互备(导入后只改 active)
```bash
codex-helper config overwrite-from-codex --yes
# 选择一个首选(但仍允许同级 failover)
codex-helper config set-active right
# 同级互备一般用默认 profile 即可
codex-helper config set-retry-profile balanced
```
如果你更想直接改 `config.toml`,等价写法是:
```toml
[codex]
active = "right"
[retry]
profile = "balanced"
```
> 想缩小候选集:把你不希望参与自动路由的 config `disable` 掉(active 除外)。例如:`codex-helper config disable some-provider`。
#### 模板 C:中转优先,直连/官方兜底(level 分级)
> 下面的 `right/packyapi/yescode/openai` 仅为示例,请以 `codex-helper config list` 输出的真实名称替换。
```bash
codex-helper config overwrite-from-codex --yes
# L1:各类中转
codex-helper config set-level right 1
codex-helper config set-level packyapi 1
codex-helper config set-level yescode 1
# L2:直连/官方兜底
codex-helper config set-level openai 2
# 首选一个中转(仍允许跨 level 降级)
codex-helper config set-active right
codex-helper config set-retry-profile balanced
```
等价的 `config.toml`(示例):
```toml
[codex]
active = "right"
[codex.configs.right]
level = 1
[codex.configs.openai]
level = 2
[retry]
profile = "balanced"
```
#### 模板 D:包月中转主、按量直连从(省钱 + 回切探测)
> 下面的 `right/openai` 仅为示例,请以 `codex-helper config list` 输出的真实名称替换。
```bash
codex-helper config overwrite-from-codex --yes
# L1:包月中转(便宜但可能不稳)
codex-helper config set-level right 1
codex-helper config set-active right
# L2:按量直连(贵但稳)
codex-helper config set-level openai 2
# 开启 cost-primary:失败越多,冷却越久;冷却到期会“探测回切”
codex-helper config set-retry-profile cost-primary
```
等价的 `config.toml`(示例):
```toml
[codex]
active = "right"
[codex.configs.right]
level = 1
[codex.configs.openai]
level = 2
[retry]
profile = "cost-primary"
```
> 注意:如果 config 名称包含 `-` 等字符,请在 TOML 里用引号,例如:`[codex.configs."openai-main"]`。
### Level 分组(跨配置降级,可选)
如果你更希望把不同供应商/通道拆成多个 config,codex-helper 也支持 **按 level 分组的跨配置降级**(推荐用于“中转优先,直连兜底”等场景):
- 每个 config 有一个 `level`(1..=10,越小优先级越高)。
- 如果存在 **多个不同的 level**,会按 level 从小到大路由/降级(低 level 优先)。
- 如果所有 config 都是同一个 level,则视为“同级候选”:仍会优先 `active`,但同级其他 config 也会参与 failover(避免 active 单点)。
- 同一 level 内会优先使用 `active` 配置。
- `enabled = false` 可把该 config 排除出自动路由(除非它是 active)。
- 实操建议:把“同一类线路”放同一 level(例如 `L1=各类中转`、`L2=官方/直连兜底`),并把 `retry.provider.max_attempts` 设到足够覆盖你希望每次请求尝试的候选数量(而 `retry.upstream.max_attempts` 控制单个候选内的重试次数)。
一个常见成本优化策略是“包月中转为主,按量备选为从”:把包月中转设为 `active` 且 `level=1`,把按量直连设为 `level=2`;当主线路不稳定时会自动降级到备选,同时通过冷却(以及可选的冷却退避)“隔一段时间探测回切”,避免一直按量计费。
例如:让 `L1` 优先使用中转(`right/packyapi/yescode/...`),失败时再降级到 `L2` 的直连 OpenAI:
```bash
codex-helper config set-level right 1
codex-helper config set-level packyapi 1
codex-helper config set-level yescode 1
codex-helper config set-level openai 2
```
---
## 常用命令速查表
### 日常使用
- 启动 Codex 助手(推荐):
- `codex-helper` / `ch`
- 显式启动 Codex 代理:
- `codex-helper serve`(默认端口 3211)
- `codex-helper serve --no-tui`(关闭内置 TUI 面板)
### 开关 Codex
- 一次性让 Codex 指向本地代理:
```bash
codex-helper switch on
```
- 从备份恢复原始配置:
```bash
codex-helper switch off
```
- 查看当前开关状态:
```bash
codex-helper switch status
```
### 配置管理(上游 / 中转)
- 列出配置:
```bash
codex-helper config list
```
- 添加新配置:
```bash
codex-helper config add openai-main \
--base-url https://api.openai.com/v1 \
--auth-token-env OPENAI_API_KEY \
--alias "OpenAI 主额度"
```
- 切换当前 active 配置:
```bash
codex-helper config set-active openai-main
```
- 设置重试策略预设(写入 `[retry]` 段,适合“只选策略,不想调一堆参数”的用法):
```bash
codex-helper config set-retry-profile balanced
codex-helper config set-retry-profile cost-primary
```
- 调整 Level 分组 / 启用禁用(用于跨配置降级):
```bash
codex-helper config set-level openai-main 1
codex-helper config disable packy-main
codex-helper config enable packy-main
```
- 从 Codex CLI 覆盖导入账号/配置(重置为默认分组):
```bash
codex-helper config overwrite-from-codex --dry-run
codex-helper config overwrite-from-codex --yes
```
### TUI 设置页(运行态)
- `R`:立即重载运行态配置(用于确认手动修改已生效;下一次请求将使用新配置)
### 会话、用量与诊断
- 会话助手(Codex):
```bash
codex-helper session list
codex-helper session last
codex-helper session transcript <ID> --tail 40
```
- 请求用量 / 日志:
```bash
codex-helper usage summary
codex-helper usage tail --limit 20 --raw
```
- 状态与诊断:
```bash
codex-helper status
codex-helper doctor
codex-helper status --json | jq .
codex-helper doctor --json | jq '.checks[] | select(.status != "ok")'
```
---
## 典型场景示例
### 场景 1:多中转 / 多 key 集中管理 + 快速切换
```bash
# 1. 为不同供应商添加配置
codex-helper config add openai-main \
--base-url https://api.openai.com/v1 \
--auth-token-env OPENAI_API_KEY \
--alias "OpenAI 主额度"
codex-helper config add packy-main \
--base-url https://codex-api.packycode.com/v1 \
--auth-token-env PACKYCODE_API_KEY \
--alias "Packy 中转"
codex-helper config list
# 2. 全局选择当前使用的供应商(active 配置)
codex-helper config set-active openai-main # 使用 OpenAI
codex-helper config set-active packy-main # 使用 Packy
# 3. 一次性让 Codex 使用本地代理(只需执行一次)
codex-helper switch on
# 4. 在当前 active 配置下启动代理
codex-helper
```
### 场景 2:按项目快速恢复 Codex 会话
```bash
cd ~/code/my-app
codex-helper session list # 列出与当前项目相关的最近会话
codex-helper session last # 给出最近一次会话 + 对应 resume 命令
codex-helper session transcript <ID> --tail 40 # 查看最近对话,用于辨认某个 session
```
`session list` 会额外展示每个会话的轮数(rounds)与最后更新时间(last_update,优先取最后一次 assistant 响应时间)。
你也可以从任意目录查询指定项目的会话:
```bash
codex-helper session list --path ~/code/my-app
codex-helper session last --path ~/code/my-app
```
这在你有多个 side project 时尤其方便:不需要记忆 session ID,只要告诉 codex-helper 你关心的目录,它会优先匹配该目录及其父/子目录下的会话,并给出 `codex resume <ID>` 命令。
---
## 进阶配置(可选)
大部分用户只需要前面的命令即可。如果你想做更细粒度的定制,可以关注这几个文件:
- 主配置:`~/.codex-helper/config.toml`(优先)或 `~/.codex-helper/config.json`(兼容)
- 请求过滤:`~/.codex-helper/filter.json`
- 用量提供商:`~/.codex-helper/usage_providers.json`
- 请求日志:`~/.codex-helper/logs/requests.jsonl`
- 详细调试日志(可选):`~/.codex-helper/logs/requests_debug.jsonl`(仅在启用 `http_debug` 拆分时生成)
- 会话统计缓存(自动生成):`~/.codex-helper/cache/session_stats.json`(用于加速 `session list/search` 的轮数/时间统计;以 session 文件 `mtime+size` 作为失效条件,如怀疑不准可直接删除该文件强制重建)
如果你希望快速生成一个带注释的 TOML 默认模板:
```bash
codex-helper config init
```
> 说明:
> - 模板注释默认是中文;
> - 如果检测到 `~/.codex/config.toml`,会 best-effort 自动把 Codex providers 导入到生成的 `config.toml`;
> - 只想生成纯模板(不导入)可用:`codex-helper config init --no-import`。
Codex 官方文件:
- `~/.codex/auth.json`:由 `codex login` 维护,codex-helper 只读取,不写入;
- `~/.codex/config.toml`:由 Codex CLI 维护,codex-helper 仅在 `switch on/off` 时有限修改。
### 配置文件简要结构(推荐 TOML)
codex-helper 支持 `config.toml` 与 `config.json`,字段结构基本一致;如同时存在,以 `config.toml` 为准。
```toml
version = 1
[codex]
active = "openai-main"
[codex.configs.openai-main]
name = "openai-main"
alias = "主 OpenAI 额度"
enabled = true
level = 1
[[codex.configs.openai-main.upstreams]]
base_url = "https://api.openai.com/v1"
auth = { auth_token_env = "OPENAI_API_KEY" }
tags = { source = "codex-config", provider_id = "openai" }
```
关键点:
- `active`:当前生效的配置名;
- `configs`:按名称索引的配置集合;
- `level`:用于跨配置分组路由(1..=10,越小优先级越高;默认 1);
- `enabled`:该配置是否参与自动路由(默认 true);
- 每个 `upstream` 表示一个上游 endpoint,顺序 = 优先级(primary → backup...)。
### 用量提供商(Usage Providers)
路径:`~/.codex-helper/usage_providers.json`,示例:
```jsonc
{
"providers": [
{
"id": "packycode",
"kind": "budget_http_json",
"domains": ["packycode.com"],
"endpoint": "https://www.packycode.com/api/backend/users/info",
"token_env": null,
"poll_interval_secs": 60
}
]
}
```
行为简述:
- upstream 的 `base_url` host 匹配 `domains` 中任一项,即视为该 provider 的管理对象;
- 调用 `endpoint` 的认证 token 优先来自 `token_env`,否则尝试使用绑定 upstream 的 `auth.auth_token` / `auth.auth_token_env`(运行时从环境变量解析);
- 请求结束后,codex-helper 按需调用 `endpoint` 查询额度,解析 `monthly_budget_usd` / `monthly_spent_usd`;
- 当额度用尽时,对应 upstream 在 LB 中被标记为 `usage_exhausted = true`,优先避开该线路。
### 请求过滤与日志
- 过滤规则:`~/.codex-helper/filter.json`,例如:
```jsonc
[
{ "op": "replace", "source": "your-company.com", "target": "[REDACTED_DOMAIN]" },
{ "op": "remove", "source": "super-secret-token" }
]
```
请求 body 在发出前会按规则进行字节级替换 / 删除,规则根据文件 mtime 约 1 秒内自动刷新。
- 请求日志:`~/.codex-helper/logs/requests.jsonl`,每行一个 JSON,字段包括:
- `service`(目前为 `codex`)、`method`、`path`、`status_code`、`duration_ms`;
- `config_name`、`upstream_base_url`;
- `usage`(input/output/total_tokens 等)。
- (可选)`retry`:发生重试/切换上游时记录重试次数与尝试链路(便于回溯问题)。
- (可选)`http_debug`:用于排查 4xx/5xx 时记录更完整的请求/响应信息(请求头、请求体预览、上游响应头/响应体预览等)。
- (可选)`http_debug_ref`:当启用拆分写入时,主日志只保存引用,详细内容写入 `requests_debug.jsonl`。
你可以通过环境变量启用该调试日志(默认关闭):
- `CODEX_HELPER_HTTP_DEBUG=1`:仅当上游返回非 2xx 时写入 `http_debug`;
- `CODEX_HELPER_HTTP_DEBUG_ALL=1`:对所有请求都写入 `http_debug`(更容易产生日志膨胀);
- `CODEX_HELPER_HTTP_DEBUG_BODY_MAX=65536`:请求/响应 body 预览的最大字节数(会截断)。
- `CODEX_HELPER_HTTP_DEBUG_SPLIT=1`:将 `http_debug` 大对象拆分写入 `requests_debug.jsonl`,主 `requests.jsonl` 仅保留 `http_debug_ref`(推荐在 `*_ALL=1` 时开启)。
另外,你也可以让代理在终端直接输出更完整的非 2xx 调试信息(同样默认关闭):
- `CODEX_HELPER_HTTP_WARN=1`:当上游返回非 2xx 时,以 `warn` 级别输出一段裁剪后的 `http_debug` JSON;
- `CODEX_HELPER_HTTP_WARN_ALL=1`:对所有请求都输出(不建议,容易泄露/刷屏);
- `CODEX_HELPER_HTTP_WARN_BODY_MAX=65536`:终端输出里 body 预览的最大字节数(会截断)。
注意:敏感请求头会自动脱敏(例如 `Authorization`/`Cookie` 等);如需进一步控制请求体中的敏感信息,建议配合 `~/.codex-helper/filter.json` 使用。
### 两层重试与切换(默认:每个 upstream 2 次尝试;最多尝试 2 个 config/provider;同一 config 内会在多个 upstream 间切换)
有些上游错误(例如网络抖动、429 限流、5xx/524、或看起来像 Cloudflare/WAF 的拦截页)可能是瞬态的;codex-helper 在**未开始向客户端输出响应**前按“两层模型”执行:先在当前 provider/config 内做 upstream 级重试,仍失败再做 provider/config 级 failover(例如 401/403/404/408 等路由/认证类错误也会触发切换)。
- 强烈建议将 Codex 侧 `model_providers.codex_proxy.request_max_retries = 0`,让“重试与切换”主要由 codex-helper 负责,避免 Codex 默认 5 次重试把同一个 502 反复打满(`switch on` 会在该字段不存在时写入 0;如你手动改过,则不会覆盖)。
- 主配置(`~/.codex-helper/config.toml` / `config.json`)的 `[retry]` 段用于设置全局默认值(从 `v0.8.0` 起不再支持通过环境变量覆盖 retry 参数)。
配置示例(TOML,两层可分别覆盖;profile 默认 `balanced`):
```toml
[retry]
profile = "balanced"
[retry.upstream]
max_attempts = 2
strategy = "same_upstream"
backoff_ms = 200
backoff_max_ms = 2000
jitter_ms = 100
on_status = "429,500-599,524"
on_class = ["upstream_transport_error", "cloudflare_timeout", "cloudflare_challenge"]
[retry.provider]
max_attempts = 2
strategy = "failover"
on_status = "401,403,404,408,429,500-599,524"
on_class = ["upstream_transport_error"]
never_on_status = "413,415,422"
never_on_class = ["client_error_non_retryable"]
cloudflare_challenge_cooldown_secs = 300
cloudflare_timeout_cooldown_secs = 60
transport_cooldown_secs = 30
cooldown_backoff_factor = 1
cooldown_backoff_max_secs = 600
# 兼容说明:旧版扁平字段(max_attempts/on_status/strategy/...)仍可解析,默认映射到 retry.upstream.*。
```
注意:重试可能导致 **POST 请求重放**(例如重复计费/重复写入)。建议仅在你明确接受这一风险、且错误大多是瞬态的场景下开启,并将尝试次数控制在较小范围内。
### 日志文件大小控制(推荐)
`requests.jsonl` 默认会持续追加,为避免长期运行导致文件过大,codex-helper 支持自动轮转(默认开启):
- `CODEX_HELPER_REQUEST_LOG_MAX_BYTES=52428800`:单个日志文件最大字节数,超过会自动轮转(`requests.jsonl` → `requests.<timestamp_ms>.jsonl`;`requests_debug.jsonl` → `requests_debug.<timestamp_ms>.jsonl`)(默认 50MB);
- `CODEX_HELPER_REQUEST_LOG_MAX_FILES=10`:最多保留多少个历史轮转文件(默认 10);
- `CODEX_HELPER_REQUEST_LOG_ONLY_ERRORS=1`:只记录非 2xx 请求(可显著减少日志量,默认关闭)。
这些字段是稳定契约,后续版本只会在此基础上追加字段,不会删除或改名,方便脚本长期依赖。
---
## 与 cli_proxy / cc-switch 的关系
- [cli_proxy](https://github.com/guojinpeng/cli_proxy):多服务守护进程 + Web UI,看板 + 管理功能很全面;
- [cc-switch](https://github.com/farion1231/cc-switch):桌面 GUI 级供应商 / MCP 管理器,主打“一处管理、按需应用到各客户端”。
codex-helper 借鉴了它们的设计思路,但定位更轻量:
- 专注 Codex CLI;
- 单一二进制,无守护进程、无 Web UI;
- 更适合作为你日常使用的“命令行小助手”,或者集成进你自己的脚本 / 工具链中。