# Screenshots Guide
This directory contains screenshots for the README.
## Required Screenshots
### 1. Dashboard Overview (`dashboard.png`)
- **URL**: `http://localhost:13456/admin`
- **What to capture**:
- Overview tab showing system status
- Total providers, models, and routing rules
- Last saved timestamp
- Recent activity or stats (if available)
**Recommended size**: 1200x800px or similar
---
### 2. Provider Management (`providers.png`)
- **URL**: `http://localhost:13456/admin?tab=providers`
- **What to capture**:
- Provider list with cards/table
- "Add Provider" button visible
- At least 2-3 providers configured (z.ai, OpenRouter, Kimi)
- Enable/disable toggles visible
**Recommended size**: 1200x800px or similar
---
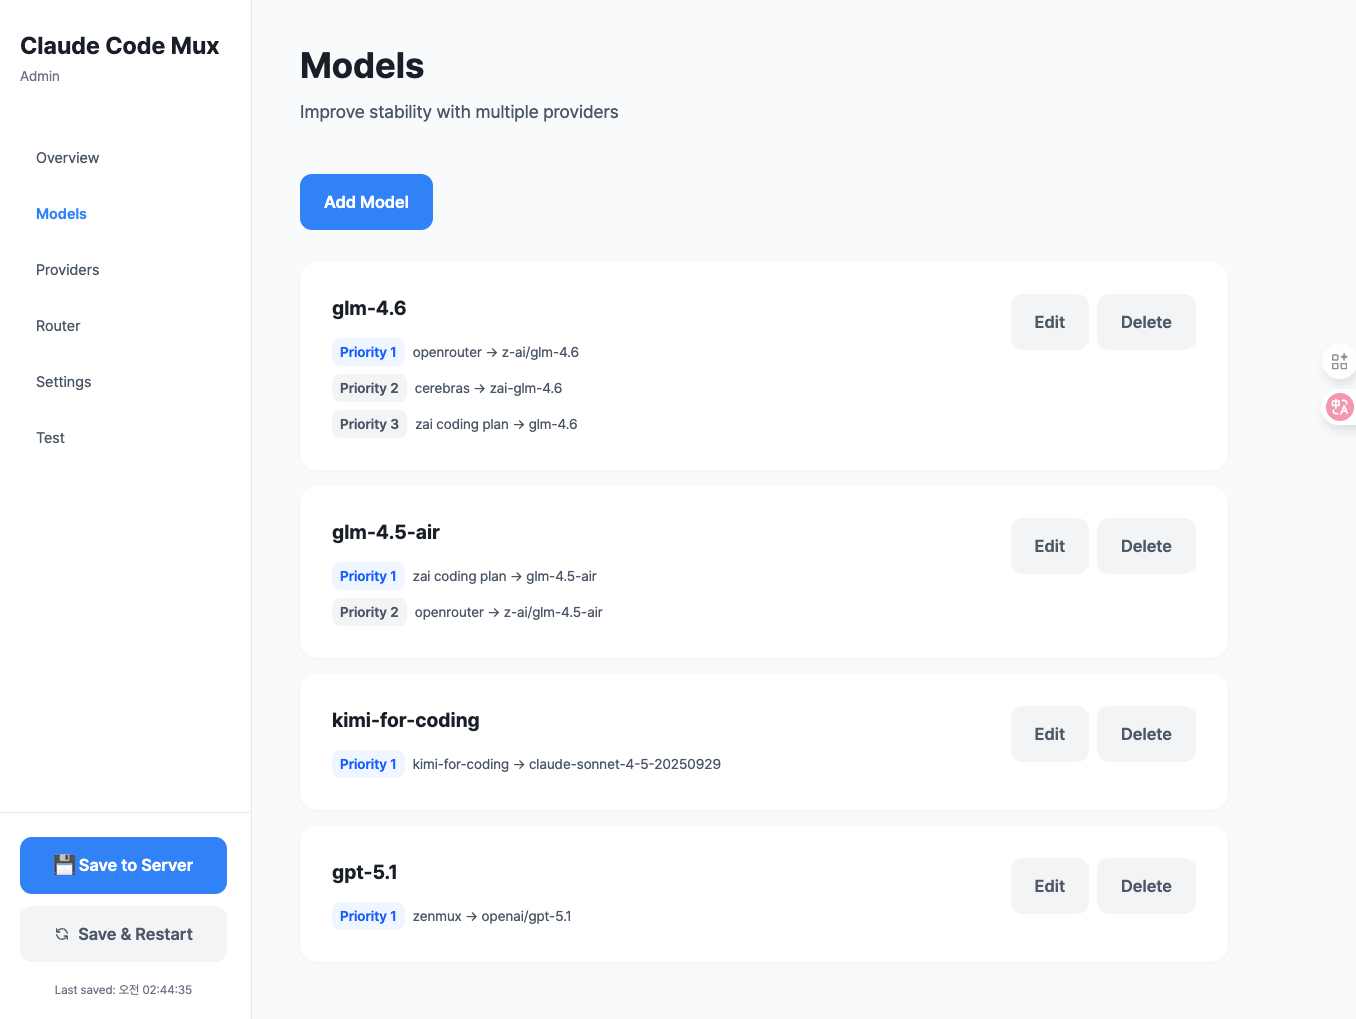
### 3. Model Mappings (`models.png`)
- **URL**: `http://localhost:13456/admin?tab=models`
- **What to capture**:
- Model list showing mappings
- Fallback priorities visible (Priority 1, 2, etc.)
- Example: `glm-4.6` with multiple providers
- "Add Model" button visible
**Recommended size**: 1200x800px or similar
---
### 4. Routing Rules (`routing.png`)
- **URL**: `http://localhost:13456/admin?tab=router` (or routing section)
- **What to capture**:
- Routing configuration form/table
- Default, Think, WebSearch, Background rules visible
- Model selections for each rule
- Clean, simple interface
**Recommended size**: 1200x800px or similar
---
## How to Take Screenshots
### macOS
```bash
# Fullscreen
Cmd + Shift + 3
# Select area
Cmd + Shift + 4
# Window
Cmd + Shift + 4, then press Space, click window
```
### Linux
```bash
# Using GNOME Screenshot
gnome-screenshot -a
# Using scrot
scrot -s
```
### Windows
```bash
# Snipping Tool
Win + Shift + S
```
---
## Image Optimization
After taking screenshots, optimize them:
```bash
# Install imagemagick (if not installed)
brew install imagemagick # macOS
sudo apt install imagemagick # Ubuntu/Debian
# Resize to max width 1200px (maintains aspect ratio)
convert dashboard-raw.png -resize 1200x dashboard.png
convert providers-raw.png -resize 1200x providers.png
convert models-raw.png -resize 1200x models.png
convert routing-raw.png -resize 1200x routing.png
# Compress further (optional)
# Install pngquant
brew install pngquant
pngquant --quality=80-90 dashboard.png --output dashboard-optimized.png
```
---
## Tips for Good Screenshots
1. **Clean browser**:
- Use incognito/private mode
- No browser extensions visible
- Hide bookmarks bar
2. **Consistent theme**:
- Use same browser for all screenshots
- Consistent window size
- Same zoom level (100%)
3. **Sample data**:
- Use realistic but non-sensitive data
- Use example API keys like "your-api-key-here"
- Show 2-3 items in lists (not empty, not too crowded)
4. **Highlight key features**:
- Make sure buttons are visible
- Show enabled/disabled states
- Include some interaction hints
5. **File format**:
- PNG for UI screenshots (better quality)
- Keep file size under 500KB if possible
---
## Alternative: Demo GIF
Instead of static screenshots, you can create an animated demo:
```bash
# Using LICEcap (macOS/Windows)
# Download from: https://www.cockos.com/licecap/
# Or using Kap (macOS)
brew install --cask kap
# Record 10-15 seconds showing:
# 1. Dashboard overview
# 2. Navigate to Providers
# 3. Add a new provider
# 4. Navigate to Models
# 5. Save configuration
```
Save as `demo.gif` in this directory and reference in README:
```markdown

```
---
## Current Status
- [ ] `dashboard.png` - Not added yet
- [ ] `providers.png` - Not added yet
- [ ] `models.png` - Not added yet
- [ ] `routing.png` - Not added yet
- [ ] `demo.gif` - Optional
Once screenshots are added, remove the "Add screenshot" notes from README.md.