

assert2
All-purpose assert!(...) and check!(...) macros, inspired by Catch2.
There is also a debug_assert!(...) macro that is disabled on optimized builds by default.
Why these macros?
These macros offer some benefits over the assertions from the standard library:
- Use comparison operators inside the assertion instead of specialized macros:
assert!(1 + 1 == 2). - Test pattern matches:
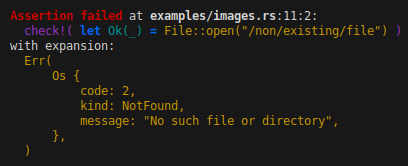
assert!(let Err(e) = File::open("/non/existing/file")). - Use let chains (even with compilers older than Rust 1.88).
- See which part of a
&&chain failed. - Re-use captured variables from pattern matches in later code with
assert!(...). - Perform multiple checks before panicking with
check!(...). - Colored failure messages!
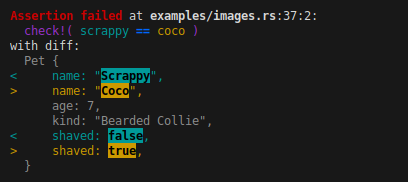
- Highlighted diffs between the Debug form of the expected and actual values!
The macros also accept additional arguments for a custom message, so it is fully compatible with std::assert!(...).
This means that you can import the macro as a drop in replacement:
use assert;
Examples
check!;

check!;
check!;

check!;
assert!;
check!;

check!;
assert vs check
The crate provides two macros: check!(...) and assert!(...).
The main difference is that check is really intended for test cases and doesn't immediately panic.
Instead, it will print the assertion error and fail the test.
This allows you to run multiple checks and can help to determine the reason of a test failure more easily.
The assert macro on the other hand simply prints the error and panics,
and can be used outside of tests just as well.
Currently, check uses a scope guard to delay the panic until the current scope ends.
Ideally, check doesn't panic at all, but only signals that a test case has failed.
If this becomes possible in the future, the check macro will change, so you should not rely on check to panic.
Difference between stable and nightly.
If available, the crate uses the proc_macro_span feature to get the original source code.
On stable and beta, it falls back to stringifying the expression.
This makes the output a bit more readable on nightly.
Capturing variables
When you use the assert!(...) macro, any placeholders in let patterns are captured.
They will be made available in the calling scope as if they were a regular let binding.
This allows you to run additional checks on the captured variables.
For example:
assert!;
check!;
assert!;
check!;
check!;
The check!(...) can not do this, as code following the macro can still be executed, even if the check failed.
However, you can run multiple checks inside the same macro call using let chains:
check!;
check!;
Controlling the output format.
As an end-user, you can influence the way that assert2 formats failed assertions by changing the ASSERT2 environment variable.
You can specify any combination of options, separated by a comma.
The supported options are:
auto: Automatically select the compact or prettyDebugformat for an assertion based on the length (default).pretty: Always use the prettyDebugformat for assertion messages ({:#?}).compact: Always use the compactDebugformat for assertion messages ({:?}).no-color: Disable colored output, even when the output is going to a terminal.color: Enable colored output, even when the output is not going to a terminal.
For example, you can run the following command to force the use of the compact Debug format with colored output:
ASSERT2=compact,color cargo test
If neither the color or the no-color options are set,
then assert2 follows the clicolors specification:
NO_COLOR != 0orCLICOLOR == 0: Write plain output without color codes.CLICOLOR != 0: Write colored output when the output is going to a terminal.CLICOLOR_FORCE != 0: Write colored output even when it is not going to a terminal.