# Active Call 配置指南
本文档详细说明 `active-call` 的配置文件(`active-call.toml`)各项参数的含义以及不同呼叫场景的配置方案。
## 目录
- [基础配置](#基础配置)
- [网络配置](#网络配置)
- [TLS 与 SRTP 配置](#tls-与-srtp-配置)
- [媒体配置](#媒体配置)
- [呼入处理配置](#呼入处理配置)
- [录音与CDR配置](#录音与cdr配置)
- [呼叫场景配置](#呼叫场景配置)
- [场景1: WebRTC 呼叫(浏览器通话)](#场景1-webrtc-呼叫浏览器通话)
- [场景2: SIP 呼叫(对接PBX/FS网关)](#场景2-sip-呼叫对接pbxfs网关)
- [场景3: WebSocket 呼叫(自定义应用)](#场景3-websocket-呼叫自定义应用)
- [场景4: SIP 呼入(注册到PBX)](#场景4-sip-呼入注册到pbx)
---
## 基础配置
```toml
# SIP 服务监听地址
addr = "0.0.0.0"
# HTTP 服务端口地址
http_addr = "0.0.0.0:8080"
# UDP 端口(用于 SIP 和 RTP,默认 25060)
udp_port = 25060
# 日志级别:trace, debug, info, warn, error
log_level = "debug"
# 日志文件路径(可选)
# log_file = "/tmp/active-call.log"
# 跳过访问日志的 HTTP 路径(可选)
# http_access_skip_paths = ["/health", "/metrics*"]
# 媒体缓存路径
media_cache_path = "./config/mediacache"
```
### 配置项说明
- **addr**: SIP 服务绑定的 IP 地址
- **http_addr**: HTTP 服务完整地址(IP + 端口)
- **udp_port**: UDP 端口,用于 SIP 信令和 RTP 媒体流
- **log_level**: 日志级别,建议生产环境使用 `info` 或 `warn`
- **media_cache_path**: 媒体文件(如 TTS 音频)的缓存目录
---
## 网络配置
### NAT 和外部 IP 配置
如果服务器在 NAT 后面,需要配置公网 IP:
```toml
# 外部 IP 地址(用于 SIP 信令和媒体协商)
# 如果服务器在 NAT 后面,请设置公网 IP(不包含端口)
external_ip = "1.2.3.4"
```
### RTP 端口范围
```toml
# RTP 端口范围
rtp_start_port = 12000
rtp_end_port = 42000
```
### STUN/TURN 服务器配置(WebRTC)
用于 WebRTC 客户端的 NAT 穿透:
```toml
# STUN 服务器
[[ice_servers]]
urls = ["stun:stun.l.google.com:19302"]
# TURN 服务器(需要认证)
[[ice_servers]]
urls = ["turn:turn.example.com:3478"]
username = "turnuser"
credential = "turnpass"
```
---
## TLS 与 SRTP 配置
适用于需要加密信令和媒体传输的 PSTN 运营商对接场景(如 Twilio、Telnyx 等)。
### SIP over TLS(SIPS)
```toml
# TLS 端口,用于加密的 SIP 信令(SIPS)
# Twilio 要求使用 TLS;生产环境运营商对接建议开启
tls_port = 5061
tls_cert_file = "./certs/cert.pem" # TLS 证书路径(PEM 格式)
tls_key_file = "./certs/key.pem" # TLS 私钥路径(PEM 格式)
```
设置 `tls_port` 后,active-call 将在该端口额外启动一个 TLS SIP 侦听器。原有的 `udp_port` UDP 侦听器同时保持运行。
**生成自签名证书**(测试用):
```bash
mkdir -p certs
openssl req -x509 -newkey rsa:2048 -keyout certs/key.pem \
-out certs/cert.pem -days 365 -nodes \
-subj "/CN=你的公网IP或域名"
```
生产环境建议使用 CA 签名证书(如 Let's Encrypt)。
### SRTP(加密媒体)
```toml
# 全局开启 SRTP 加密媒体传输
# 开启 tls_port 时推荐同时开启 SRTP
enable_srtp = true
```
也可以在 **HTTP API 调用时按通话覆盖**:
```json
{
"callee": "sip:+18005551234@yourdomain.pstn.twilio.com",
"sip": {
"enableSrtp": true
}
}
```
**SRTP 优先级链**(由高到低):
1. API 调用 body 中的 `sip.enableSrtp` — 单次通话覆盖
2. `active-call.toml` 中的 `enable_srtp` — 全局默认
3. `false` — 明文 RTP(兜底)
### 配置示例:对接 Twilio 的完整配置
```toml
addr = "0.0.0.0"
udp_port = 5060
tls_port = 5061
tls_cert_file = "./certs/cert.pem"
tls_key_file = "./certs/key.pem"
enable_srtp = true
external_ip = "你的公网IP"
rtp_start_port = 12000
rtp_end_port = 42000
```
完整的运营商对接流程,请参阅 [Twilio 集成指南](./twilio_integration.md)。
---
## 媒体配置
### ASR/TTS 引擎默认值
但在使用 Playbook 或通过 API 发起呼叫时,如果没有指定提供商,Active Call 将使用以下默认值:
- **中文 (zh)**: TTS 默认使用 **aliyun**, ASR 默认使用 **sensevoice**(离线) 或 **aliyun**(在线)。
- **英文 (en)**: TTS 默认使用 **supertonic**, ASR 默认使用 **sensevoice**(离线) 或 **openai**(在线)。
### SIP 配置
```toml
# SIP 服务监听地址 (对应基础配置中的 addr)
addr = "0.0.0.0"
# SIP 服务端口 (对应基础配置中的 udp_port)
udp_port = 25060
```
**注意**: 建议不使用 5060 端口,因为很多网络环境会对该端口进行特殊处理。
---
## 呼入处理配置
Active Call 支持两种 SIP 呼入处理方式:
### 方式1: Webhook 处理器
将呼入请求转发到 HTTP 接口,由外部服务决定如何处理:
```toml
[handler]
type = "webhook"
url = "http://localhost:8090/webhook"
method = "POST"
```
**Webhook 请求格式**:
```json
{
"caller": "sip:alice@example.com",
"callee": "sip:bob@pbx.example.com",
"call_id": "abc123",
"from_tag": "tag1",
"to_tag": "tag2"
}
```
### 方式2: Playbook 处理器
根据来电号码和被叫号码自动路由到对应的 Playbook:
```toml
[handler]
type = "playbook"
default = "default.md" # 可选:没有匹配规则时使用的默认 Playbook
# 规则1: 美国号码呼叫支持热线
[[handler.rules]]
caller = "^\\+1\\d{10}$" # 匹配美国号码格式
callee = "^sip:support@.*" # 匹配支持热线
playbook = "support.md" # 使用支持 Playbook
# 规则2: 中国号码自动使用中文 Playbook
[[handler.rules]]
caller = "^\\+86\\d+" # 匹配中国号码
playbook = "chinese.md" # 只匹配来电号码
# 规则3: 销售热线
[[handler.rules]]
callee = "^sip:sales@.*" # 只匹配被叫号码
playbook = "sales.md"
```
**规则匹配逻辑**:
- 按从上到下的顺序评估规则
- 每条规则可以指定 `caller` 和/或 `callee` 的正则表达式
- 两个模式都必须匹配(省略的模式匹配任何值)
- 第一条匹配的规则决定使用哪个 Playbook
- 如果没有规则匹配且没有设置 default,则拒绝呼叫
### CLI 快速配置
也可以通过命令行参数快速配置处理器:
```bash
# Webhook 处理器
./active-call --handler https://example.com/webhook
# Playbook 处理器(默认 Playbook)
./active-call --handler default.md
# 发起 SIP 呼出并执行 Playbook
./active-call --call sip:1001@127.0.0.1 --handler greeting.md
# 设置外部 IP 和支持的编码
./active-call --external-ip 1.2.3.4 --codecs pcmu,pcma,opus
```
---
## 录音与 CDR 配置
### 录音配置
```toml
[recording]
enabled = true # 启用录音
auto_start = true # 自动开始录音
```
### CDR(呼叫详单)配置
```toml
[callrecord]
type = "local"
root = "./config/cdr"
```
CDR 文件将保存在指定的目录中,包含每次呼叫的详细信息。
---
## 呼叫场景配置
Active Call 支持多种呼叫场景,通过不同的 WebSocket 接口发起呼叫。以下是常见场景的配置和使用方法。
### 场景1: WebRTC 呼叫(浏览器通话)
**使用场景**: 网页应用、浏览器客户端直接与 AI Agent 通话。
> **注意**: WebRTC 需要安全上下文(Secure Context)。请确保通过 **HTTPS** 或 **127.0.0.1** 访问您的网页客户端,否则浏览器将无法启用 WebRTC 功能。
#### 配置要点
```toml
# 基础配置
http_addr = "0.0.0.0:8080"
# 配置 STUN/TURN 服务器(用于 NAT 穿透)
[[ice_servers]]
urls = ["stun:stun.l.google.com:19302"]
[[ice_servers]]
urls = ["turn:turn.example.com:3478"]
username = "turnuser"
credential = "turnpass"
# 如果在 NAT 后面,配置外部 IP
external_ip = "1.2.3.4"
```
#### 发起呼叫
通过 WebSocket 连接到 `/call/webrtc` 端点:
```javascript
// 建立 WebSocket 连接
const ws = new WebSocket('ws://localhost:8080/call/webrtc?id=session123');
// 创建 WebRTC PeerConnection
const pc = new RTCPeerConnection({
iceServers: [
{ urls: 'stun:stun.l.google.com:19302' }
]
});
// 添加本地音频流
const stream = await navigator.mediaDevices.getUserMedia({ audio: true });
stream.getTracks().forEach(track => pc.addTrack(track, stream));
// 创建并发送 Offer
const offer = await pc.createOffer();
await pc.setLocalDescription(offer);
ws.send(JSON.stringify({
command: "invite",
option: {
sdp: offer.sdp,
codec: "opus",
playbook: "greeting.md"
}
}));
// 接收 Answer
ws.onmessage = async (event) => {
const msg = JSON.parse(event.data);
if (msg.event === "answer") {
await pc.setRemoteDescription({
type: "answer",
sdp: msg.sdp
});
}
};
```
#### 优势
- 浏览器原生支持,无需插件
- 低延迟,适合实时对话
- 自动 NAT 穿透
- 支持 Opus 高质量音频编码
---
### 场景2: SIP 呼叫(对接PBX/FS网关)
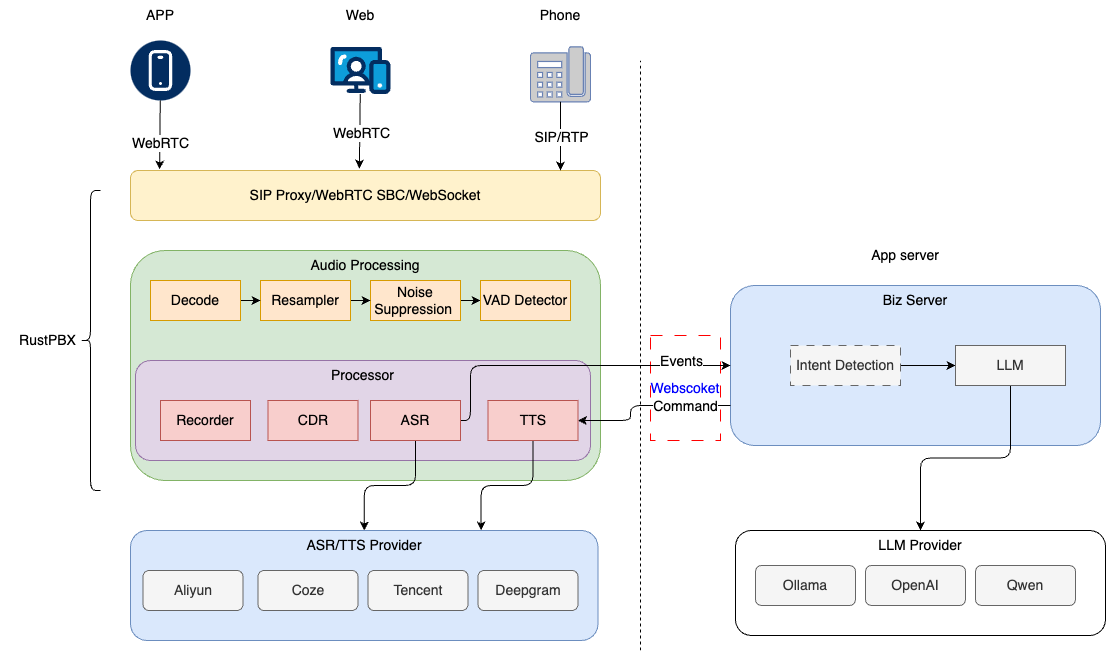
**使用场景**: 对接企业 PBX 系统、[RustPBX](https://github.com/restsend/rustpbx)、FreeSWITCH、Asterisk 等传统电话网络。
#### 配置要点
```toml
# SIP 服务配置
addr = "0.0.0.0"
udp_port = 25060
# 如果在 NAT 后面,配置外部 IP
external_ip = "1.2.3.4"
# RTP 端口范围
rtp_start_port = 12000
rtp_end_port = 42000
```
#### 发起 SIP 呼叫
通过 WebSocket 连接到 `/call/sip` 端点:
```javascript
const ws = new WebSocket('ws://localhost:8080/call/sip?id=session456');
ws.onopen = () => {
// 发起 SIP 呼叫
ws.send(JSON.stringify({
command: "invite",
option: {
caller: "sip:agent@active-call.com",
callee: "sip:1001@pbx.example.com:5060",
codec: "pcmu", // 或 "pcma", "g722"
playbook: "customer_service.md",
asr: {
provider: "openai",
model: "whisper-1",
language: "zh-CN"
},
tts: {
provider: "openai",
model: "tts-1",
voice: "alloy"
}
}
}));
};
// 处理事件
ws.onmessage = (event) => {
const msg = JSON.parse(event.data);
console.log('Event:', msg.event);
if (msg.event === "answer") {
console.log('Call answered');
} else if (msg.event === "transcript") {
console.log('User said:', msg.text);
} else if (msg.event === "end") {
console.log('Call ended');
}
};
```
#### 与 PBX 系统集成示例
**RustPBX 拨号计划配置**:
```yaml
# RustPBX dialplan.yml
rules:
- match: "^9999$"
actions:
- bridge: "sip:agent@active-call-server:13050"
```
**FreeSWITCH 拨号计划配置**:
```xml
<extension name="call_ai_agent">
<condition field="destination_number" expression="^9999$">
<action application="bridge" data="sofia/external/agent@active-call-server:13050"/>
</action>
</extension>
```
#### 优势
- 对接传统电话网络
- 支持标准 SIP 协议
- 兼容各种 PBX 系统
- 支持 G.711、G.722 等电话音频编码
---
### 场景3: WebSocket 呼叫(自定义应用)
**使用场景**: 需要完全控制音频流的自定义应用,或者不希望使用 WebRTC/SIP 的场景。
#### 配置要点
```toml
# 基础 HTTP 配置即可
http_addr = "0.0.0.0:8080"
```
#### 发起 WebSocket 呼叫
通过 WebSocket 连接到 `/call` 端点:
```javascript
const ws = new WebSocket('ws://localhost:8080/call?id=session789');
ws.onopen = () => {
// 开始呼叫(不需要 SDP 协商)
ws.send(JSON.stringify({
command: "start",
option: {
codec: "pcm", // 或 "pcma", "pcmu", "g722"
sampleRate: 16000,
playbook: "assistant.md",
vad: {
type: "silero",
samplerate: 16000,
speechPadding: 300,
silencePadding: 500
}
}
}));
};
// 发送音频数据
function sendAudio(audioData) {
// audioData 是 PCM16 格式的音频数据(ArrayBuffer)
ws.send(audioData);
}
// 接收音频和事件
ws.onmessage = (event) => {
playAudio(event.data);
} else {
// JSON 事件
const msg = JSON.parse(event.data);
handleEvent(msg);
}
};
```
#### 音频格式
WebSocket 呼叫支持以下音频格式:
- **PCM**: 16-bit signed, little-endian
- **PCMA**: G.711 A-law
- **PCMU**: G.711 μ-law
- **G722**: G.722 宽带编码
#### 优势
- 最简单的集成方式
- 完全控制音频流
- 低开销,无 RTP/RTCP 协议
- 适合内部系统集成
---
### 场景4: SIP 呼入(注册到PBX)
**使用场景**: Active Call 作为 SIP 终端注册到 [RustPBX](https://github.com/restsend/rustpbx)、FreeSWITCH、Asterisk 等 PBX,接听来电。
#### 配置 SIP 注册
```toml
# SIP 服务配置 (使用基础配置中的 addr 和 udp_port)
addr = "0.0.0.0"
udp_port = 25060
# SIP 注册账号(可配置多个)
[[register_users]]
server = "pbx.example.com:5060"
username = "1001"
disabled = false
[register_users.credential]
username = "1001"
password = "secret123"
realm = "pbx.example.com"
[[register_users]]
server = "pbx.example.com:5060"
username = "1002"
disabled = false
[register_users.credential]
username = "1002"
password = "secret456"
realm = "pbx.example.com"
```
#### 配置呼入处理
使用 Playbook 处理器自动路由不同的来电:
```toml
[handler]
type = "playbook"
default = "default.md"
# 根据被叫号码路由
[[handler.rules]]
callee = "^sip:1001@.*"
playbook = "tech_support.md"
[[handler.rules]]
callee = "^sip:1002@.*"
playbook = "sales.md"
# 根据来电号码路由
[[handler.rules]]
caller = "^sip:vip.*"
playbook = "vip_service.md"
```
#### PBX 系统配置示例
**RustPBX 配置**:
```yaml
# RustPBX users.yml
users:
- username: "1001"
password: "secret123"
domain: "pbx.example.com"
enabled: true
```
**FreeSWITCH 配置**:
在 FreeSWITCH 中创建用户:
```xml
<!-- conf/directory/default/1001.xml -->
<include>
<user id="1001">
<params>
<param name="password" value="secret123"/>
</params>
</user>
</include>
```
#### 优势
- 作为标准 SIP 终端接入
- 可以接收来自 PBX 的转接
- 支持多账号同时注册
- 灵活的呼入路由规则
---
## 完整配置示例
### 示例1: 纯 WebRTC 场景
```toml
addr = "0.0.0.0"
http_addr = "0.0.0.0:8080"
log_level = "info"
media_cache_path = "./config/mediacache"
[[ice_servers]]
urls = ["stun:stun.l.google.com:19302"]
[[ice_servers]]
urls = ["turn:turn.example.com:3478"]
username = "user"
credential = "pass"
[recording]
enabled = true
auto_start = true
[callrecord]
type = "local"
root = "./config/cdr"
```
### 示例2: SIP + WebRTC 混合场景
```toml
addr = "0.0.0.0"
http_addr = "0.0.0.0:8080"
udp_port = 25060
log_level = "info"
external_ip = "203.0.113.1"
media_cache_path = "./config/mediacache"
rtp_start_port = 12000
rtp_end_port = 42000
[[ice_servers]]
urls = ["stun:stun.l.google.com:19302"]
[handler]
type = "playbook"
default = "default.md"
[[handler.rules]]
callee = "^sip:support@.*"
playbook = "support.md"
[recording]
enabled = true
auto_start = true
[callrecord]
type = "local"
root = "./config/cdr"
```
### 示例3: 企业 PBX 集成场景
```toml
addr = "0.0.0.0"
http_addr = "0.0.0.0:8080"
udp_port = 25060
log_level = "info"
external_ip = "203.0.113.1"
media_cache_path = "./config/mediacache"
# SIP 账号注册
[[register_users]]
server = "pbx.company.com:5060"
username = "ai-agent-1"
disabled = false
[register_users.credential]
username = "ai-agent-1"
password = "ComplexPassword123"
realm = "pbx.company.com"
# Webhook 处理器(由外部系统决定路由)
[handler]
type = "webhook"
url = "http://crm.company.com:8090/call-routing"
method = "POST"
[recording]
enabled = true
auto_start = true
[callrecord]
type = "local"
root = "/var/recordings"
```
---
## CLI 参数
除了配置文件,也可以通过命令行参数快速启动:
```bash
# 基础使用
./active-call --conf active-call.toml
# 覆盖 HTTP 地址
./active-call --conf active-call.toml --http 0.0.0.0:9090
# 覆盖 SIP 地址
./active-call --conf active-call.toml --sip 0.0.0.0:13050
# 快速设置 Webhook 处理器
./active-call --handler https://api.example.com/webhook
# 快速设置 Playbook 处理器
./active-call --handler default.md
# 发起 SIP 呼出
./active-call --call sip:1001@127.0.0.1 --handler greeting.md
# 设置外部 IP 和支持的编码
./active-call --external-ip 1.2.3.4 --codecs pcmu,pcma,opus
# 组合使用
./active-call --conf active-call.toml \
--http 0.0.0.0:8080 \
--sip 0.0.0.0:13050 \
--handler https://api.example.com/webhook \
--external-ip 1.2.3.4 \
--codecs pcmu,pcma,opus
```
---
## 参考文档
- [API 文档](./api.md) - WebSocket API 详细说明
- [Playbook 教程](./playbook_tutorial.zh.md) - Playbook 编写指南
- [架构设计](./a%20decoupled%20architecture%20for%20AI%20Voice%20Agent%20zh.md) - 系统架构说明
- [WebRTC 与 SIP 互通](./how%20webrtc%20work%20with%20sip(zh).md) - 技术实现细节
---
## 常见问题
### Q: 如何选择使用哪种呼叫方式?
- **浏览器应用** → 使用 WebRTC (`/call/webrtc`)
- **对接电话网络** → 使用 SIP (`/call/sip`)
- **自定义应用/微信小程序** → 使用 WebSocket (`/call`)
- **接听电话来电** → 配置 SIP 注册和呼入处理器
### Q: 在 NAT 后面如何配置?
设置 `external_ip` 为公网 IP 地址,并在防火墙上开放相应端口:
- HTTP/WebSocket: 8080 (或自定义)
- SIP: 13050 (或自定义)
- RTP: 20000-30000 (或自定义范围)
### Q: 如何实现呼叫负载均衡?
在 Active Call 前面部署负载均衡器(如 Nginx、HAProxy),注意:
- WebSocket 连接需要支持 Upgrade
- SIP 和 RTP 是 UDP 协议,需要特殊处理
- 建议使用源 IP Hash 保持会话粘性
### Q: 支持哪些音频编码?
- **WebRTC**: PCM, Opus, PCMA, PCMU, G722
- **SIP**: PCM, PCMA, PCMU, G722
- **WebSocket**: PCM, PCMA, PCMU, G722
### Q: 如何调试配置问题?
1. 设置 `log_level = "debug"` 获取详细日志
2. 使用 `log_file` 将日志输出到文件
3. 检查防火墙和网络配置
4. 使用 SIP 调试工具(如 sngrep)查看 SIP 信令