Expand description
A getting-started tutorial for rust_xlsxwriter.
§Introduction
The rust_xlsxwriter library is a Rust library for writing Excel files in
the xlsx format.
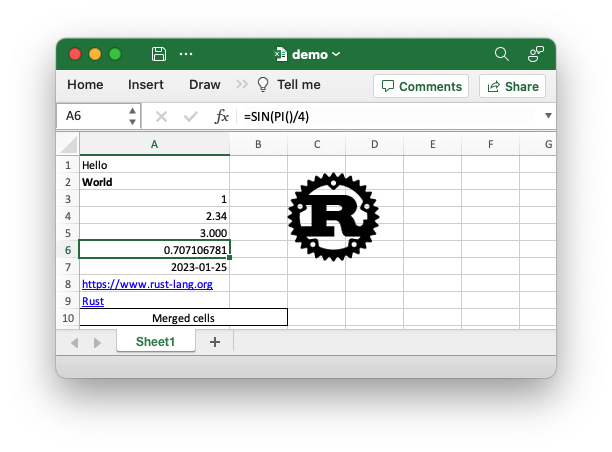
It can be used to write text, numbers, dates and formulas to multiple worksheets in a new Excel 2007+ xlsx file. It has a focus on performance and on fidelity with the file format created by Excel.
This document is a tutorial on getting started with rust_xlsxwriter and using
it to write Excel xlsx files.
§Getting started
To use rust_xlsxwriter in an application or another library, you
will need to add it as a dependency to the Cargo.toml file of your project.
To demonstrate the steps required, we will start with a small sample application.
§Create a sample project
Create a new Rust command-line application as follows:
$ cargo new hello-xlsxChange to the new hello-xlsx directory:
$ cd hello-xlsxThe directory structure will look like the following:
hello-xlsx/
├── Cargo.toml
└── src
└── main.rs§Add rust_xlsxwriter to Cargo.toml
Add the rust_xlsxwriter dependency to the project’s Cargo.toml file:
$ cargo add rust_xlsxwriter§Modify main.rs
Modify the src/main.rs file so it looks like this:
// This code is available in examples/app_hello_world.rs
use rust_xlsxwriter::{Workbook, XlsxError};

fn main() -> Result<(), XlsxError> {
    // Create a new Excel file object.
    let mut workbook = Workbook::new();

    // Add a worksheet to the workbook.
    let worksheet = workbook.add_worksheet();

    // Write a string to cell (0, 0) = A1.
    worksheet.write(0, 0, "Hello")?;

    // Write a number to cell (1, 0) = A2.
    worksheet.write(1, 0, 12345)?;

    // Save the file to disk.
    workbook.save("hello.xlsx")?;

    Ok(())
}§Run the application
Run the application as follows:
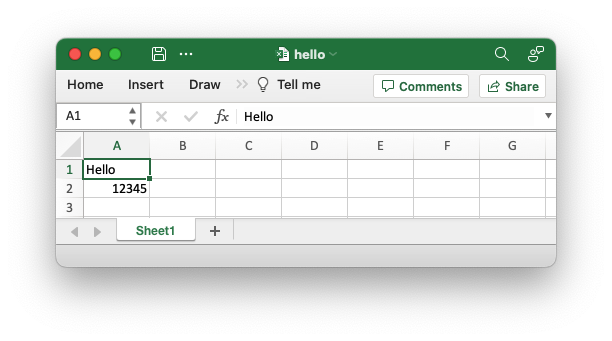
$ cargo runThis will create an output file called hello.xlsx, which should look something
like this:
Once you have the “hello world” application working, you can move on to a slightly more realistic tutorial example.
§Tutorial
To look at some of the basic but more useful features of the
rust_xlsxwriter library, we will create an application to summarize some
monthly expenses into a spreadsheet.
The tutorial presents a direct approach so as not to confuse the reader with information that isn’t initially relevant. If there is more advanced information that might be interesting at a later stage, it will be highlighted as “Extra information”.
§Tutorial Part 1: Adding data to a worksheet
To add some sample expense data to a worksheet, we could start with a simple program like the following:
// This code is available in examples/app_tutorial1.rs
use rust_xlsxwriter::{Formula, Workbook, XlsxError};
fn main() -> Result<(), XlsxError> {
// Some sample data we want to write to a spreadsheet.
let expenses = vec![
("Rent", 2000),
("Gas", 200),
("Food", 500),
("Gym", 100),
];
// Create a new Excel file object.
let mut workbook = Workbook::new();
// Add a worksheet to the workbook.
let worksheet = workbook.add_worksheet();
// Iterate over the data and write it out row by row.
let mut row = 0;
for expense in &expenses {
worksheet.write(row, 0, expense.0)?;
worksheet.write(row, 1, expense.1)?;
row += 1;
}
// Write a total using a formula.
worksheet.write(row, 0, "Total")?;
worksheet.write(row, 1, Formula::new("=SUM(B1:B4)"))?;
// Save the file to disk.
workbook.save("tutorial1.xlsx")?;
Ok(())
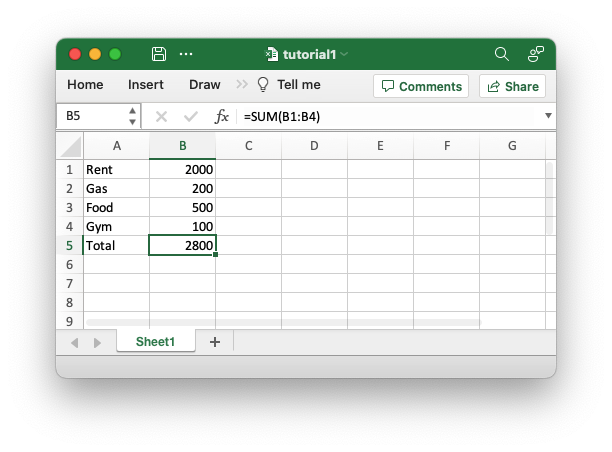
}If we run this program, we should get a spreadsheet that looks like this:
This is a simple program, but it demonstrates some of the steps that would apply
to any rust_xlsxwriter program.
The first step is to create a new workbook object using the
Workbook constructor
Workbook::new():
let mut workbook = Workbook::new();Note, rust_xlsxwriter can only create new files. It cannot read or modify
existing files.
The workbook object is then used to add a new worksheet via the
Workbook::add_worksheet() method:
let worksheet = workbook.add_worksheet();The worksheet will have a standard Excel name, in this case “Sheet1”. You can
specify the worksheet name using the
Worksheet::set_name() method.
We then iterate over the data and use the
Worksheet::write() method which converts common Rust
types to the equivalent Excel types and writes them to the specified row, col
location in the worksheet:
    for expense in &expenses {
        worksheet.write(row, 0, expense.0)?;
        worksheet.write(row, 1, expense.1)?;
        row += 1;
    }
Extra information:
There are other type-specific write methods such as
Worksheet::write_string()andWorksheet::write_number(). However, these aren’t generally required, and thanks to Rust’s monomorphization, the performance of the genericwrite()method is just as fast.There are also worksheet methods for writing arrays of data or arrays of arrays of data that can be useful in cases where the data to be added is in a vector format:
Throughout rust_xlsxwriter, rows and columns are zero-indexed. So the first
cell in a worksheet (0, 0) is equivalent to the Excel notation of A1.
To calculate the total of the items in the second column, we add a
Formula:
worksheet.write(row, 1, Formula::new("=SUM(B1:B4)"))?;Finally, we save and close the Excel file via the
Workbook::save() method which will generate the
spreadsheet shown in the image above.:
workbook.save("tutorial1.xlsx")?;Extra information:
The
Workbook::save()method takes astd::pathargument, which can be aPath,PathBuf, or a filename string. It is also possible to save to a byte vector usingWorkbook::save_to_buffer().
§Tutorial Part 2: Adding some formatting
The previous example converted the required data into an Excel file, but it looked a little bare. To make the information clearer, we can add some simple formatting, like this:
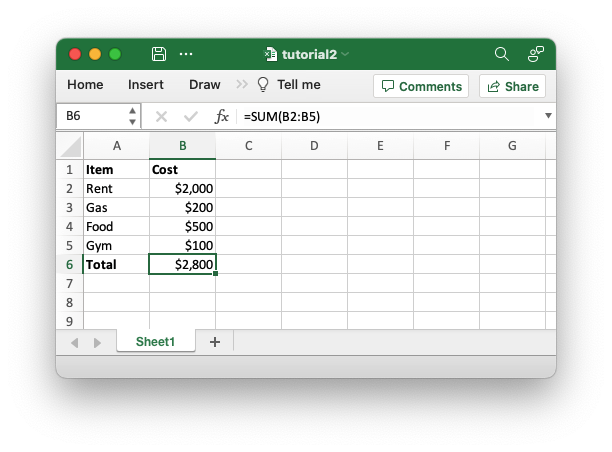
The differences here are that we have added “Item” and “Cost” column headers in a bold font, we have formatted the currency in the second column, and we have made the “Total” string bold.
To do this programmatically, we can extend our code as follows:
// This code is available in examples/app_tutorial2.rs
use rust_xlsxwriter::{Format, Formula, Workbook, XlsxError};

fn main() -> Result<(), XlsxError> {
    // Some sample data we want to write to a spreadsheet.
    let expenses = vec![
        ("Rent", 2000),
        ("Gas", 200),
        ("Food", 500),
        ("Gym", 100),
    ];

    // Create a new Excel file object.
    let mut workbook = Workbook::new();

    // Add a bold format to use to highlight cells.
    let bold = Format::new().set_bold();

    // Add a number format for cells with money values.
    let money_format = Format::new().set_num_format("$#,##0");

    // Add a worksheet to the workbook.
    let worksheet = workbook.add_worksheet();

    // Write some column headers.
    worksheet.write_with_format(0, 0, "Item", &bold)?;
    worksheet.write_with_format(0, 1, "Cost", &bold)?;

    // Iterate over the data and write it out row by row.
    let mut row = 1;
    for expense in &expenses {
        worksheet.write(row, 0, expense.0)?;
        worksheet.write_with_format(row, 1, expense.1, &money_format)?;
        row += 1;
    }

    // Write a total using a formula.
    worksheet.write_with_format(row, 0, "Total", &bold)?;
    worksheet.write_with_format(row, 1, Formula::new("=SUM(B2:B5)"), &money_format)?;

    // Save the file to disk.
    workbook.save("tutorial2.xlsx")?;

    Ok(())
}
The main difference between this and the previous program is that we have added
two Format objects that we can use to format cells in the
spreadsheet.
Format objects represent all the formatting properties that can be applied
to a cell in Excel, such as fonts, number formatting, colors, and borders. This is
explained in more detail in the Format struct documentation.
For now, we will avoid getting into the details of Format and just use a
limited amount of its functionality to add some simple formatting:
    // Add a bold format to use to highlight cells.
    let bold = Format::new().set_bold();

    // Add a number format for cells with money values.
    let money_format = Format::new().set_num_format("$#,##0");
We can use these formats with the
Worksheet::write_with_format() method
which writes data and formatting together, like these examples from the code:
    worksheet.write_with_format(0, 0, "Item", &bold)?;

    worksheet.write_with_format(row, 1, expense.1, &money_format)?;

worksheet.write_with_format(row, 1, Formula::new("=SUM(B2:B5)"), &money_format)?;§Tutorial Part 3: Adding dates and more formatting
Let’s extend the application a little bit more to add some dates to the data:
    let expenses = [
        ("Rent", 2000, "2022-09-01"),
        ("Gas", 200, "2022-09-05"),
        ("Food", 500, "2022-09-21"),
        ("Gym", 100, "2022-09-28"),
    ];
The corresponding spreadsheet will look like this:
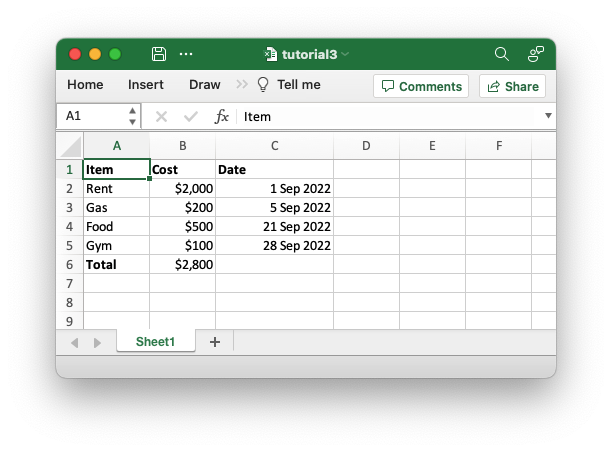
The differences here are that we have added a “Date” column with formatting and made that column a little wider to accommodate the dates.
To do this, we can extend our program as follows:
// This code is available in examples/app_tutorial3.rs
use rust_xlsxwriter::{ExcelDateTime, Format, Formula, Workbook, XlsxError};

fn main() -> Result<(), XlsxError> {
    // Some sample data we want to write to a spreadsheet.
    let expenses = vec![
        ("Rent", 2000, "2022-09-01"),
        ("Gas", 200, "2022-09-05"),
        ("Food", 500, "2022-09-21"),
        ("Gym", 100, "2022-09-28"),
    ];

    // Create a new Excel file object.
    let mut workbook = Workbook::new();

    // Add a bold format to use to highlight cells.
    let bold = Format::new().set_bold();

    // Add a number format for cells with money values.
    let money_format = Format::new().set_num_format("$#,##0");

    // Add a number format for cells with dates.
    let date_format = Format::new().set_num_format("d mmm yyyy");

    // Add a worksheet to the workbook.
    let worksheet = workbook.add_worksheet();

    // Write some column headers.
    worksheet.write_with_format(0, 0, "Item", &bold)?;
    worksheet.write_with_format(0, 1, "Cost", &bold)?;
    worksheet.write_with_format(0, 2, "Date", &bold)?;

    // Adjust the date column width for clarity.
    worksheet.set_column_width(2, 15)?;

    // Iterate over the data and write it out row by row.
    let mut row = 1;
    for expense in &expenses {
        worksheet.write(row, 0, expense.0)?;
        worksheet.write_with_format(row, 1, expense.1, &money_format)?;

        let date = ExcelDateTime::parse_from_str(expense.2)?;
        worksheet.write_with_format(row, 2, &date, &date_format)?;

        row += 1;
    }

    // Write a total using a formula.
    worksheet.write_with_format(row, 0, "Total", &bold)?;
    worksheet.write_with_format(row, 1, Formula::new("=SUM(B2:B5)"), &money_format)?;

    // Save the file to disk.
    workbook.save("tutorial3.xlsx")?;

    Ok(())
}
Dates and times in Excel are floating point numbers that have a format applied
to display them in the desired way. To handle dates and times with
rust_xlsxwriter, we create them using a ExcelDateTime
instance and format them with an Excel number format.
Extra information:
If you enable the
chronofeature inrust_xlsxwriter, you can also usechrono::NaiveDateTime,chrono::NaiveDateorchrono::NaiveTimeinstances.
In the example above, we create the ExcelDateTime instance from the date
strings in our input data and then add a number format it so that it appears
correctly in Excel:
        let date = ExcelDateTime::parse_from_str(expense.2)?;
        worksheet.write_with_format(row, 2, &date, &date_format)?;
Another addition to our program is to make the “Date” column wider for
clarity using the
Worksheet::set_column_width() method.
worksheet.set_column_width(2, 15)?;§Tutorial Part 4: Adding a chart
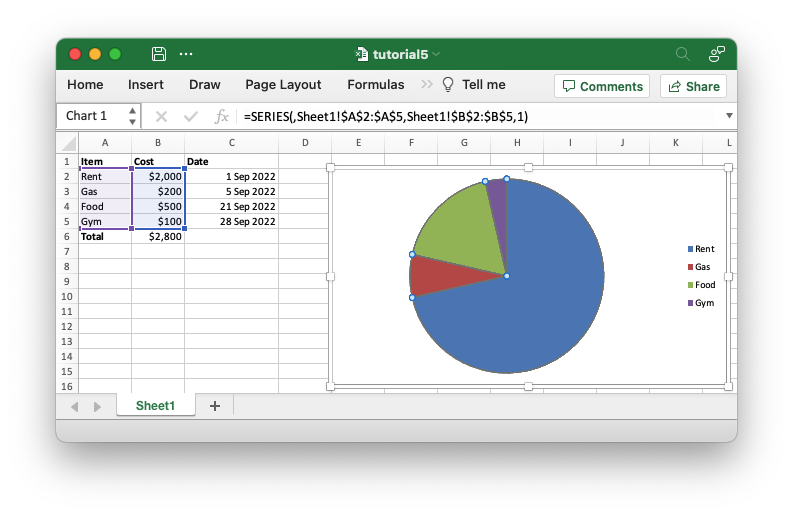
To extend our example a little further, let’s add a Pie chart to show the relative sizes of the outgoing expenses to get a spreadsheet that will look like this:

We use the Chart struct to represent the chart.
The Chart struct has a lot of configuration options and
sub-structs to replicate Excel’s chart features, but as an initial demonstration,
we will just add the data series to which the chart refers. Here is the updated
code with the chart addition at the end.
// This code is available in examples/app_tutorial4.rs
use rust_xlsxwriter::{Chart, ExcelDateTime, Format, Formula, Workbook, XlsxError};

fn main() -> Result<(), XlsxError> {
    // Some sample data we want to write to a spreadsheet.
    let expenses = vec![
        ("Rent", 2000, "2022-09-01"),
        ("Gas", 200, "2022-09-05"),
        ("Food", 500, "2022-09-21"),
        ("Gym", 100, "2022-09-28"),
    ];

    // Create a new Excel file object.
    let mut workbook = Workbook::new();

    // Add a bold format to use to highlight cells.
    let bold = Format::new().set_bold();

    // Add a number format for cells with money values.
    let money_format = Format::new().set_num_format("$#,##0");

    // Add a number format for cells with dates.
    let date_format = Format::new().set_num_format("d mmm yyyy");

    // Add a worksheet to the workbook.
    let worksheet = workbook.add_worksheet();

    // Write some column headers.
    worksheet.write_with_format(0, 0, "Item", &bold)?;
    worksheet.write_with_format(0, 1, "Cost", &bold)?;
    worksheet.write_with_format(0, 2, "Date", &bold)?;

    // Adjust the date column width for clarity.
    worksheet.set_column_width(2, 15)?;

    // Iterate over the data and write it out row by row.
    let mut row = 1;
    for expense in &expenses {
        worksheet.write(row, 0, expense.0)?;
        worksheet.write_with_format(row, 1, expense.1, &money_format)?;

        let date = ExcelDateTime::parse_from_str(expense.2)?;
        worksheet.write_with_format(row, 2, &date, &date_format)?;

        row += 1;
    }

    // Write a total using a formula.
    worksheet.write_with_format(row, 0, "Total", &bold)?;
    worksheet.write_with_format(row, 1, Formula::new("=SUM(B2:B5)"), &money_format)?;

    // Add a chart to display the expenses.
    let mut chart = Chart::new_pie();

    // Configure the data series for the chart.
    chart
        .add_series()
        .set_categories("Sheet1!$A$2:$A$5")
        .set_values("Sheet1!$B$2:$B$5");

    // Add the chart to the worksheet.
    worksheet.insert_chart(1, 4, &chart)?;

    // Save the file to disk.
    workbook.save("tutorial4.xlsx")?;

    Ok(())
}
See the documentation for Chart for more information.
§Tutorial Part 5: Making the code more programmatic
The previous example worked as expected, but it contained some hard-coded cell
ranges like set_values("Sheet1!$B$2:$B$5") and Formula::new("=SUM(B2:B5)").
If our example changed to have a different number of data items, then we would
have to manually change the code to adjust for the new ranges.
Fortunately, these hard-coded values are only used for the sake of a tutorial, and
rust_xlsxwriter provides APIs to handle these more programmatically.
Let’s start by looking at the chart ranges:
    chart
        .add_series()
        .set_categories("Sheet1!$A$2:$A$5")
        .set_values("Sheet1!$B$2:$B$5");
In general, rust_xlsxwriter always provides numeric APIs for any ranges in
Excel, but when it makes ergonomic sense, it also provides secondary string
based APIs. The previous example uses one of these secondary string based APIs
for demonstration purposes, but for real applications, you would set the chart
ranges using 5-tuple values like this:
    chart
        .add_series()
        .set_categories(("Sheet1", first_row, item_col, last_row, item_col))
        .set_values(("Sheet1", first_row, cost_col, last_row, cost_col));
Where the range values are set or calculated in the code with something like the following:
    let first_row = 1;
    let last_row = first_row + (expenses.len() as u32) - 1;
    let item_col = 0;
    let cost_col = 1;
This allows the range to change dynamically if we add new elements to our data
vector and ensures that the worksheet name is quoted properly (when
required).
The other section of the code that had a hard-coded string is the formula
"=SUM(B2:B5)". There isn’t a single API change that can be applied to ranges
in formulas, but rust_xlsxwriter provides several utility functions that can
convert numbers to string ranges. For example, the
cell_range() function, which takes zero-indexed
numbers and converts them to a string range like B2:B5:
    let range = cell_range(first_row, cost_col, last_row, cost_col);
    let formula = format!("=SUM({range})");
    worksheet.write_with_format(row, 1, Formula::new(formula), &money_format)?;
Extra information:
The
cell_range()function and other similar functions are detailed in theutilitydocumentation.
Adding these improvements, our application changes to the following:
// This code is available in examples/app_tutorial5.rs
use rust_xlsxwriter::{cell_range, Chart, ExcelDateTime, Format, Formula, Workbook, XlsxError};

fn main() -> Result<(), XlsxError> {
    // Some sample data we want to write to a spreadsheet.
    let expenses = vec![
        ("Rent", 2000, "2022-09-01"),
        ("Gas", 200, "2022-09-05"),
        ("Food", 500, "2022-09-21"),
        ("Gym", 100, "2022-09-28"),
    ];

    // Create a new Excel file object.
    let mut workbook = Workbook::new();

    // Add a bold format to use to highlight cells.
    let bold = Format::new().set_bold();

    // Add a number format for cells with money values.
    let money_format = Format::new().set_num_format("$#,##0");

    // Add a number format for cells with dates.
    let date_format = Format::new().set_num_format("d mmm yyyy");

    // Add a worksheet to the workbook.
    let worksheet = workbook.add_worksheet();

    // Write some column headers.
    worksheet.write_with_format(0, 0, "Item", &bold)?;
    worksheet.write_with_format(0, 1, "Cost", &bold)?;
    worksheet.write_with_format(0, 2, "Date", &bold)?;

    // Adjust the date column width for clarity.
    worksheet.set_column_width(2, 15)?;

    // Iterate over the data and write it out row by row.
    let mut row = 1;
    for expense in &expenses {
        worksheet.write(row, 0, expense.0)?;
        worksheet.write_with_format(row, 1, expense.1, &money_format)?;

        let date = ExcelDateTime::parse_from_str(expense.2)?;
        worksheet.write_with_format(row, 2, &date, &date_format)?;

        row += 1;
    }

    // For clarity, define some variables to use in the formula and chart ranges.
    // Row and column numbers are all zero-indexed.
    let first_row = 1; // Skip the header row.
    let last_row = first_row + (expenses.len() as u32) - 1;
    let item_col = 0;
    let cost_col = 1;

    // Write a total using a formula.
    worksheet.write_with_format(row, 0, "Total", &bold)?;

    let range = cell_range(first_row, cost_col, last_row, cost_col);
    let formula = format!("=SUM({range})");
    worksheet.write_with_format(row, 1, Formula::new(formula), &money_format)?;

    // Add a chart to display the expenses.
    let mut chart = Chart::new_pie();

    // Configure the data series for the chart.
    chart
        .add_series()
        .set_categories(("Sheet1", first_row, item_col, last_row, item_col))
        .set_values(("Sheet1", first_row, cost_col, last_row, cost_col));

    // Add the chart to the worksheet.
    worksheet.insert_chart(1, 4, &chart)?;

    // Save the file to disk.
    workbook.save("tutorial5.xlsx")?;

    Ok(())
}
This gives the same output as the previous version, but it is now future-proof for any changes to our input data:
§Next steps
Once you have completed this simple application, you can look through the following resources for more information:
-
The main API documentation for the library. Click on the
rust_xlsxwriterlogo at the top left to get back to the start. -
Cookbook to see other examples that you can use to get you started.
-
The
WorkbookAPIs and introduction. -
The
WorksheetAPIs and introduction. -
The
FormatAPIs and introduction. -
The
ChartAPIs and introduction. -
The
TableAPIs and introduction. -
User Guide: Some longer explanations of parts of
rust_xlsxwriterAPI.