Struct rust_xlsxwriter::Worksheet
source · pub struct Worksheet { /* private fields */ }Expand description
The Worksheet struct represents an Excel worksheet. It handles operations
such as writing data to cells or formatting the worksheet layout.
Examples
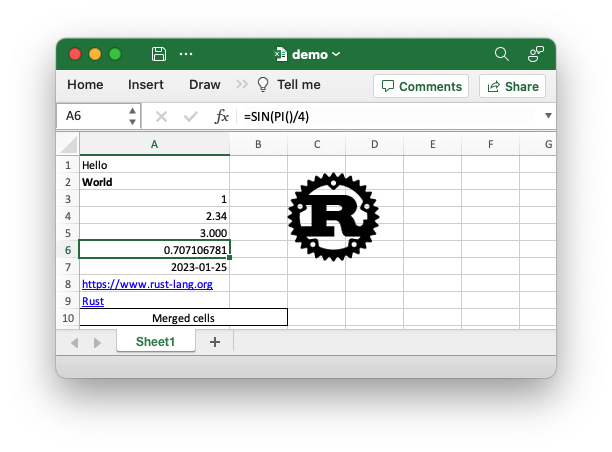
Sample code to generate the Excel file shown above.
use rust_xlsxwriter::*;
fn main() -> Result<(), XlsxError> {
// Create a new Excel file object.
let mut workbook = Workbook::new();
// Create some formats to use in the worksheet.
let bold_format = Format::new().set_bold();
let decimal_format = Format::new().set_num_format("0.000");
let date_format = Format::new().set_num_format("yyyy-mm-dd");
let merge_format = Format::new()
.set_border(FormatBorder::Thin)
.set_align(FormatAlign::Center);
// Add a worksheet to the workbook.
let worksheet = workbook.add_worksheet();
// Set the column width for clarity.
worksheet.set_column_width(0, 22)?;
// Write a string without formatting.
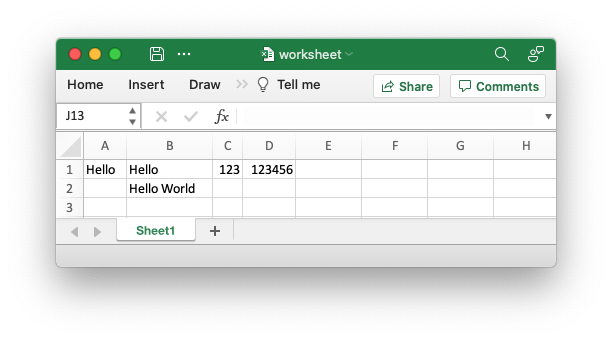
worksheet.write(0, 0, "Hello")?;
// Write a string with the bold format defined above.
worksheet.write_with_format(1, 0, "World", &bold_format)?;
// Write some numbers.
worksheet.write(2, 0, 1)?;
worksheet.write(3, 0, 2.34)?;
// Write a number with formatting.
worksheet.write_with_format(4, 0, 3.00, &decimal_format)?;
// Write a formula.
worksheet.write(5, 0, Formula::new("=SIN(PI()/4)"))?;
// Write a date.
let date = ExcelDateTime::from_ymd(2023, 1, 25)?;
worksheet.write_with_format(6, 0, &date, &date_format)?;
// Write some links.
worksheet.write(7, 0, Url::new("https://www.rust-lang.org"))?;
worksheet.write(8, 0, Url::new("https://www.rust-lang.org").set_text("Rust"))?;
// Write some merged cells.
worksheet.merge_range(9, 0, 9, 1, "Merged cells", &merge_format)?;
// Insert an image.
let image = Image::new("examples/rust_logo.png")?;
worksheet.insert_image(1, 2, &image)?;
// Save the file to disk.
workbook.save("demo.xlsx")?;
Ok(())
}Implementations§
source§impl Worksheet
impl Worksheet
sourcepub fn new() -> Worksheet
pub fn new() -> Worksheet
Create a new Worksheet object to represent an Excel worksheet.
The Worksheet::new() constructor is used to create a new Excel
worksheet object. This can be used to write data to a worksheet prior to
adding it to a workbook.
There are two way of creating a worksheet object with rust_xlsxwriter:
via the workbook.add_worksheet()
method and via the Worksheet::new() constructor. The first method
ties the worksheet to the workbook object that will write it
automatically when the file is saved, whereas the second method creates
a worksheet that is independent of a workbook. This has certain
advantages in keeping the worksheet free of the workbook borrow checking
until you wish to add it.
When working with an independent worksheet object you will need to add
it to a workbook using
workbook.push_worksheet in order
for it to be written to a file.
See also the rust_xlsxwriter documentation on Creating worksheets
and working with the borrow checker.
Examples
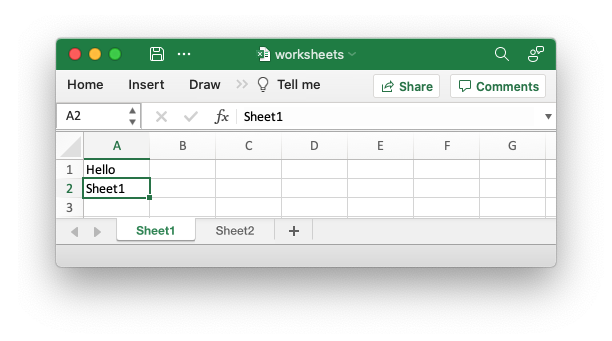
The following example demonstrates creating new worksheet objects and then adding them to a workbook.
    // Create a new workbook.
    let mut workbook = Workbook::new();

    // Create new worksheets.
    let mut worksheet1 = Worksheet::new();
    let mut worksheet2 = Worksheet::new();

    // Use the first workbook.
    worksheet1.write_string(0, 0, "Hello")?;
    worksheet1.write_string(1, 0, "Sheet1")?;

    // Use the second workbook.
    worksheet2.write_string(0, 0, "Hello")?;
    worksheet2.write_string(1, 0, "Sheet2")?;

    // Add the worksheets to the workbook.
    workbook.push_worksheet(worksheet1);
    workbook.push_worksheet(worksheet2);

    // Save the workbook.
    workbook.save("worksheets.xlsx")?;
Output file:
sourcepub fn set_name(
&mut self,
name: impl Into<String>
) -> Result<&mut Worksheet, XlsxError>
pub fn set_name( &mut self, name: impl Into<String> ) -> Result<&mut Worksheet, XlsxError>
Set the worksheet name.
Set the worksheet name. If no name is set the default Excel convention will be followed (Sheet1, Sheet2, etc.) in the order the worksheets are created.
Parameters
name- The worksheet name. It must follow the Excel rules, shown below.
Errors
XlsxError::SheetnameCannotBeBlank- Worksheet name cannot be blank.XlsxError::SheetnameLengthExceeded- Worksheet name exceeds Excel’s limit of 31 characters.XlsxError::SheetnameContainsInvalidCharacter- Worksheet name cannot contain invalid characters:[ ] : * ? / \XlsxError::SheetnameStartsOrEndsWithApostrophe- Worksheet name cannot start or end with an apostrophe.
Examples
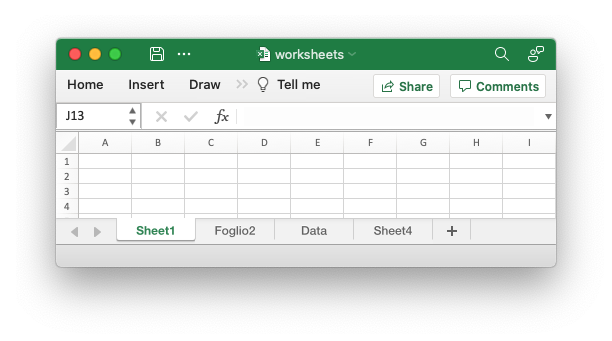
The following example demonstrates setting user defined worksheet names and the default values when a name isn’t set.
    let _worksheet1 = workbook.add_worksheet(); // Defaults to Sheet1
    let _worksheet2 = workbook.add_worksheet().set_name("Foglio2");
    let _worksheet3 = workbook.add_worksheet().set_name("Data");
    let _worksheet4 = workbook.add_worksheet(); // Defaults to Sheet4
Output file:
The worksheet name must be a valid Excel worksheet name, i.e:
- The name is less than 32 characters.
- The name isn’t blank.
- The name doesn’t contain any of the characters:
[ ] : * ? / \. - The name doesn’t start or end with an apostrophe.
- The name shouldn’t be “History” (case-insensitive) since that is reserved by Excel.
- It must not be a duplicate of another worksheet name used in the workbook.
The rules for worksheet names in Excel are explained in the Microsoft Office documentation.
sourcepub fn name(&self) -> String
pub fn name(&self) -> String
Get the worksheet name.
Get the worksheet name that was set automatically such as Sheet1,
Sheet2, etc., or that was set by the user using
set_name().
The worksheet name can be used to get a reference to a worksheet object
using the
workbook.worksheet_from_name()
method.
Examples
The following example demonstrates getting a worksheet name.
    // Try name() using a default sheet name.
    let worksheet = workbook.add_worksheet();
    assert_eq!("Sheet1", worksheet.name());

    // Try name() using a user defined sheet name.
    let worksheet = workbook.add_worksheet().set_name("Data")?;
    assert_eq!("Data", worksheet.name());
sourcepub fn write(
&mut self,
row: RowNum,
col: ColNum,
data: impl IntoExcelData
) -> Result<&mut Worksheet, XlsxError>
pub fn write( &mut self, row: RowNum, col: ColNum, data: impl IntoExcelData ) -> Result<&mut Worksheet, XlsxError>
Write generic data to a cell.
The write() method writes data that implements IntoExcelData to a
worksheet cell.
The types currently supported are:
- String types:
&str,String,&StringandCow<'_, str>. - Numbers that convert
Intof64. boolExcelDateTime.Formula.Url.
If the chrono feature is enabled you can use the following types:
- Dates:
"yyyy\\-mm\\-dd;@" - Times:
"hh:mm:ss;@" - Date and times:
"yyyy\\-mm\\-dd\\ hh:mm:ss"
Users can also use this method to write their own data types to Excel by
implementing the IntoExcelData trait.
Parameters
row- The zero indexed row number.col- The zero indexed column number.data- An type that implements theIntoExcelDatatrait.format- TheFormatproperty for the cell.
Errors
XlsxError::RowColumnLimitError- Row or column exceeds Excel’s worksheet limits.XlsxError::MaxStringLengthExceeded- String exceeds Excel’s limit of 32,767 characters.
sourcepub fn write_with_format<'a, T>(
&'a mut self,
row: RowNum,
col: ColNum,
data: T,
format: &'a Format
) -> Result<&mut Worksheet, XlsxError>where
T: IntoExcelData,
pub fn write_with_format<'a, T>( &'a mut self, row: RowNum, col: ColNum, data: T, format: &'a Format ) -> Result<&mut Worksheet, XlsxError>where T: IntoExcelData,
Write formatted generic data to a cell.
The write_with_format() method writes formatted data that implements
IntoExcelData to a worksheet cell.
The types currently supported are:
- String types:
&str,String,&StringandCow<'_, str>. - Numbers that convert
Intof64. boolExcelDateTime.Formula.Url.
If the chrono feature is enabled you can use the following types:
Users can also use this method to write their own data types to Excel by
implementing the IntoExcelData trait.
Parameters
row- The zero indexed row number.col- The zero indexed column number.data- An type that implements theIntoExcelDatatrait.format- TheFormatproperty for the cell.
Errors
XlsxError::RowColumnLimitError- Row or column exceeds Excel’s worksheet limits.XlsxError::MaxStringLengthExceeded- String exceeds Excel’s limit of 32,767 characters.
sourcepub fn write_row<I>(
&mut self,
row: RowNum,
col: ColNum,
data: I
) -> Result<&mut Worksheet, XlsxError>where
I: IntoIterator,
I::Item: IntoExcelData,
pub fn write_row<I>( &mut self, row: RowNum, col: ColNum, data: I ) -> Result<&mut Worksheet, XlsxError>where I: IntoIterator, I::Item: IntoExcelData,
Write an array like data structure as a row of data to a worksheet.
Write an array of data horizontally rightwards starting from the initial
row, col cell.
This methods works for arrays or array-like data structures that
implement IntoIterator and that contain a data type that implements
IntoExcelData.
See also worksheet.write_column() for a
similar function that works in an orthogonal direction.
Parameters
row- The zero indexed row number.col- The zero indexed column number.data- Arrays or array-like data structures that implementIntoIteratorand that contain a data type that implementsIntoExcelData.
Errors
XlsxError::RowColumnLimitError- Row or column exceeds Excel’s worksheet limits.XlsxError::MaxStringLengthExceeded- String exceeds Excel’s limit of 32,767 characters.
Examples
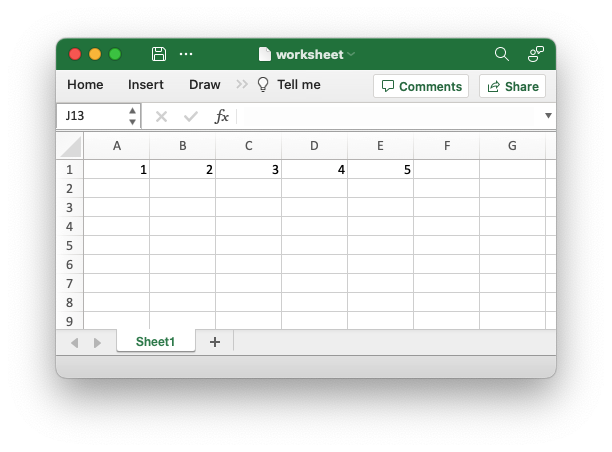
The following example demonstrates writing an array of data as a row to a worksheet.
    let worksheet = workbook.add_worksheet();

    // Some array data to write.
    let data = [1, 2, 3, 4, 5];

    // Write the array data as a row.
    worksheet.write_row(0, 0, data)?;
Output file:
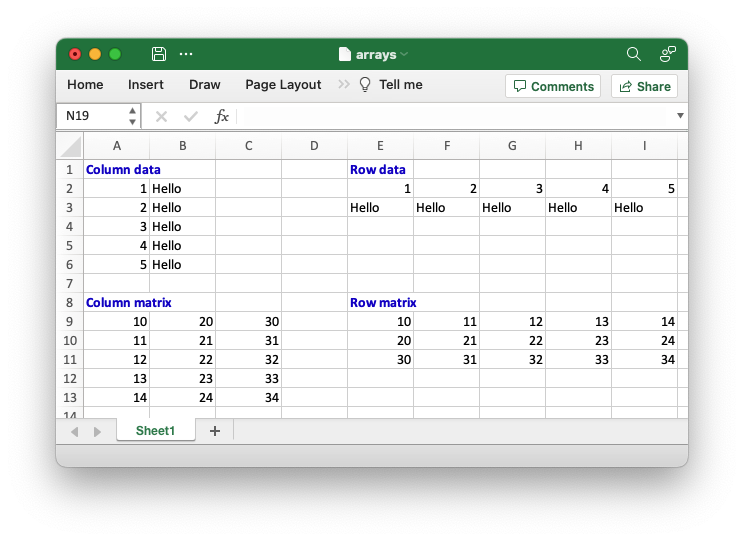
An example of writing arrays of data using the rust_xlsxwriter
library. Array in this context means Rust arrays or arrays like data
types that implement IntoIterator. The array must also contain data
types that implement rust_xlsxwriter’s IntoExcelData.
use rust_xlsxwriter::{Format, Workbook, XlsxError};

fn main() -> Result<(), XlsxError> {
    // Create a new Excel file object.
    let mut workbook = Workbook::new();

    // Add a format for the headings.
    let heading = Format::new().set_bold().set_font_color("#0000CC");

    // Add a worksheet to the workbook.
    let worksheet = workbook.add_worksheet();

    // Some array data to write.
    let numbers = [1, 2, 3, 4, 5];
    let words = ["Hello"; 5];
    let matrix = [
        [10, 11, 12, 13, 14],
        [20, 21, 22, 23, 24],
        [30, 31, 32, 33, 34],
    ];

    // Write the array data as columns.
    worksheet.write_with_format(0, 0, "Column data", &heading)?;
    worksheet.write_column(1, 0, numbers)?;
    worksheet.write_column(1, 1, words)?;

    // Write the array data as rows.
    worksheet.write_with_format(0, 4, "Row data", &heading)?;
    worksheet.write_row(1, 4, numbers)?;
    worksheet.write_row(2, 4, words)?;

    // Write the matrix data as an array or rows and as an array of columns.
    worksheet.write_with_format(7, 4, "Row matrix", &heading)?;
    worksheet.write_row_matrix(8, 4, matrix)?;

    worksheet.write_with_format(7, 0, "Column matrix", &heading)?;
    worksheet.write_column_matrix(8, 0, matrix)?;

    // Save the file to disk.
    workbook.save("arrays.xlsx")?;

    Ok(())
}
Output file:
sourcepub fn write_column<I>(
&mut self,
row: RowNum,
col: ColNum,
data: I
) -> Result<&mut Worksheet, XlsxError>where
I: IntoIterator,
I::Item: IntoExcelData,
pub fn write_column<I>( &mut self, row: RowNum, col: ColNum, data: I ) -> Result<&mut Worksheet, XlsxError>where I: IntoIterator, I::Item: IntoExcelData,
Write an array like data structure as a column of data to a worksheet.
Write an array of data vertically downwards starting from the initial
row, col cell.
This methods works for arrays or array-like data structures that
implement IntoIterator and that contain a data type that implements
IntoExcelData.
See also worksheet.write_row() for a similar
function that works in an orthogonal direction.
Errors
XlsxError::RowColumnLimitError- Row or column exceeds Excel’s worksheet limits.XlsxError::MaxStringLengthExceeded- String exceeds Excel’s limit of 32,767 characters.
Parameters
row- The zero indexed row number.col- The zero indexed column number.data- Arrays or array-like data structures that implementIntoIteratorand that contain a data type that implementsIntoExcelData.
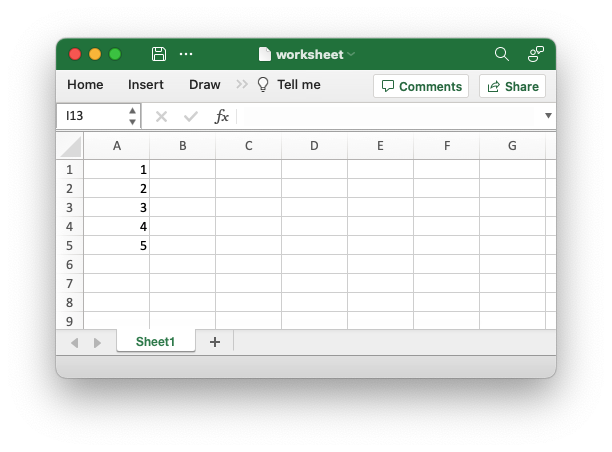
Examples
The following example demonstrates writing an array of data as a column to a worksheet.
    let worksheet = workbook.add_worksheet();

    // Some array data to write.
    let data = [1, 2, 3, 4, 5];

    // Write the array data as a column.
    worksheet.write_column(0, 0, data)?;
Output file:
sourcepub fn write_row_matrix<I, II>(
&mut self,
row: RowNum,
col: ColNum,
data: I
) -> Result<&mut Worksheet, XlsxError>where
I: IntoIterator,
I::Item: IntoIterator<Item = II>,
II: IntoExcelData,
pub fn write_row_matrix<I, II>( &mut self, row: RowNum, col: ColNum, data: I ) -> Result<&mut Worksheet, XlsxError>where I: IntoIterator, I::Item: IntoIterator<Item = II>, II: IntoExcelData,
Write an array of row arrays to a worksheet.
Write an array of row arrays vertically downwards starting from the
initial row, col cell.
This methods works for 2D arrays or array-like data structures that
implement IntoIterator and that contain a data type that implements
IntoExcelData.
See also
worksheet.write_column_matrix() for
a similar function that works in an orthogonal direction.
Errors
XlsxError::RowColumnLimitError- Row or column exceeds Excel’s worksheet limits.XlsxError::MaxStringLengthExceeded- String exceeds Excel’s limit of 32,767 characters.
Parameters
row- The zero indexed row number.col- The zero indexed column number.data- 2D arrays or array-like data structures that implementIntoIteratorand that contain a data type that implementsIntoExcelData.
Examples
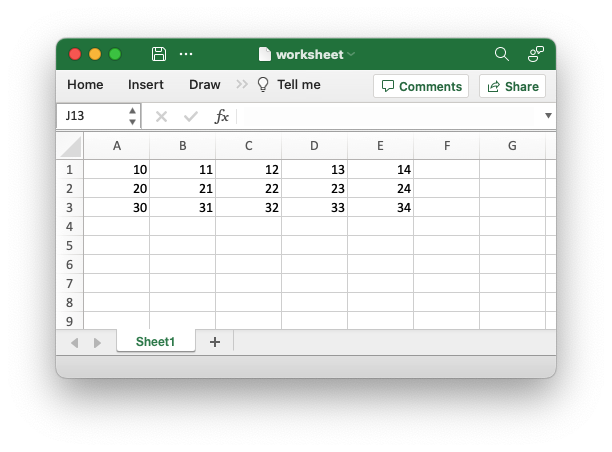
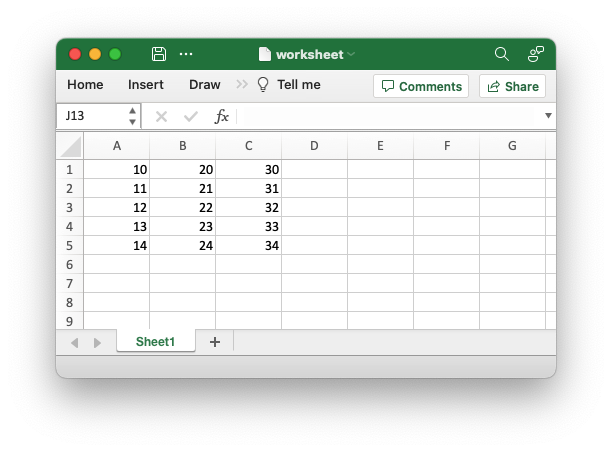
The following example demonstrates writing an array of row arrays to a worksheet.
    let worksheet = workbook.add_worksheet();

    // Some array data to write.
    let data = [
        [10, 11, 12, 13, 14],
        [20, 21, 22, 23, 24],
        [30, 31, 32, 33, 34],
    ];

    // Write the array data as a series of rows.
    worksheet.write_row_matrix(0, 0, data)?;
Output file:
sourcepub fn write_column_matrix<I, II>(
&mut self,
row: RowNum,
col: ColNum,
data: I
) -> Result<&mut Worksheet, XlsxError>where
I: IntoIterator,
I::Item: IntoIterator<Item = II>,
II: IntoExcelData,
pub fn write_column_matrix<I, II>( &mut self, row: RowNum, col: ColNum, data: I ) -> Result<&mut Worksheet, XlsxError>where I: IntoIterator, I::Item: IntoIterator<Item = II>, II: IntoExcelData,
Write an array of column arrays to a worksheet.
Write an array of column arrays horizontally rightwards starting from
the initial row, col cell.
This methods works for 2D arrays or array-like data structures that
implement IntoIterator and that contain a data type that implements
IntoExcelData.
See also worksheet.write_row_matrix()
for a similar function that works in an orthogonal direction.
Errors
XlsxError::RowColumnLimitError- Row or column exceeds Excel’s worksheet limits.XlsxError::MaxStringLengthExceeded- String exceeds Excel’s limit of 32,767 characters.
Parameters
row- The zero indexed row number.col- The zero indexed column number.data- 2D arrays or array-like data structures that implementIntoIteratorand that contain a data type that implementsIntoExcelData.
Examples
The following example demonstrates writing an array of column arrays to a worksheet.
    let worksheet = workbook.add_worksheet();

    // Some array data to write.
    let data = [
        [10, 11, 12, 13, 14],
        [20, 21, 22, 23, 24],
        [30, 31, 32, 33, 34],
    ];

    // Write the array data as a series of columns.
    worksheet.write_column_matrix(0, 0, data)?;
Output file:
sourcepub fn write_number(
&mut self,
row: RowNum,
col: ColNum,
number: impl Into<f64>
) -> Result<&mut Worksheet, XlsxError>
pub fn write_number( &mut self, row: RowNum, col: ColNum, number: impl Into<f64> ) -> Result<&mut Worksheet, XlsxError>
Write an unformatted number to a cell.
Write an unformatted number to a worksheet cell. To write a formatted
number see the
write_number_with_format()
method below.
All numerical values in Excel are stored as IEEE 754 Doubles which are
the equivalent of rust’s f64 type. This method will accept any rust
type that will convert Into a f64. These include i8, u8, i16, u16,
i32, u32 and f32 but not i64 or u64. IEEE 754 Doubles and f64 have
around 15 digits of precision. Anything beyond that cannot be stored as
a number by Excel without a loss of precision and may need to be stored
as a string instead.
Excel doesn’t have handling for NaN or INF floating point numbers. These will be stored as the strings “Nan”, “INF”, and “-INF” strings instead.
Parameters
row- The zero indexed row number.col- The zero indexed column number.number- The number to write to the cell.
Errors
XlsxError::RowColumnLimitError- Row or column exceeds Excel’s worksheet limits.
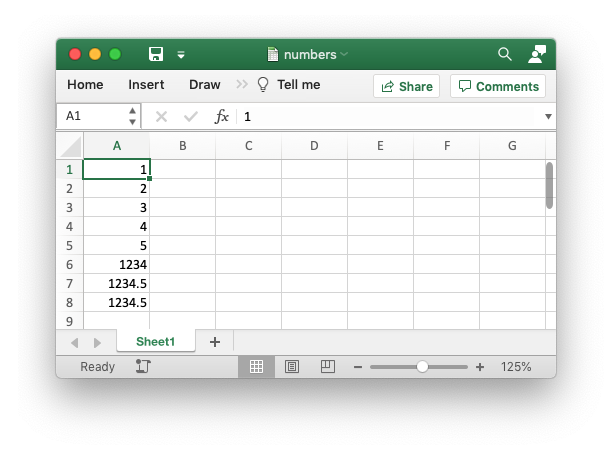
Examples
The following example demonstrates writing unformatted numbers to an
Excel worksheet. Any numeric type that will convert Into f64 can be
transferred to Excel.
    let mut workbook = Workbook::new();

    // Add a worksheet to the workbook.
    let worksheet = workbook.add_worksheet();

    // Write some different rust number types to a worksheet.
    // Note, u64 isn't supported by Excel.
    worksheet.write_number(0, 0, 1_u8)?;
    worksheet.write_number(1, 0, 2_i16)?;
    worksheet.write_number(2, 0, 3_u32)?;
    worksheet.write_number(3, 0, 4_f32)?;
    worksheet.write_number(4, 0, 5_f64)?;

    // Write some numbers with implicit types.
    worksheet.write_number(5, 0, 1234)?;
    worksheet.write_number(6, 0, 1234.5)?;

    // Note Excel normally ignores trailing decimal zeros
    // when the number is unformatted.
    worksheet.write_number(7, 0, 1234.50000)?;
Output file:
sourcepub fn write_number_with_format(
&mut self,
row: RowNum,
col: ColNum,
number: impl Into<f64>,
format: &Format
) -> Result<&mut Worksheet, XlsxError>
pub fn write_number_with_format( &mut self, row: RowNum, col: ColNum, number: impl Into<f64>, format: &Format ) -> Result<&mut Worksheet, XlsxError>
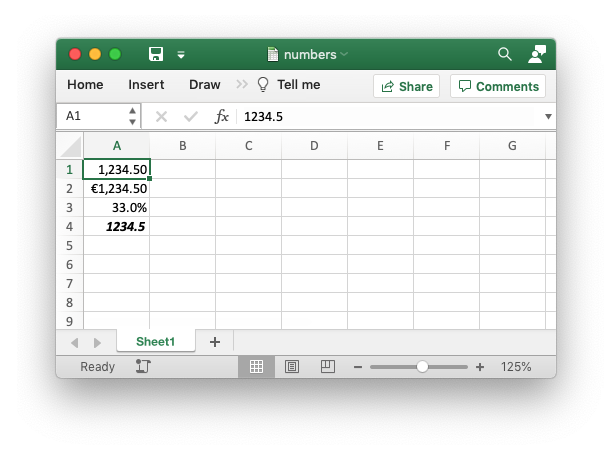
Write a formatted number to a worksheet cell.
Write a number with formatting to a worksheet cell. The format is set
via a Format struct which can control the numerical formatting of
the number, for example as a currency or a percentage value, or the
visual format, such as bold and italic text.
All numerical values in Excel are stored as IEEE 754 Doubles which are
the equivalent of rust’s f64 type. This method will accept any rust
type that will convert Into a f64. These include i8, u8, i16, u16,
i32, u32 and f32 but not i64 or u64. IEEE 754 Doubles and f64 have
around 15 digits of precision. Anything beyond that cannot be stored as
a number by Excel without a loss of precision and may need to be stored
as a string instead.
Excel doesn’t have handling for NaN or INF floating point numbers. These will be stored as the strings “Nan”, “INF”, and “-INF” strings instead.
Parameters
row- The zero indexed row number.col- The zero indexed column number.number- The number to write to the cell.format- TheFormatproperty for the cell.
Errors
XlsxError::RowColumnLimitError- Row or column exceeds Excel’s worksheet limits.
Examples
The following example demonstrates setting different formatting for numbers in an Excel worksheet.
let mut workbook = Workbook::new();
// Create some formats to use with the numbers below.
let number_format = Format::new().set_num_format("#,##0.00");
let currency_format = Format::new().set_num_format("€#,##0.00");
let percentage_format = Format::new().set_num_format("0.0%");
let bold_italic_format = Format::new().set_bold().set_italic();
// Add a worksheet to the workbook.
let worksheet = workbook.add_worksheet();
worksheet.write_number_with_format(0, 0, 1234.5, &number_format)?;
worksheet.write_number_with_format(1, 0, 1234.5, ¤cy_format)?;
worksheet.write_number_with_format(2, 0, 0.3300, &percentage_format)?;
worksheet.write_number_with_format(3, 0, 1234.5, &bold_italic_format)?;
Output file:
sourcepub fn write_string(
&mut self,
row: RowNum,
col: ColNum,
string: impl Into<String>
) -> Result<&mut Worksheet, XlsxError>
pub fn write_string( &mut self, row: RowNum, col: ColNum, string: impl Into<String> ) -> Result<&mut Worksheet, XlsxError>
Write an unformatted string to a worksheet cell.
Write an unformatted string to a worksheet cell. To write a formatted
string see the
write_string_with_format()
method below.
Excel only supports UTF-8 text in the xlsx file format. Any rust UTF-8 encoded string can be written with this method. The maximum string size supported by Excel is 32,767 characters.
Parameters
row- The zero indexed row number.col- The zero indexed column number.string- The string to write to the cell.
Errors
XlsxError::RowColumnLimitError- Row or column exceeds Excel’s worksheet limits.XlsxError::MaxStringLengthExceeded- String exceeds Excel’s limit of 32,767 characters.
Examples
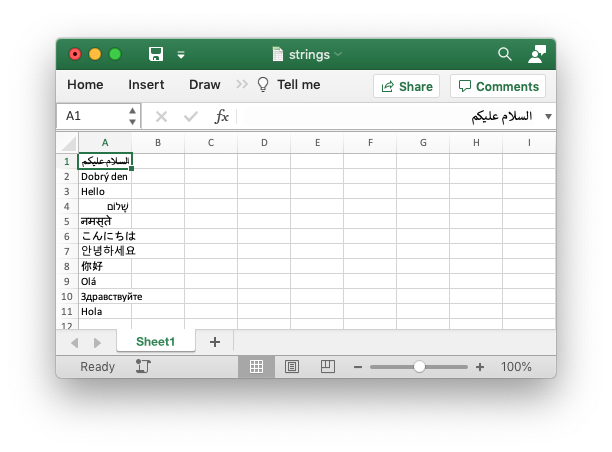
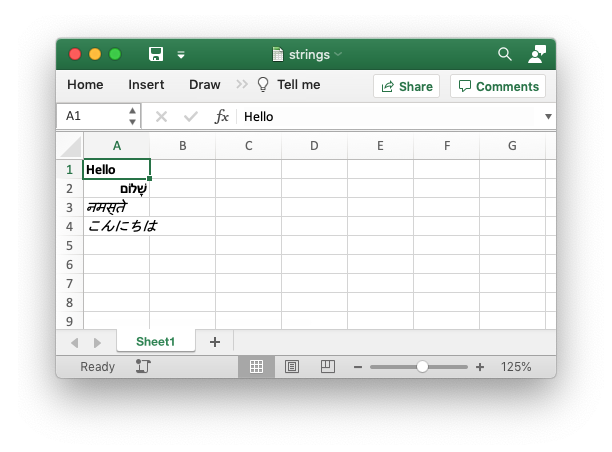
The following example demonstrates writing some strings to a worksheet. The UTF-8 strings are taken from the UTF-8 example in the Rust Programming Language book.
    // Write some strings to the worksheet.
    worksheet.write_string(0,  0, "السلام عليكم")?;
    worksheet.write_string(1,  0, "Dobrý den")?;
    worksheet.write_string(2,  0, "Hello")?;
    worksheet.write_string(3,  0, "שָׁלוֹם")?;
    worksheet.write_string(4,  0, "नमस्ते")?;
    worksheet.write_string(5,  0, "こんにちは")?;
    worksheet.write_string(6,  0, "안녕하세요")?;
    worksheet.write_string(7,  0, "你好")?;
    worksheet.write_string(8,  0, "Olá")?;
    worksheet.write_string(9,  0, "Здравствуйте")?;
    worksheet.write_string(10, 0, "Hola")?;
Output file:
sourcepub fn write_string_with_format(
&mut self,
row: RowNum,
col: ColNum,
string: impl Into<String>,
format: &Format
) -> Result<&mut Worksheet, XlsxError>
pub fn write_string_with_format( &mut self, row: RowNum, col: ColNum, string: impl Into<String>, format: &Format ) -> Result<&mut Worksheet, XlsxError>
Write a formatted string to a worksheet cell.
Write a string with formatting to a worksheet cell. The format is set
via a Format struct which can control the font or color or
properties such as bold and italic.
Excel only supports UTF-8 text in the xlsx file format. Any rust UTF-8 encoded string can be written with this method. The maximum string size supported by Excel is 32,767 characters.
Parameters
row- The zero indexed row number.col- The zero indexed column number.string- The string to write to the cell.format- TheFormatproperty for the cell.
Errors
XlsxError::RowColumnLimitError- Row or column exceeds Excel’s worksheet limits.XlsxError::MaxStringLengthExceeded- String exceeds Excel’s limit of 32,767 characters.
Examples
The following example demonstrates setting different formatting for numbers in an Excel worksheet.
    // Create a new Excel file object.
    let mut workbook = Workbook::new();

    // Create some formats to use in the worksheet.
    let bold_format = Format::new().set_bold();
    let italic_format = Format::new().set_italic();

    // Add a worksheet to the workbook.
    let worksheet = workbook.add_worksheet();

    // Write some strings with formatting.
    worksheet.write_string_with_format(0, 0, "Hello",     &bold_format)?;
    worksheet.write_string_with_format(1, 0, "שָׁלוֹם",      &bold_format)?;
    worksheet.write_string_with_format(2, 0, "नमस्ते",      &italic_format)?;
    worksheet.write_string_with_format(3, 0, "こんにちは", &italic_format)?;
Output file:
sourcepub fn write_rich_string(
&mut self,
row: RowNum,
col: ColNum,
rich_string: &[(&Format, &str)]
) -> Result<&mut Worksheet, XlsxError>
pub fn write_rich_string( &mut self, row: RowNum, col: ColNum, rich_string: &[(&Format, &str)] ) -> Result<&mut Worksheet, XlsxError>
Write a “rich” string with multiple formats to a worksheet cell.
The write_rich_string() method is used to write strings with
multiple font formats within the string. For example strings like “This
is bold and this is italic”. For strings with a single format you
can use the more common write_string_with_format()
method.
The basic rule is to break the string into pairs of Format and
str fragments. So if we look at the above string again:
- This is bold and this is italic
The would be broken down into 4 fragments:
     default: |This is |
     bold:    |bold|
     default: | and this is |
     italic:  |italic|
This should then be converted to an array of Format and str
tuples:
    let segments = [
       (&default, "This is "),
       (&red,     "red"),
       (&default, " and this is "),
       (&blue,    "blue"),
    ];
See the full example below.
For the default format segments you can use
Format::default().
Note, only the Font elements of the Format are used by Excel in rich
strings. For example it isn’t possible in Excel to highlight part of the
string with a yellow background. It is possible to have a yellow
background for the entire cell or to format other cell properties using
an additional Format object and the
write_rich_string_with_format() method, see below.
Parameters
row- The zero indexed row number.col- The zero indexed column number.rich_string- An array reference of(&Format, &str)tuples. See the Errors section below for the restrictions.
Errors
XlsxError::RowColumnLimitError- Row or column exceeds Excel’s worksheet limits.XlsxError::MaxStringLengthExceeded- String exceeds Excel’s limit of 32,767 characters.XlsxError::ParameterError- The following error cases will raise aParameterErrorerror:- If any of the str elements is empty. Excel doesn’t allow this.
- If there isn’t at least one
(&Format, &str)tuple element in therich_stringparameter array. Strictly speaking there should be at least 2 tuples to make a rich string, otherwise it is just a normal formatted string. However, Excel allows it.
Examples
The following example demonstrates writing a “rich” string with multiple formats.
    // Add some formats to use in the rich strings.
    let default = Format::default();
    let red = Format::new().set_font_color(Color::Red);
    let blue = Format::new().set_font_color(Color::Blue);

    // Write a Rich strings with multiple formats.
    let segments = [
        (&default, "This is "),
        (&red,     "red"),
        (&default, " and this is "),
        (&blue,    "blue"),
    ];
    worksheet.write_rich_string(0, 0, &segments)?;

    // It is possible, and idiomatic, to use slices as the string segments.
    let text = "This is blue and this is red";
    let segments = [
        (&default, &text[..8]),
        (&blue,    &text[8..12]),
        (&default, &text[12..25]),
        (&red,     &text[25..]),
    ];
    worksheet.write_rich_string(1, 0, &segments)?;
Output file:

sourcepub fn write_rich_string_with_format(
&mut self,
row: RowNum,
col: ColNum,
rich_string: &[(&Format, &str)],
format: &Format
) -> Result<&mut Worksheet, XlsxError>
pub fn write_rich_string_with_format( &mut self, row: RowNum, col: ColNum, rich_string: &[(&Format, &str)], format: &Format ) -> Result<&mut Worksheet, XlsxError>
Write a “rich” string with multiple formats to a worksheet cell, with an additional cell format.
The write_rich_string_with_format() method is used to write strings with multiple
font formats within the string. For example strings like “This is
bold and this is italic”. It also allows you to add an additional
Format to the cell so that you can, for example, center the text in
the cell.
The syntax for creating and using (&Format, &str) tuples to create the
rich string is shown above in
write_rich_string().
For strings with a single format you can use the more common
write_string_with_format() method.
Parameters
row- The zero indexed row number.col- The zero indexed column number.rich_string- An array reference of(&Format, &str)tuples. See the Errors section below for the restrictions.format- TheFormatproperty for the cell.
Errors
XlsxError::RowColumnLimitError- Row or column exceeds Excel’s worksheet limits.XlsxError::MaxStringLengthExceeded- String exceeds Excel’s limit of 32,767 characters.XlsxError::ParameterError- The following error cases will raise aParameterErrorerror:- If any of the str elements is empty. Excel doesn’t allow this.
- If there isn’t at least one
(&Format, &str)tuple element in therich_stringparameter array. Strictly speaking there should be at least 2 tuples to make a rich string, otherwise it is just a normal formatted string. However, Excel allows it.
Examples
The following example demonstrates writing a “rich” string with multiple formats, and an additional cell format.
// Add some formats to use in the rich strings.
let default = Format::default();
let red = Format::new().set_font_color(Color::Red);
let blue = Format::new().set_font_color(Color::Blue);
// Write a rich strings with multiple formats.
let segments = [
(&default, "This is "),
(&red, "red"),
(&default, " and this is "),
(&blue, "blue"),
];
worksheet.write_rich_string(0, 0, &segments)?;
// Add an extra format to use for the entire cell.
let center = Format::new().set_align(FormatAlign::Center);
// Write the rich string again with the cell format.
worksheet.write_rich_string_with_format(2, 0, &segments, ¢er)?;
Output file:

sourcepub fn write_formula(
&mut self,
row: RowNum,
col: ColNum,
formula: impl Into<Formula>
) -> Result<&mut Worksheet, XlsxError>
pub fn write_formula( &mut self, row: RowNum, col: ColNum, formula: impl Into<Formula> ) -> Result<&mut Worksheet, XlsxError>
Write an unformatted formula to a worksheet cell.
Write an unformatted Excel formula to a worksheet cell. See also the
documentation on working with formulas at Formula.
Parameters
row- The zero indexed row number.col- The zero indexed column number.formula- The formula to write to the cell as a string orFormula.
Errors
XlsxError::RowColumnLimitError- Row or column exceeds Excel’s worksheet limits.
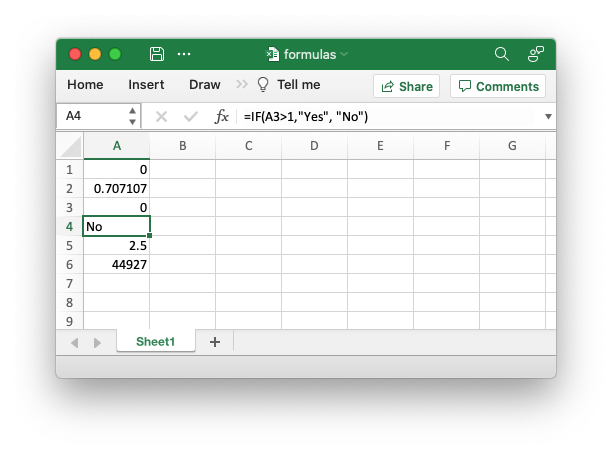
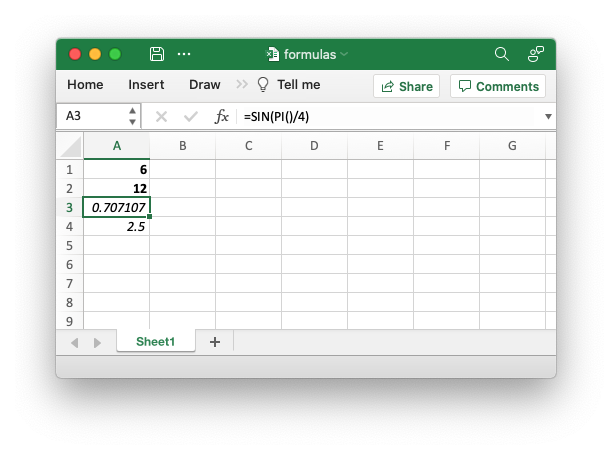
Examples
The following example demonstrates writing formulas with formatting to a worksheet.
    let worksheet = workbook.add_worksheet();

    // Write some formulas to the worksheet.
    worksheet.write_formula(0, 0, "=B3 + B4")?;
    worksheet.write_formula(1, 0, "=SIN(PI()/4)")?;
    worksheet.write_formula(2, 0, "=SUM(B1:B5)")?;
    worksheet.write_formula(3, 0, r#"=IF(A3>1,"Yes", "No")"#)?;
    worksheet.write_formula(4, 0, "=AVERAGE(1, 2, 3, 4)")?;
    worksheet.write_formula(5, 0, r#"=DATEVALUE("1-Jan-2023")"#)?;
Output file:
sourcepub fn write_formula_with_format(
&mut self,
row: RowNum,
col: ColNum,
formula: impl Into<Formula>,
format: &Format
) -> Result<&mut Worksheet, XlsxError>
pub fn write_formula_with_format( &mut self, row: RowNum, col: ColNum, formula: impl Into<Formula>, format: &Format ) -> Result<&mut Worksheet, XlsxError>
Write a formatted formula to a worksheet cell.
Write a formula with formatting to a worksheet cell. The format is set
via a Format struct which can control the font or color or
properties such as bold and italic.
See also the documentation on working with formulas at Formula.
Parameters
row- The zero indexed row number.col- The zero indexed column number.formula- The formula to write to the cell as a string orFormula.format- TheFormatproperty for the cell.
Errors
XlsxError::RowColumnLimitError- Row or column exceeds Excel’s worksheet limits.
Examples
The following example demonstrates writing formulas with formatting to a worksheet.
    // Create some formats to use in the worksheet.
    let bold_format = Format::new().set_bold();
    let italic_format = Format::new().set_italic();

    // Add a worksheet to the workbook.
    let worksheet = workbook.add_worksheet();

    // Write some formulas with formatting.
    worksheet.write_formula_with_format(0, 0, "=1+2+3", &bold_format)?;
    worksheet.write_formula_with_format(1, 0, "=A1*2", &bold_format)?;
    worksheet.write_formula_with_format(2, 0, "=SIN(PI()/4)", &italic_format)?;
    worksheet.write_formula_with_format(3, 0, "=AVERAGE(1, 2, 3, 4)", &italic_format)?;
Output file:
sourcepub fn write_array_formula(
&mut self,
first_row: RowNum,
first_col: ColNum,
last_row: RowNum,
last_col: ColNum,
formula: impl Into<Formula>
) -> Result<&mut Worksheet, XlsxError>
pub fn write_array_formula( &mut self, first_row: RowNum, first_col: ColNum, last_row: RowNum, last_col: ColNum, formula: impl Into<Formula> ) -> Result<&mut Worksheet, XlsxError>
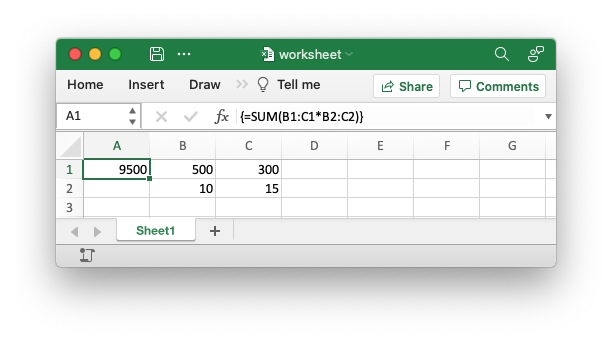
Write an array formula to a worksheet cell.
The write_array_formula() method writes an array formula to a
cell range. In Excel an array formula is a formula that performs a
calculation on a range of values. It can return a single value or a
range/“array” of values.
An array formula is displayed with a pair of curly brackets around the
formula like this: {=SUM(A1:B1*A2:B2)}. The write_array()
method doesn’t require actually require these so you can omit them in
the formula, and the equal sign, if you wish like this:
SUM(A1:B1*A2:B2).
For array formulas that return a range of values you must specify the
range that the return values will be written to with the first_ and
last_ parameters. If the array formula returns a single value then the
first_ and last_ parameters should be the same, as shown in the example
below.
Parameters
first_row- The first row of the range. (All zero indexed.)first_col- The first row of the range.last_row- The last row of the range.last_col- The last row of the range.formula- The formula to write to the cell as a string orFormula.
Errors
XlsxError::RowColumnLimitError- Row or column exceeds Excel’s worksheet limits.XlsxError::RowColumnOrderError- First row or column is larger than the last row or column.
Examples
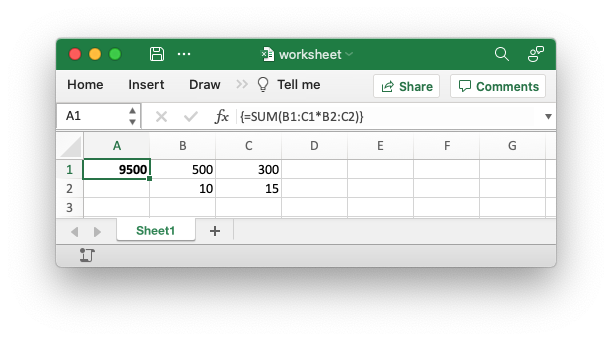
The following example demonstrates writing an array formulas to a worksheet.
    // Write an array formula that returns a single value.
    worksheet.write_array_formula(0, 0, 0, 0, "{=SUM(B1:C1*B2:C2)}")?;
Output file:
sourcepub fn write_array_formula_with_format(
&mut self,
first_row: RowNum,
first_col: ColNum,
last_row: RowNum,
last_col: ColNum,
formula: impl Into<Formula>,
format: &Format
) -> Result<&mut Worksheet, XlsxError>
pub fn write_array_formula_with_format( &mut self, first_row: RowNum, first_col: ColNum, last_row: RowNum, last_col: ColNum, formula: impl Into<Formula>, format: &Format ) -> Result<&mut Worksheet, XlsxError>
Write a formatted array formula to a worksheet cell.
Write an array formula with formatting to a worksheet cell. The format
is set via a Format struct which can control the font or color or
properties such as bold and italic.
The write_array() method writes an array formula to a cell
range. In Excel an array formula is a formula that performs a
calculation on a range of values. It can return a single value or a
range/“array” of values.
An array formula is displayed with a pair of curly brackets around the
formula like this: {=SUM(A1:B1*A2:B2)}. The write_array()
method doesn’t require actually require these so you can omit them in
the formula, and the equal sign, if you wish like this:
SUM(A1:B1*A2:B2).
For array formulas that return a range of values you must specify the
range that the return values will be written to with the first_ and
last_ parameters. If the array formula returns a single value then the
first_ and last_ parameters should be the same, as shown in the example
below.
Parameters
first_row- The first row of the range. (All zero indexed.)first_col- The first row of the range.last_row- The last row of the range.last_col- The last row of the range.formula- The formula to write to the cell as a string orFormula.format- TheFormatproperty for the cell.
Errors
XlsxError::RowColumnLimitError- Row or column exceeds Excel’s worksheet limits.XlsxError::RowColumnOrderError- First row larger than the last row.
Examples
The following example demonstrates writing an array formula with formatting to a worksheet.
    // Write an array formula that returns a single value.
    worksheet.write_array_formula_with_format(0, 0, 0, 0, "{=SUM(B1:C1*B2:C2)}", &bold)?;
Output file:
sourcepub fn write_dynamic_array_formula(
&mut self,
first_row: RowNum,
first_col: ColNum,
last_row: RowNum,
last_col: ColNum,
formula: impl Into<Formula>
) -> Result<&mut Worksheet, XlsxError>
pub fn write_dynamic_array_formula( &mut self, first_row: RowNum, first_col: ColNum, last_row: RowNum, last_col: ColNum, formula: impl Into<Formula> ) -> Result<&mut Worksheet, XlsxError>
Write a dynamic array formula to a worksheet cell or range of cells.
The write_dynamic_array_formula() function writes an Excel 365
dynamic array formula to a cell range. Some examples of functions that
return dynamic arrays are:
FILTER()RANDARRAY()SEQUENCE()SORTBY()SORT()UNIQUE()XLOOKUP()XMATCH()
For more details see the rust_xlsxwriter documentation section on
Dynamic Array support and the Dynamic array formulas example.
Parameters
first_row- The first row of the range. (All zero indexed.)first_col- The first row of the range.last_row- The last row of the range.last_col- The last row of the range.formula- The formula to write to the cell as a string orFormula.
Errors
XlsxError::RowColumnLimitError- Row or column exceeds Excel’s worksheet limits.XlsxError::RowColumnOrderError- First row larger than the last row.
Examples
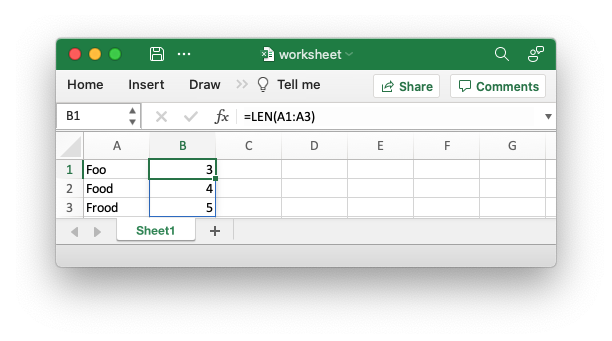
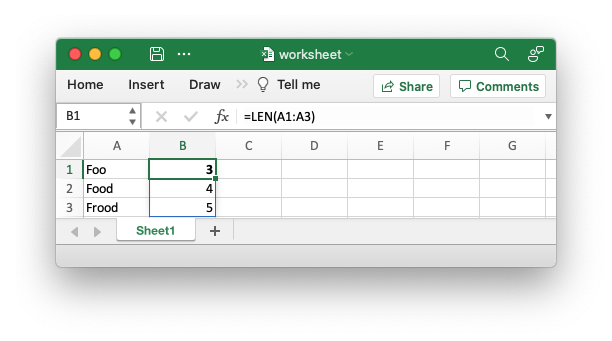
The following example demonstrates a static function which generally returns one value turned into a dynamic array function which returns a range of values.
worksheet.write_dynamic_array_formula(0, 1, 0, 1, "=LEN(A1:A3)")?;Output file:
sourcepub fn write_dynamic_array_formula_with_format(
&mut self,
first_row: RowNum,
first_col: ColNum,
last_row: RowNum,
last_col: ColNum,
formula: impl Into<Formula>,
format: &Format
) -> Result<&mut Worksheet, XlsxError>
pub fn write_dynamic_array_formula_with_format( &mut self, first_row: RowNum, first_col: ColNum, last_row: RowNum, last_col: ColNum, formula: impl Into<Formula>, format: &Format ) -> Result<&mut Worksheet, XlsxError>
Write a formatted dynamic array formula to a worksheet cell or range of cells.
The write_dynamic_array_formula_with_format() function writes an Excel 365 dynamic
array formula to a cell range. Some examples of functions that return
dynamic arrays are:
FILTER()RANDARRAY()SEQUENCE()SORTBY()SORT()UNIQUE()XLOOKUP()XMATCH()
The format is set via a Format struct which can control the font or
color or properties such as bold and italic.
For array formulas that return a range of values you must specify the
range that the return values will be written to with the first_ and
last_ parameters. If the array formula returns a single value then the
first_ and last_ parameters should be the same, as shown in the example
below or use the
write_dynamic_formula_with_format() method.
For more details see the rust_xlsxwriter documentation section on
Dynamic Array support and the Dynamic array formulas example.
Parameters
first_row- The first row of the range. (All zero indexed.)first_col- The first row of the range.last_row- The last row of the range.last_col- The last row of the range.formula- The formula to write to the cell as a string orFormula.format- TheFormatproperty for the cell.
Errors
XlsxError::RowColumnLimitError- Row or column exceeds Excel’s worksheet limits.XlsxError::RowColumnOrderError- First row or column is larger than the last row or column.
Examples
The following example demonstrates a static function which generally returns one value turned into a dynamic array function which returns a range of values.
worksheet.write_dynamic_array_formula_with_format(0, 1, 0, 1, "=LEN(A1:A3)", &bold)?;Output file:
sourcepub fn write_dynamic_formula(
&mut self,
row: RowNum,
col: ColNum,
formula: impl Into<Formula>
) -> Result<&mut Worksheet, XlsxError>
pub fn write_dynamic_formula( &mut self, row: RowNum, col: ColNum, formula: impl Into<Formula> ) -> Result<&mut Worksheet, XlsxError>
Write a dynamic formula to a worksheet cell.
The write_dynamic_formula() method is similar to the
write_dynamic_array_formula()
method, shown above, except that it writes a dynamic array formula to a
single cell, rather than a range. This is a syntactic shortcut since the
array range isn’t generally known for a dynamic range and specifying the
initial cell is sufficient for Excel.
For more details see the rust_xlsxwriter documentation section on
Dynamic Array support and the Dynamic array formulas example.
Parameters
row- The zero indexed row number.col- The zero indexed column number.formula- The formula to write to the cell as a string orFormula.
Errors
XlsxError::RowColumnLimitError- Row or column exceeds Excel’s worksheet limits.
sourcepub fn write_dynamic_formula_with_format(
&mut self,
row: RowNum,
col: ColNum,
formula: impl Into<Formula>,
format: &Format
) -> Result<&mut Worksheet, XlsxError>
pub fn write_dynamic_formula_with_format( &mut self, row: RowNum, col: ColNum, formula: impl Into<Formula>, format: &Format ) -> Result<&mut Worksheet, XlsxError>
Write a formatted dynamic formula to a worksheet cell.
The write_dynamic_formula_with_format() method is similar to the
write_dynamic_array_formula_with_format()
method, shown above, except that it writes a dynamic array formula to a
single cell, rather than a range. This is a syntactic shortcut since the
array range isn’t generally known for a dynamic range and specifying the
initial cell is sufficient for Excel.
For more details see the rust_xlsxwriter documentation section on
Dynamic Array support and the Dynamic array formulas example.
Parameters
row- The zero indexed row number.col- The zero indexed column number.formula- The formula to write to the cell as a string orFormula.format- TheFormatproperty for the cell.
Errors
XlsxError::RowColumnLimitError- Row or column exceeds Excel’s worksheet limits.
sourcepub fn write_blank(
&mut self,
row: RowNum,
col: ColNum,
format: &Format
) -> Result<&mut Worksheet, XlsxError>
pub fn write_blank( &mut self, row: RowNum, col: ColNum, format: &Format ) -> Result<&mut Worksheet, XlsxError>
Write a blank formatted worksheet cell.
Write a blank cell with formatting to a worksheet cell. The format is
set via a Format struct.
Excel differentiates between an “Empty” cell and a “Blank” cell. An “Empty” cell is a cell which doesn’t contain data or formatting whilst a “Blank” cell doesn’t contain data but does contain formatting. Excel stores “Blank” cells but ignores “Empty” cells.
The most common case for a formatted blank cell is to write a background or a border, see the example below.
Parameters
row- The zero indexed row number.col- The zero indexed column number.format- TheFormatproperty for the cell.
Errors
XlsxError::RowColumnLimitError- Row or column exceeds Excel’s worksheet limits.
Examples
The following example demonstrates writing a blank cell with formatting, i.e., a cell that has no data but does have formatting.
    let worksheet = workbook.add_worksheet();

    let format1 = Format::new().set_background_color(Color::Yellow);

    let format2 = Format::new()
        .set_background_color(Color::Yellow)
        .set_border(FormatBorder::Thin);

    worksheet.write_blank(1, 1, &format1)?;
    worksheet.write_blank(3, 1, &format2)?;
Output file:
![]()
sourcepub fn write_url(
&mut self,
row: RowNum,
col: ColNum,
link: impl Into<Url>
) -> Result<&mut Worksheet, XlsxError>
pub fn write_url( &mut self, row: RowNum, col: ColNum, link: impl Into<Url> ) -> Result<&mut Worksheet, XlsxError>
Write a url/hyperlink to a worksheet cell.
Write a url/hyperlink to a worksheet cell with the default Excel “Hyperlink” cell style.
There are 3 types of url/link supported by Excel:
-
Web based URIs like:
http://,https://,ftp://,ftps://andmailto:.
-
Local file links using the
file://URI.file:///Book2.xlsxfile:///..\Sales\Book2.xlsxfile:///C:\Temp\Book1.xlsxfile:///Book2.xlsx#Sheet1!A1file:///Book2.xlsx#'Sales Data'!A1:G5
Most paths will be relative to the root folder, following the Windows convention, so most paths should start with
file:///. For links to other Excel files the url string can include a sheet and cell reference after the"#"anchor, as shown in the last 2 examples above. When using Windows paths, like in the examples above, it is best to use a Rust raw string to avoid issues with the backslashes:r"file:///C:\Temp\Book1.xlsx". -
Internal links to a cell or range of cells in the workbook using the pseudo-uri
internal::internal:Sheet2!A1internal:Sheet2!A1:G5internal:'Sales Data'!A1
Worksheet references are typically of the form
Sheet1!A1where a worksheet and target cell should be specified. You can also link to a worksheet range using the standard Excel range notation likeSheet1!A1:B2. Excel requires that worksheet names containing spaces or non alphanumeric characters are single quoted as follows'Sales Data'!A1.
The function will escape the following characters in URLs as required by
Excel, \s " < > \ [ ] ` ^ { }, unless the URL already contains %xx
style escapes. In which case it is assumed that the URL was escaped
correctly by the user and will by passed directly to Excel.
Excel has a limit of around 2080 characters in the url string. Strings beyond this limit will raise an error, see below.
For other variants of this function see:
write_url_with_text()to add alternative text to the link.write_url_with_format()to add an alternative format to the link.
Parameters
row- The zero indexed row number.col- The zero indexed column number.string- The url string to write to the cell.link- The url/hyperlink to write to the cell as a string orUrl.
Errors
XlsxError::RowColumnLimitError- Row or column exceeds Excel’s worksheet limits.XlsxError::MaxUrlLengthExceeded- URL string or anchor exceeds Excel’s limit of 2080 characters.XlsxError::UnknownUrlType- The URL has an unknown URI type. See the supported types listed above.
Examples
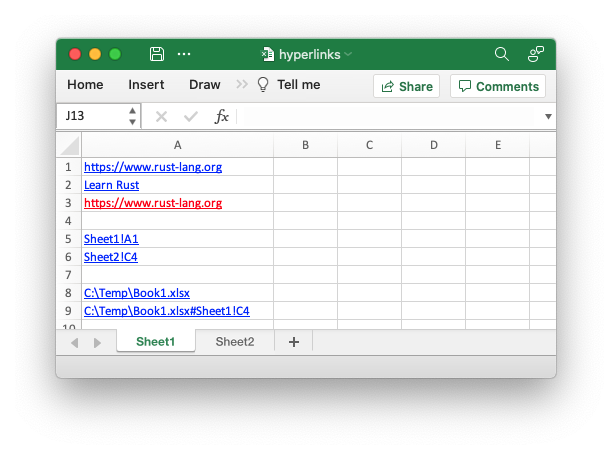
The following example demonstrates several of the url writing methods.
// Write some url links.
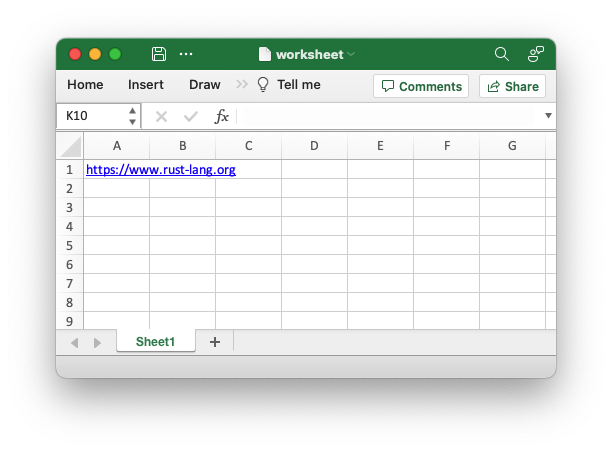
worksheet1.write_url(0, 0, "https://www.rust-lang.org")?;
worksheet1.write_url_with_text(1, 0, "https://www.rust-lang.org", "Learn Rust")?;
worksheet1.write_url_with_format(2, 0, "https://www.rust-lang.org", &link_format)?;
// Write some internal links.
worksheet1.write_url(4, 0, "internal:Sheet1!A1")?;
worksheet1.write_url(5, 0, "internal:Sheet2!C4")?;
// Write some external links.
worksheet1.write_url(7, 0, r"file:///C:\Temp\Book1.xlsx")?;
worksheet1.write_url(8, 0, r"file:///C:\Temp\Book1.xlsx#Sheet1!C4")?;
// Add another sheet to link to.
let worksheet2 = workbook.add_worksheet();
worksheet2.write_string(3, 2, "Here I am")?;
worksheet2.write_url_with_text(4, 2, "internal:Sheet1!A6", "Go back")?;
Output file:
You can also write the url using a Url struct:
    // Write a url with a Url struct.
    worksheet.write_url(0, 0, Url::new("https://www.rust-lang.org"))?;
Output file:
sourcepub fn write_url_with_text(
&mut self,
row: RowNum,
col: ColNum,
link: impl Into<Url>,
text: impl Into<String>
) -> Result<&mut Worksheet, XlsxError>
pub fn write_url_with_text( &mut self, row: RowNum, col: ColNum, link: impl Into<Url>, text: impl Into<String> ) -> Result<&mut Worksheet, XlsxError>
Write a url/hyperlink to a worksheet cell with an alternative text.
Write a url/hyperlink to a worksheet cell with an alternative, user friendly, text and the default Excel “Hyperlink” cell style.
This method is similar to write_url() except
that you can specify an alternative string for the url. For example you
could have a cell contain the link Learn
Rust instead of the raw link
https://www.rust-lang.org.
Parameters
row- The zero indexed row number.col- The zero indexed column number.link- The url/hyperlink to write to the cell as a string orUrl.text- The alternative string to write to the cell.
Errors
XlsxError::RowColumnLimitError- Row or column exceeds Excel’s worksheet limits.XlsxError::MaxStringLengthExceeded- Text string exceeds Excel’s limit of 32,767 characters.XlsxError::MaxUrlLengthExceeded- URL string or anchor exceeds Excel’s limit of 2080 characters.XlsxError::UnknownUrlType- The URL has an unknown URI type. See the supported types listed above.
Examples
A simple, getting started, example of some of the features of the
rust_xlsxwriter library.
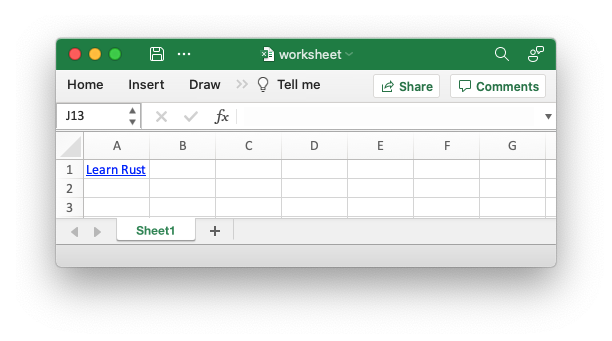
    // Write a url and alternative text.
    worksheet.write_url_with_text(0, 0, "https://www.rust-lang.org", "Learn Rust")?;
Output file:
You can also write the url using a Url struct:
    // Write a url with a Url struct and alternative text.
worksheet.write(0, 0, Url::new("https://www.rust-lang.org").set_text("Learn Rust"))?;sourcepub fn write_url_with_format(
&mut self,
row: RowNum,
col: ColNum,
link: impl Into<Url>,
format: &Format
) -> Result<&mut Worksheet, XlsxError>
pub fn write_url_with_format( &mut self, row: RowNum, col: ColNum, link: impl Into<Url>, format: &Format ) -> Result<&mut Worksheet, XlsxError>
Write a url/hyperlink to a worksheet cell with a user defined format
Write a url/hyperlink to a worksheet cell with a user defined format instead of the default Excel “Hyperlink” cell style.
This method is similar to write_url()
except that you can specify an alternative format for the url.
Parameters
row- The zero indexed row number.col- The zero indexed column number.link- The url/hyperlink to write to the cell as a string orUrl.format- TheFormatproperty for the cell.
Errors
XlsxError::RowColumnLimitError- Row or column exceeds Excel’s worksheet limits.XlsxError::MaxUrlLengthExceeded- URL string or anchor exceeds Excel’s limit of 2080 characters.XlsxError::UnknownUrlType- The URL has an unknown URI type. See the supported types listed above.
Examples
The following example demonstrates writing a url with alternative format.
    // Create a format to use in the worksheet.
    let link_format = Format::new()
        .set_font_color(Color::Red)
        .set_underline(FormatUnderline::Single);

    // Write a url with an alternative format.
    worksheet.write_url_with_format(0, 0, "https://www.rust-lang.org", &link_format)?;
Output file:

sourcepub fn write_datetime_with_format(
&mut self,
row: RowNum,
col: ColNum,
datetime: impl IntoExcelDateTime,
format: &Format
) -> Result<&mut Worksheet, XlsxError>
pub fn write_datetime_with_format( &mut self, row: RowNum, col: ColNum, datetime: impl IntoExcelDateTime, format: &Format ) -> Result<&mut Worksheet, XlsxError>
Write a formatted date and/or time to a worksheet cell.
The method method writes dates/times that implements IntoExcelDateTime
to a worksheet cell.
The date/time types supported are:
If the chrono feature is enabled you can use the following types:
Excel stores dates and times as a floating point number with a number
format to defined how it is displayed. The number format is set via a
Format struct which can also control visual formatting such as bold
and italic text.
Parameters
row- The zero indexed row number.col- The zero indexed column number.datetime- A date/time instance that implementsIntoExcelDateTime.format- TheFormatproperty for the cell.
Errors
XlsxError::RowColumnLimitError- Row or column exceeds Excel’s worksheet limits.
Examples
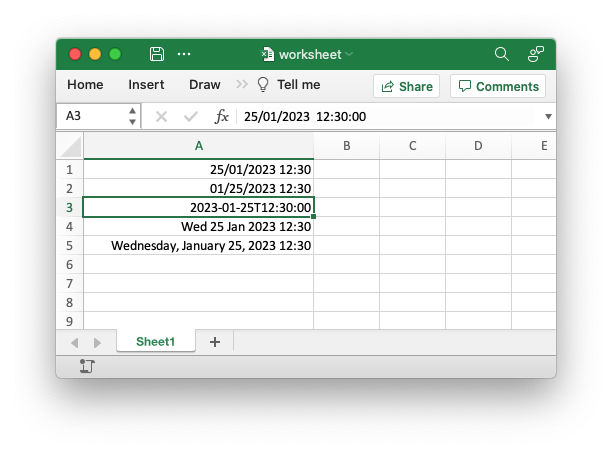
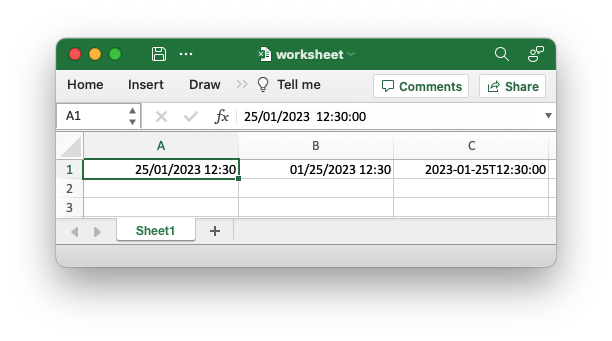
The following example demonstrates writing formatted datetimes in an Excel worksheet.
    let worksheet = workbook.add_worksheet();

    // Create some formats to use with the datetimes below.
    let format1 = Format::new().set_num_format("dd/mm/yyyy hh::mm");
    let format2 = Format::new().set_num_format("mm/dd/yyyy hh::mm");
    let format3 = Format::new().set_num_format("yyyy-mm-ddThh::mm:ss");
    let format4 = Format::new().set_num_format("ddd dd mmm yyyy hh::mm");
    let format5 = Format::new().set_num_format("dddd, mmmm dd, yyyy hh::mm");

    // Set the column width for clarity.
    worksheet.set_column_width(0, 30)?;

    // Create a datetime object.
    let datetime = ExcelDateTime::from_ymd(2023, 1, 25)?.and_hms(12, 30, 0)?;

    // Write the datetime with different Excel formats.
    worksheet.write_datetime_with_format(0, 0, &datetime, &format1)?;
    worksheet.write_datetime_with_format(1, 0, &datetime, &format2)?;
    worksheet.write_datetime_with_format(2, 0, &datetime, &format3)?;
    worksheet.write_datetime_with_format(3, 0, &datetime, &format4)?;
    worksheet.write_datetime_with_format(4, 0, &datetime, &format5)?;
Output file:
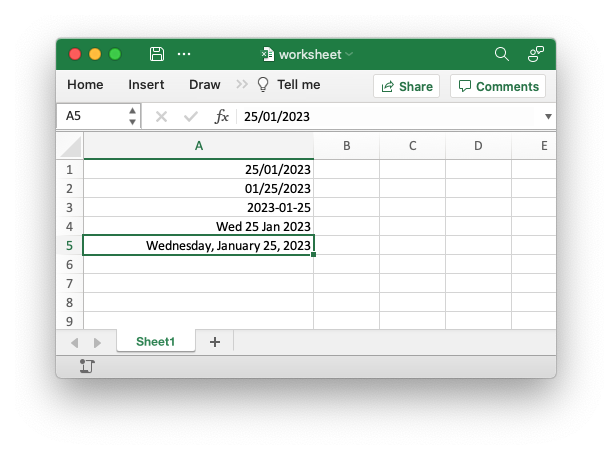
The following example demonstrates writing formatted dates in an Excel worksheet.
    let worksheet = workbook.add_worksheet();

    // Create some formats to use with the dates below.
    let format1 = Format::new().set_num_format("dd/mm/yyyy");
    let format2 = Format::new().set_num_format("mm/dd/yyyy");
    let format3 = Format::new().set_num_format("yyyy-mm-dd");
    let format4 = Format::new().set_num_format("ddd dd mmm yyyy");
    let format5 = Format::new().set_num_format("dddd, mmmm dd, yyyy");

    // Set the column width for clarity.
    worksheet.set_column_width(0, 30)?;

    // Create a date object.
    let date = ExcelDateTime::from_ymd(2023, 1, 25)?;

    // Write the date with different Excel formats.
    worksheet.write_datetime_with_format(0, 0, &date, &format1)?;
    worksheet.write_datetime_with_format(1, 0, &date, &format2)?;
    worksheet.write_datetime_with_format(2, 0, &date, &format3)?;
    worksheet.write_datetime_with_format(3, 0, &date, &format4)?;
    worksheet.write_datetime_with_format(4, 0, &date, &format5)?;
Output file:
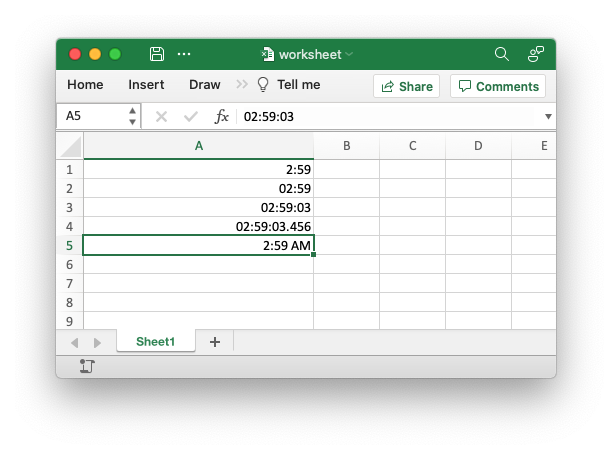
The following example demonstrates writing formatted times in an Excel worksheet.
    let worksheet = workbook.add_worksheet();

    // Create some formats to use with the times below.
    let format1 = Format::new().set_num_format("h::mm");
    let format2 = Format::new().set_num_format("hh::mm");
    let format3 = Format::new().set_num_format("hh::mm:ss");
    let format4 = Format::new().set_num_format("hh::mm:ss.000");
    let format5 = Format::new().set_num_format("h::mm AM/PM");

    // Set the column width for clarity.
    worksheet.set_column_width(0, 30)?;

    // Create a time object.
    let time = ExcelDateTime::from_hms_milli(2, 59, 3, 456)?;

    // Write the time with different Excel formats.
    worksheet.write_datetime_with_format(0, 0, &time, &format1)?;
    worksheet.write_datetime_with_format(1, 0, &time, &format2)?;
    worksheet.write_datetime_with_format(2, 0, &time, &format3)?;
    worksheet.write_datetime_with_format(3, 0, &time, &format4)?;
    worksheet.write_datetime_with_format(4, 0, &time, &format5)?;
Output file:
sourcepub fn write_datetime(
&mut self,
row: RowNum,
col: ColNum,
datetime: impl IntoExcelDateTime
) -> Result<&mut Worksheet, XlsxError>
pub fn write_datetime( &mut self, row: RowNum, col: ColNum, datetime: impl IntoExcelDateTime ) -> Result<&mut Worksheet, XlsxError>
Write an unformatted date and/or time to a worksheet cell.
In general an unformatted date/time isn’t very useful since a date in Excel without a format is just a number. However, this method is provided for cases where an implicit format is derived from the column or row format.
However, for most use cases you should use the
write_datetime_with_format()
method with an explicit format.
The date/time types supported are:
If the chrono feature is enabled you can use the following types:
Parameters
row- The zero indexed row number.col- The zero indexed column number.datetime- A date/time instance that implementsIntoExcelDateTime.
Errors
XlsxError::RowColumnLimitError- Row or column exceeds Excel’s worksheet limits.
Examples
The following example demonstrates writing datetimes that take an implicit format from the column formatting.
    // Create some formats to use with the datetimes below.
    let format1 = Format::new().set_num_format("dd/mm/yyyy hh::mm");
    let format2 = Format::new().set_num_format("mm/dd/yyyy hh::mm");
    let format3 = Format::new().set_num_format("yyyy-mm-ddThh::mm:ss");

    // Set the column formats.
    worksheet.set_column_format(0, &format1)?;
    worksheet.set_column_format(1, &format2)?;
    worksheet.set_column_format(2, &format3)?;

    // Set the column widths for clarity.
    worksheet.set_column_width(0, 20)?;
    worksheet.set_column_width(1, 20)?;
    worksheet.set_column_width(2, 20)?;

    // Create a datetime object.
    let datetime = ExcelDateTime::from_ymd(2023, 1, 25)?.and_hms(12, 30, 0)?;

    // Write the datetime without a formats. The dates will get the column
    // format instead.
    worksheet.write_datetime(0, 0, &datetime)?;
    worksheet.write_datetime(0, 1, &datetime)?;
    worksheet.write_datetime(0, 2, &datetime)?;
Output file:
sourcepub fn write_boolean(
&mut self,
row: RowNum,
col: ColNum,
boolean: bool
) -> Result<&mut Worksheet, XlsxError>
pub fn write_boolean( &mut self, row: RowNum, col: ColNum, boolean: bool ) -> Result<&mut Worksheet, XlsxError>
Write an unformatted boolean value to a cell.
Write an unformatted Excel boolean value to a worksheet cell.
Parameters
row- The zero indexed row number.col- The zero indexed column number.boolean- The boolean value to write to the cell.
Errors
XlsxError::RowColumnLimitError- Row or column exceeds Excel’s worksheet limits.
Examples
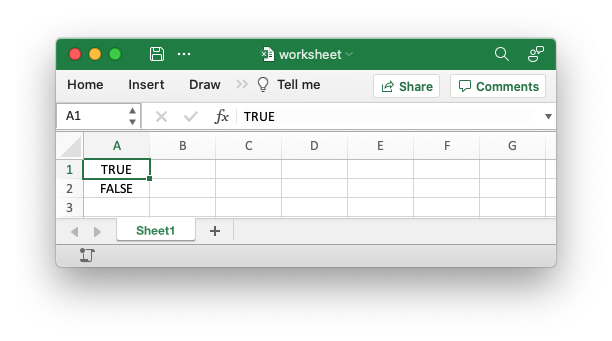
The following example demonstrates writing boolean values to a worksheet.
    let worksheet = workbook.add_worksheet();

    worksheet.write_boolean(0, 0, true)?;
    worksheet.write_boolean(1, 0, false)?;
Output file:
sourcepub fn write_boolean_with_format(
&mut self,
row: RowNum,
col: ColNum,
boolean: bool,
format: &Format
) -> Result<&mut Worksheet, XlsxError>
pub fn write_boolean_with_format( &mut self, row: RowNum, col: ColNum, boolean: bool, format: &Format ) -> Result<&mut Worksheet, XlsxError>
Write a formatted boolean value to a worksheet cell.
Write a boolean value with formatting to a worksheet cell. The format is set
via a Format struct which can control the numerical formatting of
the number, for example as a currency or a percentage value, or the
visual format, such as bold and italic text.
Parameters
row- The zero indexed row number.col- The zero indexed column number.boolean- The boolean value to write to the cell.format- TheFormatproperty for the cell.
Errors
XlsxError::RowColumnLimitError- Row or column exceeds Excel’s worksheet limits.
Examples
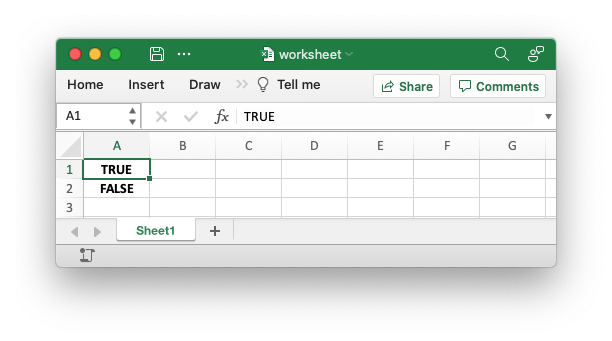
The following example demonstrates writing formatted boolean values to a worksheet.
    let worksheet = workbook.add_worksheet();

    worksheet.write_boolean_with_format(0, 0, true, &bold)?;
    worksheet.write_boolean_with_format(1, 0, false, &bold)?;
Output file:
sourcepub fn merge_range(
&mut self,
first_row: RowNum,
first_col: ColNum,
last_row: RowNum,
last_col: ColNum,
string: &str,
format: &Format
) -> Result<&mut Worksheet, XlsxError>
pub fn merge_range( &mut self, first_row: RowNum, first_col: ColNum, last_row: RowNum, last_col: ColNum, string: &str, format: &Format ) -> Result<&mut Worksheet, XlsxError>
Merge a range of cells.
The merge_range() method allows cells to be merged together so that
they act as a single area.
The merge_range() method writes a string to the merged cells. In order
to write other data types, such as a number or a formula, you can
overwrite the first cell with a call to one of the other
worksheet.write_*() functions. The same Format instance should be
used as was used in the merged range, see the example below.
Parameters
first_row- The first row of the range. (All zero indexed.)first_col- The first row of the range.last_row- The last row of the range.last_col- The last row of the range.string- The string to write to the cell. Other types can also be handled. See the documentation above and the example below.format- TheFormatproperty for the cell.
Errors
XlsxError::RowColumnLimitError- Row or column exceeds Excel’s worksheet limits.XlsxError::RowColumnOrderError- First row larger than the last row.XlsxError::MergeRangeSingleCell- A merge range cannot be a single cell in Excel.XlsxError::MergeRangeOverlaps- The merge range overlaps a previous merge range.
Examples
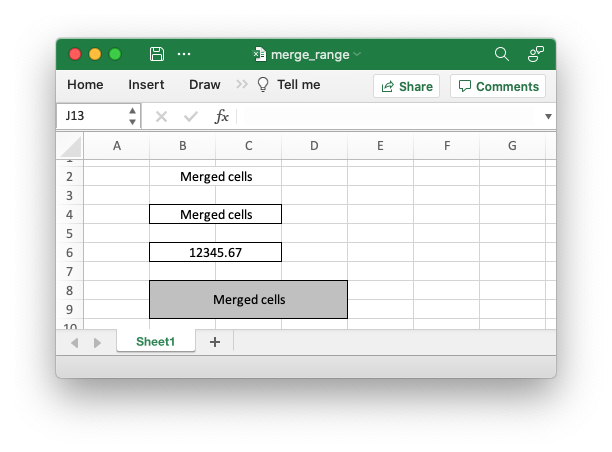
An example of creating merged ranges in a worksheet using the
rust_xlsxwriter library.
    // Write some merged cells with centering.
    let format = Format::new().set_align(FormatAlign::Center);

    worksheet.merge_range(1, 1, 1, 2, "Merged cells", &format)?;

    // Write some merged cells with centering and a border.
    let format = Format::new()
        .set_align(FormatAlign::Center)
        .set_border(FormatBorder::Thin);

    worksheet.merge_range(3, 1, 3, 2, "Merged cells", &format)?;

    // Write some merged cells with a number by overwriting the first cell in
    // the string merge range with the formatted number.
    worksheet.merge_range(5, 1, 5, 2, "", &format)?;
    worksheet.write_number_with_format(5, 1, 12345.67, &format)?;

    // Example with a more complex format and larger range.
    let format = Format::new()
        .set_align(FormatAlign::Center)
        .set_align(FormatAlign::VerticalCenter)
        .set_border(FormatBorder::Thin)
        .set_background_color(Color::Silver);

    worksheet.merge_range(7, 1, 8, 3, "Merged cells", &format)?;
Output file:
sourcepub fn insert_image(
&mut self,
row: RowNum,
col: ColNum,
image: &Image
) -> Result<&mut Worksheet, XlsxError>
pub fn insert_image( &mut self, row: RowNum, col: ColNum, image: &Image ) -> Result<&mut Worksheet, XlsxError>
Add an image to a worksheet.
Add an image to a worksheet at a cell location. The image should be
encapsulated in an Image object.
The supported image formats are:
- PNG
- JPG
- GIF: The image can be an animated gif in more resent versions of Excel.
- BMP: BMP images are only supported for backward compatibility. In general it is best to avoid BMP images since they are not compressed. If used, BMP images must be 24 bit, true color, bitmaps.
EMF and WMF file formats will be supported in an upcoming version of the library.
NOTE on SVG files: Excel doesn’t directly support SVG files in the
same way as other image file formats. It allows SVG to be inserted into
a worksheet but converts them to, and displays them as, PNG files. It
stores the original SVG image in the file so the original format can be
retrieved. This removes the file size and resolution advantage of using
SVG files. As such SVG files are not supported by rust_xlsxwriter
since a conversion to the PNG format would be required and that format
is already supported.
Parameters
row- The zero indexed row number.col- The zero indexed column number.image- TheImageto insert into the cell.
Errors
XlsxError::RowColumnLimitError- Row or column exceeds Excel’s worksheet limits.
Examples
The following example demonstrates creating a new Image object and adding it to a worksheet.
    // Create a new image object.
    let image = Image::new("examples/rust_logo.png")?;

    // Insert the image.
    worksheet.insert_image(1, 2, &image)?;
Output file:
sourcepub fn insert_image_with_offset(
&mut self,
row: RowNum,
col: ColNum,
image: &Image,
x_offset: u32,
y_offset: u32
) -> Result<&mut Worksheet, XlsxError>
pub fn insert_image_with_offset( &mut self, row: RowNum, col: ColNum, image: &Image, x_offset: u32, y_offset: u32 ) -> Result<&mut Worksheet, XlsxError>
Add an image to a worksheet at an offset.
Add an image to a worksheet at a pixel offset within a cell location.
The image should be encapsulated in an Image object.
This method is similar to insert_image()
except that the image can be offset from the top left of the cell.
Note, it is possible to offset the image outside the target cell if required.
Parameters
row- The zero indexed row number.col- The zero indexed column number.image- TheImageto insert into the cell.x_offset: The horizontal offset within the cell in pixels.y_offset: The vertical offset within the cell in pixels.
Errors
XlsxError::RowColumnLimitError- Row or column exceeds Excel’s worksheet limits.
Examples
This example shows how to add an image to a worksheet at an offset within the cell.
    // Create a new image object.
    let image = Image::new("examples/rust_logo.png")?;

    // Insert the image at an offset.
    worksheet.insert_image_with_offset(1, 2, &image, 10, 5)?;
Output file:

sourcepub fn insert_image_fit_to_cell(
&mut self,
row: RowNum,
col: ColNum,
image: &Image,
keep_aspect_ratio: bool
) -> Result<&mut Worksheet, XlsxError>
pub fn insert_image_fit_to_cell( &mut self, row: RowNum, col: ColNum, image: &Image, keep_aspect_ratio: bool ) -> Result<&mut Worksheet, XlsxError>
Add an image to a worksheet and fit it to a cell.
Add an image to a worksheet and scale it so that it fits in a cell. This
method can be useful when creating a product spreadsheet with a column
of images for each product. The image should be encapsulated in an
Image object. See insert_image() above
for details on the supported image types. The scaling calculation for
this method takes into account the DPI of the image in the same way that
Excel does.
There are two options, which are controlled by the keep_aspect_ratio
parameter. The image can be scaled vertically and horizontally to occupy
the entire cell or the aspect ratio of the image can be maintained so
that the image is scaled to the lesser of the horizontal or vertical
sizes. See the example below.
Parameters
row- The zero indexed row number.col- The zero indexed column number.image- TheImageto insert into the cell.keep_aspect_ratio- Boolean value to maintain the aspect ratio of the image iftrueor scale independently in the horizontal and vertical directions iffalse.
Errors
XlsxError::RowColumnLimitError- Row or column exceeds Excel’s worksheet limits.
Examples
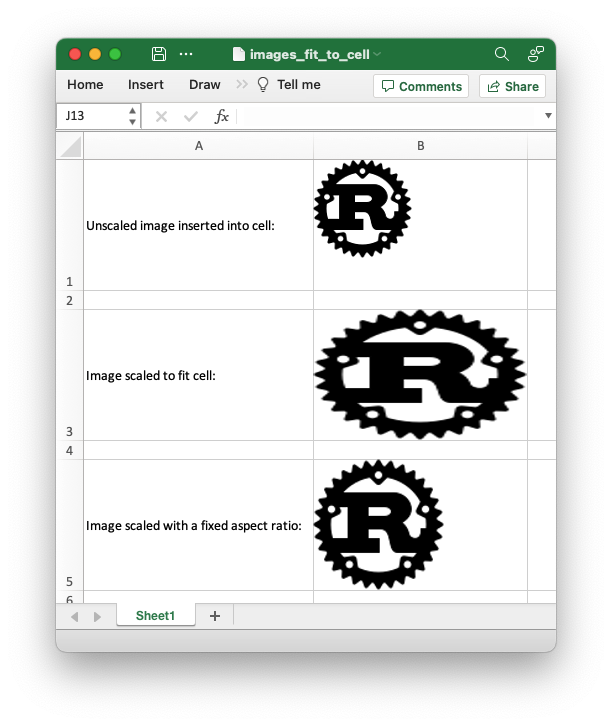
An example of inserting images into a worksheet using rust_xlsxwriter so
that they are scaled to a cell. This approach can be useful if you are
building up a spreadsheet of products with a column of images for each
product.
// Widen the first column to make the text clearer.
worksheet.set_column_width(0, 30)?;
// Set larger cells to accommodate the images.
worksheet.set_column_width_pixels(1, 200)?;
worksheet.set_row_height_pixels(0, 140)?;
worksheet.set_row_height_pixels(2, 140)?;
worksheet.set_row_height_pixels(4, 140)?;
// Create a new image object.
let image = Image::new("examples/rust_logo.png")?;
// Insert the image as standard, without scaling.
worksheet.write_with_format(0, 0, "Unscaled image inserted into cell:", ¢er)?;
worksheet.insert_image(0, 1, &image)?;
// Insert the image and scale it to fit the entire cell.
worksheet.write_with_format(2, 0, "Image scaled to fit cell:", ¢er)?;
worksheet.insert_image_fit_to_cell(2, 1, &image, false)?;
// Insert the image and scale it to the cell while maintaining the aspect ratio.
// In this case it is scaled to the smaller of the width or height scales.
worksheet.write_with_format(4, 0, "Image scaled with a fixed aspect ratio:", ¢er)?;
worksheet.insert_image_fit_to_cell(4, 1, &image, true)?;Output file:
sourcepub fn insert_chart(
&mut self,
row: RowNum,
col: ColNum,
chart: &Chart
) -> Result<&mut Worksheet, XlsxError>
pub fn insert_chart( &mut self, row: RowNum, col: ColNum, chart: &Chart ) -> Result<&mut Worksheet, XlsxError>
Add a chart to a worksheet.
Add a Chart to a worksheet at a cell location.
Parameters
row- The zero indexed row number.col- The zero indexed column number.image- TheImageto insert into the cell.
Errors
XlsxError::RowColumnLimitError- Row or column exceeds Excel’s worksheet limits.XlsxError::ChartError- A general error that is raised when a chart parameter is incorrect or a chart is configured incorrectly.
Examples
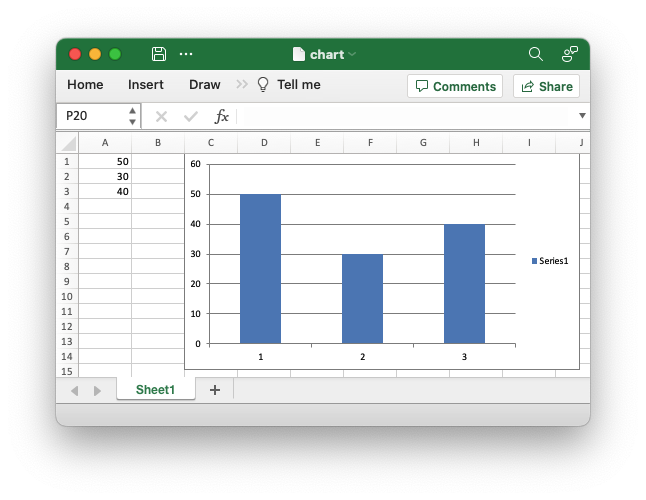
Insert a chart object into a worksheet.
    let mut chart = Chart::new(ChartType::Column);

    // Add a data series using Excel formula syntax to describe the range.
    chart.add_series().set_values("Sheet1!$A$1:$A$3");

    // Add the chart to the worksheet.
    worksheet.insert_chart(0, 2, &chart)?;
Output file:
sourcepub fn insert_chart_with_offset(
&mut self,
row: RowNum,
col: ColNum,
chart: &Chart,
x_offset: u32,
y_offset: u32
) -> Result<&mut Worksheet, XlsxError>
pub fn insert_chart_with_offset( &mut self, row: RowNum, col: ColNum, chart: &Chart, x_offset: u32, y_offset: u32 ) -> Result<&mut Worksheet, XlsxError>
Add a chart to a worksheet at an offset.
Add a Chart to a worksheet at a pixel offset within a cell
location.
Errors
XlsxError::RowColumnLimitError- Row or column exceeds Excel’s worksheet limits.XlsxError::ChartError- A general error that is raised when a chart parameter is incorrect or a chart is configured incorrectly.
Parameters
row- The zero indexed row number.col- The zero indexed column number.chart- TheChartto insert into the cell.x_offset: The horizontal offset within the cell in pixels.y_offset: The vertical offset within the cell in pixels.
Examples
Example of adding a chart to a worksheet with a pixel offset within the cell.
    let mut chart = Chart::new(ChartType::Column);

    // Add a data series using Excel formula syntax to describe the range.
    chart.add_series().set_values("Sheet1!$A$1:$A$3");

    // Add the chart to the worksheet.
    worksheet.insert_chart_with_offset(0, 2, &chart, 10, 5)?;
Output file:

sourcepub fn set_row_height(
&mut self,
row: RowNum,
height: impl Into<f64>
) -> Result<&mut Worksheet, XlsxError>
pub fn set_row_height( &mut self, row: RowNum, height: impl Into<f64> ) -> Result<&mut Worksheet, XlsxError>
Set the height for a row of cells.
The set_row_height() method is used to change the default height of a
row. The height is specified in character units, where the default
height is 15. Excel allows height values in increments of 0.25.
To specify the height in pixels use the
set_row_height_pixels() method.
Parameters
row- The zero indexed row number.height- The row height in character units.
Errors
XlsxError::RowColumnLimitError- Row exceeds Excel’s worksheet limits.
Examples
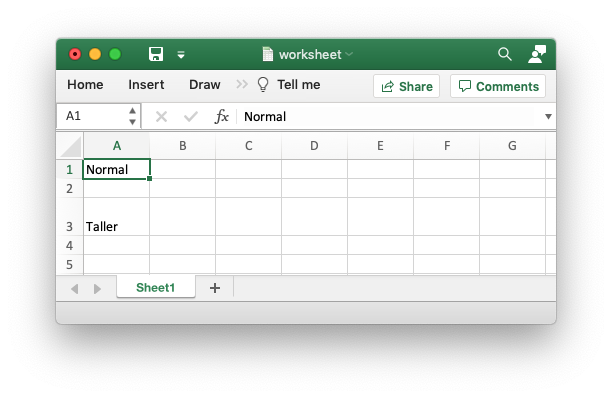
The following example demonstrates setting the height for a row in Excel.
    let worksheet = workbook.add_worksheet();

    // Add some text.
    worksheet.write_string(0, 0, "Normal")?;
    worksheet.write_string(2, 0, "Taller")?;

    // Set the row height in Excel character units.
    worksheet.set_row_height(2, 30)?;
Output file:
sourcepub fn set_row_height_pixels(
&mut self,
row: RowNum,
height: u16
) -> Result<&mut Worksheet, XlsxError>
pub fn set_row_height_pixels( &mut self, row: RowNum, height: u16 ) -> Result<&mut Worksheet, XlsxError>
Set the height for a row of cells, in pixels.
The set_row_height_pixels() method is used to change the default height of a
row. The height is specified in pixels, where the default
height is 20.
To specify the height in Excel’s character units use the
set_row_height() method.
Parameters
row- The zero indexed row number.height- The row height in pixels.
Errors
XlsxError::RowColumnLimitError- Row exceeds Excel’s worksheet limits.
Examples
The following example demonstrates setting the height for a row in Excel.
    let worksheet = workbook.add_worksheet();

    // Add some text.
    worksheet.write_string(0, 0, "Normal")?;
    worksheet.write_string(2, 0, "Taller")?;

    // Set the row height in pixels.
    worksheet.set_row_height_pixels(2, 40)?;
Output file:
sourcepub fn set_row_format(
&mut self,
row: RowNum,
format: &Format
) -> Result<&mut Worksheet, XlsxError>
pub fn set_row_format( &mut self, row: RowNum, format: &Format ) -> Result<&mut Worksheet, XlsxError>
Set the format for a row of cells.
The set_row_format() method is used to change the default format of a
row. Any unformatted data written to that row will then adopt that
format. Formatted data written to the row will maintain its own cell
format. See the example below.
A future version of this library may support automatic merging of explicit cell formatting with the row formatting but that isn’t currently supported.
Parameters
row- The zero indexed row number.format- TheFormatproperty for the cell.
Errors
XlsxError::RowColumnLimitError- Row exceeds Excel’s worksheet limits.
Examples
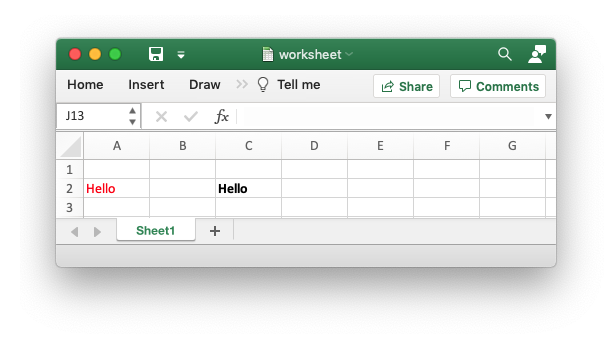
The following example demonstrates setting the format for a row in Excel.
    let worksheet = workbook.add_worksheet();

    // Add for formats.
    let bold_format = Format::new().set_bold();
    let red_format = Format::new().set_font_color(Color::Red);

    // Set the row format.
    worksheet.set_row_format(1, &red_format)?;

    // Add some unformatted text that adopts the row format.
    worksheet.write_string(1, 0, "Hello")?;

    // Add some formatted text that overrides the row format.
    worksheet.write_string_with_format(1, 2, "Hello", &bold_format)?;
Output file:
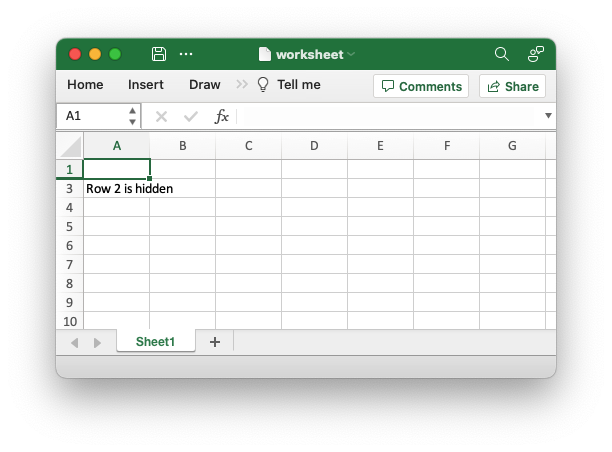
Hide a worksheet row.
The set_row_hidden() method is used to hide a row. This can be
used, for example, to hide intermediary steps in a complicated
calculation.
Parameters
row- The zero indexed row number.
Errors
XlsxError::RowColumnLimitError- Row exceeds Excel’s worksheet limits.
Examples
The following example demonstrates hiding a worksheet row.
    // Hide row 2 (with zero indexing).
    worksheet.set_row_hidden(1)?;

    worksheet.write_string(2, 0, "Row 2 is hidden")?;
Output file:
Unhide a user hidden worksheet row.
The set_row_unhidden() method is used to unhide a previously hidden
row. This can occasionally be useful when used in conjunction with
autofilter rules.
Parameters
row- The zero indexed row number.
Errors
XlsxError::RowColumnLimitError- Row exceeds Excel’s worksheet limits.
sourcepub fn set_column_width(
&mut self,
col: ColNum,
width: impl Into<f64>
) -> Result<&mut Worksheet, XlsxError>
pub fn set_column_width( &mut self, col: ColNum, width: impl Into<f64> ) -> Result<&mut Worksheet, XlsxError>
Set the width for a worksheet column.
The set_column_width() method is used to change the default width of a
worksheet column.
The width parameter sets the column width in the same units used by
Excel which is: the number of characters in the default font. The
default width is 8.43 in the default font of Calibri 11. The actual
relationship between a string width and a column width in Excel is
complex. See the following explanation of column
widths from the
Microsoft support documentation for more details. To set the width in
pixels use the
set_column_width_pixels()
method.
See also the autofit() method.
Parameters
col- The zero indexed column number.width- The row width in character units.
Errors
XlsxError::RowColumnLimitError- Column exceeds Excel’s worksheet limits.
Examples
The following example demonstrates setting the width of columns in Excel.
    let worksheet = workbook.add_worksheet();

    // Add some text.
    worksheet.write_string(0, 0, "Normal")?;
    worksheet.write_string(0, 2, "Wider")?;
    worksheet.write_string(0, 4, "Narrower")?;

    // Set the column width in Excel character units.
    worksheet.set_column_width(2, 16)?;
    worksheet.set_column_width(4, 4)?;
    worksheet.set_column_width(5, 4)?;
Output file:
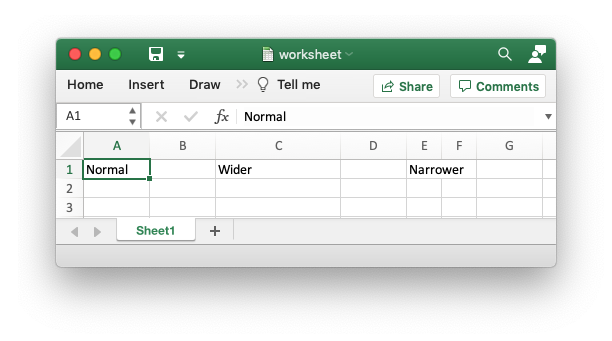
sourcepub fn set_column_width_pixels(
&mut self,
col: ColNum,
width: u16
) -> Result<&mut Worksheet, XlsxError>
pub fn set_column_width_pixels( &mut self, col: ColNum, width: u16 ) -> Result<&mut Worksheet, XlsxError>
Set the width for a worksheet column in pixels.
The set_column_width() method is used to change the default width of a
worksheet column.
To set the width in Excel character units use the
set_column_width() method.
See also the autofit() method.
Parameters
col- The zero indexed column number.width- The row width in pixels.
Errors
XlsxError::RowColumnLimitError- Column exceeds Excel’s worksheet limits.
Examples
The following example demonstrates setting the width of columns in Excel in pixels.
    let worksheet = workbook.add_worksheet();

    // Add some text.
    worksheet.write_string(0, 0, "Normal")?;
    worksheet.write_string(0, 2, "Wider")?;
    worksheet.write_string(0, 4, "Narrower")?;

    // Set the column width in pixels.
    worksheet.set_column_width_pixels(2, 117)?;
    worksheet.set_column_width_pixels(4, 33)?;
    worksheet.set_column_width_pixels(5, 33)?;
Output file:
sourcepub fn set_column_format(
&mut self,
col: ColNum,
format: &Format
) -> Result<&mut Worksheet, XlsxError>
pub fn set_column_format( &mut self, col: ColNum, format: &Format ) -> Result<&mut Worksheet, XlsxError>
Set the format for a column of cells.
The set_column_format() method is used to change the default format of a
column. Any unformatted data written to that column will then adopt that
format. Formatted data written to the column will maintain its own cell
format. See the example below.
A future version of this library may support automatic merging of explicit cell formatting with the column formatting but that isn’t currently supported.
Parameters
col- The zero indexed column number.format- TheFormatproperty for the cell.
Errors
XlsxError::RowColumnLimitError- Column exceeds Excel’s worksheet limits.
Examples
The following example demonstrates setting the format for a column in Excel.
    let worksheet = workbook.add_worksheet();

    // Add for formats.
    let bold_format = Format::new().set_bold();
    let red_format = Format::new().set_font_color(Color::Red);

    // Set the column format.
    worksheet.set_column_format(1, &red_format)?;

    // Add some unformatted text that adopts the column format.
    worksheet.write_string(0, 1, "Hello")?;

    // Add some formatted text that overrides the column format.
    worksheet.write_string_with_format(2, 1, "Hello", &bold_format)?;
Output file:
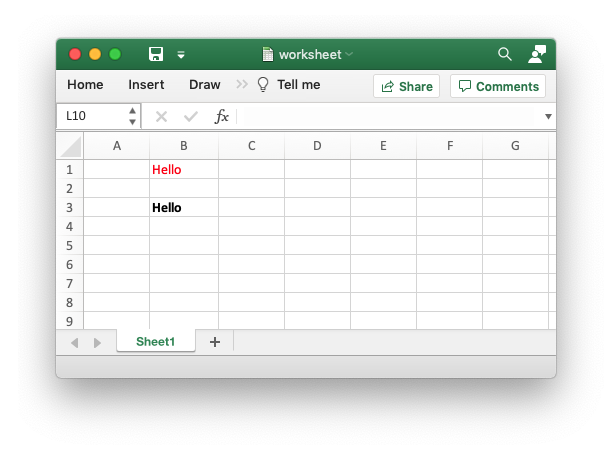
Hide a worksheet column.
The set_column_hidden() method is used to hide a column. This can be
used, for example, to hide intermediary steps in a complicated
calculation.
Parameters
col- The zero indexed column number.
Errors
XlsxError::RowColumnLimitError- Column exceeds Excel’s worksheet limits.
Examples
The following example demonstrates hiding a worksheet column.
    // Hide column B.
    worksheet.set_column_hidden(1)?;

    worksheet.write_string(0, 3, "Column B is hidden")?;
Output file:
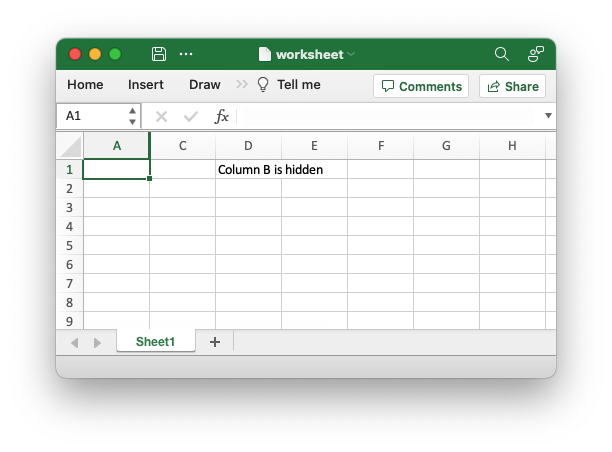
sourcepub fn autofilter(
&mut self,
first_row: RowNum,
first_col: ColNum,
last_row: RowNum,
last_col: ColNum
) -> Result<&mut Worksheet, XlsxError>
pub fn autofilter( &mut self, first_row: RowNum, first_col: ColNum, last_row: RowNum, last_col: ColNum ) -> Result<&mut Worksheet, XlsxError>
Set the autofilter area in the worksheet.
The autofilter() method allows an autofilter to be added to a
worksheet. An autofilter is a way of adding drop down lists to the
headers of a 2D range of worksheet data. This allows users to filter the
data based on simple criteria so that some data is shown and some is
hidden.
See the filter_column method for an
explanation of how to set a filter conditions for columns in the
autofilter range.
Note, Excel only allows one autofilter range per worksheet so calling this method multiple times will overwrite the previous range.
Parameters
first_row- The first row of the range. (All zero indexed.)first_col- The first row of the range.last_row- The last row of the range.last_col- The last row of the range.
Errors
XlsxError::RowColumnLimitError- Row or column exceeds Excel’s worksheet limits.XlsxError::RowColumnOrderError- First row larger than the last row.
Examples
The following example demonstrates setting a simple autofilter in a worksheet.
    // Set the autofilter.
    worksheet.autofilter(0, 0, 6, 1)?;
Output file:
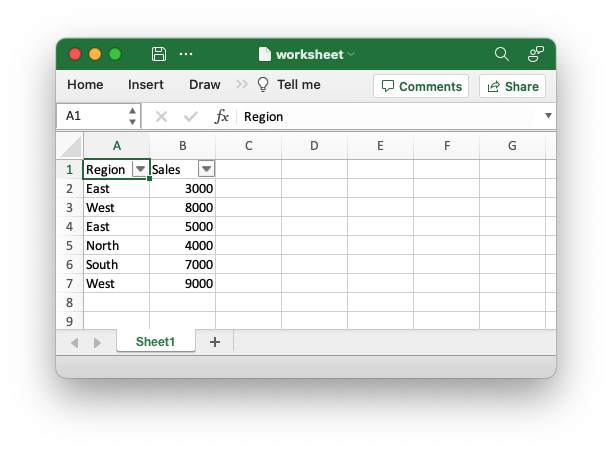
sourcepub fn filter_column(
&mut self,
col: ColNum,
filter_condition: &FilterCondition
) -> Result<&mut Worksheet, XlsxError>
pub fn filter_column( &mut self, col: ColNum, filter_condition: &FilterCondition ) -> Result<&mut Worksheet, XlsxError>
Set the filter condition for a column in an autofilter range.
The autofilter() method sets the cell range
for an autofilter but in order to filter rows within the filter area you
must also add a filter condition.
Excel supports two main types of filter. The first, and most common, is a list filter where the user selects the items to filter from a list of all the values in the the column range:
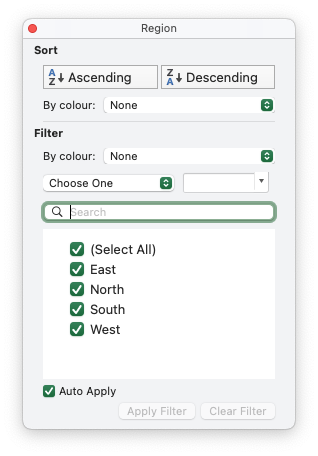
The other main type of filter is a custom filter where the user can specify 1 or 2 conditions like “>= 4000” and “<= 6000”:
In Excel these are mutually exclusive and you will need to choose one or
the other via the FilterCondition struct parameter.
For more details on setting filter conditions see FilterCondition
and the Working with Autofilters section of the Users Guide.
Note, there are some limitations on autofilter conditions. The main one
is that the hiding of rows that don’t match a filter is not an automatic
part of the file format. Instead it is necessary to hide rows that don’t
match the filters. The rust_xlsxwriter library does this automatically
and in most cases will get it right, however, there may be cases where
you need to manually hide some of the rows. See Auto-hiding filtered
rows.
Parameters
col- The zero indexed column number.filter_condition- The column filter condition defined by theFilterConditionstruct.
Errors
XlsxError::RowColumnLimitError- Column exceeds Excel’s worksheet limits.XlsxError::ParameterError- Parameter error for the following issues:- The
autofilter()range hasn’t been set. - The column is outside the
autofilter()range. - The
FilterConditiondoesn’t have a condition set.
- The
Examples
The following example demonstrates setting an autofilter with a list filter condition.
    // Set a filter condition to only show cells matching "East" in the first
    // column.
    let filter_condition = FilterCondition::new().add_list_filter("East");
    worksheet.filter_column(0, &filter_condition)?;
Output file:
sourcepub fn filter_automatic_off(&mut self) -> &mut Worksheet
pub fn filter_automatic_off(&mut self) -> &mut Worksheet
Turn off the option to automatically hide rows that don’t match filters.
Rows that don’t match autofilter conditions are hidden by Excel at
runtime. This feature isn’t an automatic part of the file format and in
practice it is necessary for the user to hide rows that don’t match the
applied filters. The rust_xlsxwriter library tries to do this
automatically and in most cases will get it right, however, there may be
cases where you need to manually hide some of the rows and may want to
turn off the automatic handling using filter_automatic_off().
See Auto-hiding filtered rows in the User Guide.
sourcepub fn add_table(
&mut self,
first_row: RowNum,
first_col: ColNum,
last_row: RowNum,
last_col: ColNum,
table: &Table
) -> Result<&mut Worksheet, XlsxError>
pub fn add_table( &mut self, first_row: RowNum, first_col: ColNum, last_row: RowNum, last_col: ColNum, table: &Table ) -> Result<&mut Worksheet, XlsxError>
Add a table to a worksheet.
Tables in Excel are a way of grouping a range of cells into a single entity that has common formatting or that can be referenced from formulas. Tables can have column headers, autofilters, total rows, column formulas and different formatting styles.
The headers and total row of a table should be configured via a
Table struct but the table data can be added via standard
worksheet.write() methods.
For more information on tables see the Microsoft documentation on Overview of Excel tables.
Parameters
first_row- The first row of the range. (All zero indexed.)first_col- The first row of the range.last_row- The last row of the range.last_col- The last row of the range.
Note, you need to ensure that the first_row and last_row range
includes all the rows for the table including the header and the total
row, if present.
Errors
XlsxError::RowColumnLimitError- Row or column exceeds Excel’s worksheet limits.XlsxError::RowColumnOrderError- First row larger than the last row.XlsxError::TableError- A general error that is raised when a table parameter is incorrect or a table is configured incorrectly.
Examples
use rust_xlsxwriter::{Table, TableColumn, TableFunction, Workbook, XlsxError};

fn main() -> Result<(), XlsxError> {
    // Create a new Excel file object.
    let mut workbook = Workbook::new();

    // Add a worksheet to the workbook.
    let worksheet = workbook.add_worksheet();

    // Some sample data for the table.
    let items = ["Apples", "Pears", "Bananas", "Oranges"];
    let data = [
        [10000, 5000, 8000, 6000],
        [2000, 3000, 4000, 5000],
        [6000, 6000, 6500, 6000],
        [500, 300, 200, 700],
    ];

    // Write the table data.
    worksheet.write_column(3, 1, items)?;
    worksheet.write_row_matrix(3, 2, data)?;

    // Set the columns widths for clarity.
    for col_num in 1..=6u16 {
        worksheet.set_column_width(col_num, 12)?;
    }

    // Create a new table and configure it.
    let mut table = Table::new();

    let columns = vec![
        TableColumn::new()
            .set_header("Product")
            .set_total_label("Totals"),
        TableColumn::new()
            .set_header("Quarter 1")
            .set_total_function(TableFunction::Sum),
        TableColumn::new()
            .set_header("Quarter 2")
            .set_total_function(TableFunction::Sum),
        TableColumn::new()
            .set_header("Quarter 3")
            .set_total_function(TableFunction::Sum),
        TableColumn::new()
            .set_header("Quarter 4")
            .set_total_function(TableFunction::Sum),
        TableColumn::new()
            .set_header("Year")
            .set_total_function(TableFunction::Sum)
            .set_formula("SUM(Table1[@[Quarter 1]:[Quarter 4]])"),
    ];

    table.set_columns(&columns);
    table.set_total_row(true);

    // Add the table to the worksheet.
    worksheet.add_table(2, 1, 7, 6, &table)?;

    // Save the file to disk.
    workbook.save("tables.xlsx")?;

    Ok(())
}
Output file:
sourcepub fn protect(&mut self) -> &mut Worksheet
pub fn protect(&mut self) -> &mut Worksheet
Protect a worksheet from modification.
The protect() method protects a worksheet from modification. It works
by enabling a cell’s locked and hidden properties, if they have been
set. A locked cell cannot be edited and this property is on by
default for all cells. A hidden cell will display the results of a
formula but not the formula itself.
These properties can be set using the
format.set_locked()
format.set_unlocked() and
worksheet.set_hidden() format methods. All cells
have the locked property turned on by default (see the example below)
so in general you don’t have to explicitly turn it on.
Examples
Example of cell locking and formula hiding in an Excel worksheet
rust_xlsxwriter library.
    // Create some format objects.
    let unlocked = Format::new().set_unlocked();
    let hidden = Format::new().set_hidden();

    // Protect the worksheet to turn on cell locking.
    worksheet.protect();

    // Examples of cell locking and hiding.
    worksheet.write_string(0, 0, "Cell B1 is locked. It cannot be edited.")?;
    worksheet.write_formula(0, 1, "=1+2")?; // Locked by default.

    worksheet.write_string(1, 0, "Cell B2 is unlocked. It can be edited.")?;
    worksheet.write_formula_with_format(1, 1, "=1+2", &unlocked)?;

    worksheet.write_string(2, 0, "Cell B3 is hidden. The formula isn't visible.")?;
    worksheet.write_formula_with_format(2, 1, "=1+2", &hidden)?;
Output file:
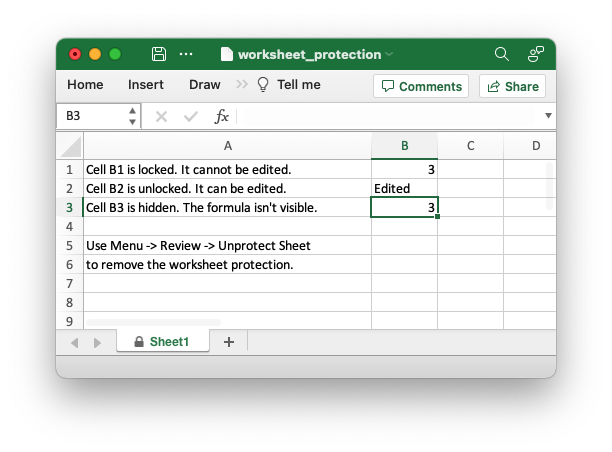
sourcepub fn protect_with_password(&mut self, password: &str) -> &mut Worksheet
pub fn protect_with_password(&mut self, password: &str) -> &mut Worksheet
Protect a worksheet from modification with a password.
The protect_with_password() method is like the
protect() method, see above, except that you can
add an optional, weak, password to prevent modification.
Note: Worksheet level passwords in Excel offer very weak protection.
They do not encrypt your data and are very easy to deactivate. Full
workbook encryption is not supported by rust_xlsxwriter. However, it
is possible to encrypt an rust_xlsxwriter file using a third party open
source tool called msoffice-crypt.
This works for macOS, Linux and Windows:
msoffice-crypt.exe -e -p password clear.xlsx encrypted.xlsx
Parameters
password- The password string. Note, only ascii text passwords are supported. Passing the empty string “” is the same as turning on protection without a password.
Examples
The following example demonstrates protecting a worksheet from editing with a password.
    // Add a worksheet to the workbook.
    let worksheet = workbook.add_worksheet();

    // Protect the worksheet from modification.
    worksheet.protect_with_password("abc123");
Output file:
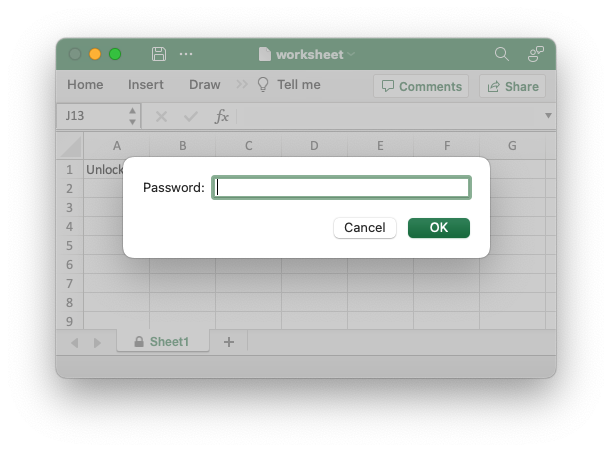
sourcepub fn protect_with_options(
&mut self,
options: &ProtectionOptions
) -> &mut Worksheet
pub fn protect_with_options( &mut self, options: &ProtectionOptions ) -> &mut Worksheet
Specify which worksheet elements should, or shouldn’t, be protected.
The protect_with_password() method is like the
protect() method, see above, except it also
specifies which worksheet elements should, or shouldn’t, be protected.
You can specify which worksheet elements protection should be on or off
via a ProtectionOptions struct reference. The Excel options
with their default states are shown below:
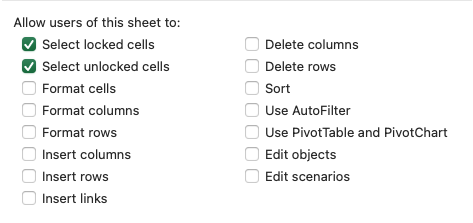
Parameters
options - Worksheet protection options as defined by a
ProtectionOptions struct reference.
Examples
The following example demonstrates setting the worksheet properties to be protected in a protected worksheet. In this case we protect the overall worksheet but allow columns and rows to be inserted.
    // Set some of the options and use the defaults for everything else.
    let options = ProtectionOptions {
        insert_columns: true,
        insert_rows: true,
        ..ProtectionOptions::default()
    };

    // Set the protection options.
    worksheet.protect_with_options(&options);
Excel dialog for the output file, compare this with the default image above:
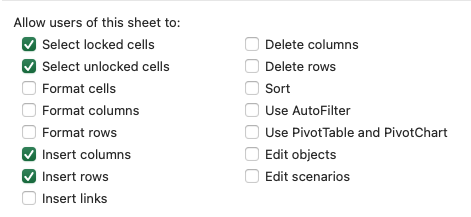
sourcepub fn unprotect_range(
&mut self,
first_row: RowNum,
first_col: ColNum,
last_row: RowNum,
last_col: ColNum
) -> Result<&mut Worksheet, XlsxError>
pub fn unprotect_range( &mut self, first_row: RowNum, first_col: ColNum, last_row: RowNum, last_col: ColNum ) -> Result<&mut Worksheet, XlsxError>
Unprotect a range of cells in a protected worksheet.
As shown in the example for the
worksheet.protect() method it is possible to
unprotect a cell by setting the format unprotect property. Excel also
offers an interface to unprotect larger ranges of cells. This is
replicated in rust_xlsxwriter using the unprotect_range() method,
see the example below.
Parameters
first_row- The first row of the range. (All zero indexed.)first_col- The first row of the range.last_row- The last row of the range.last_col- The last row of the range.
Errors
XlsxError::RowColumnLimitError- Row or column exceeds Excel’s worksheet limits.XlsxError::RowColumnOrderError- First row larger than the last row.
Examples
The following example demonstrates unprotecting ranges in a protected worksheet.
    // Protect the worksheet from modification.
    worksheet.protect();

    // Unprotect range D4:F10.
    worksheet.unprotect_range(4, 3, 9, 5)?;

    // Unprotect single cell B3 by repeating (row, col).
    worksheet.unprotect_range(2, 1, 2, 1)?;
Dialog from the output file:
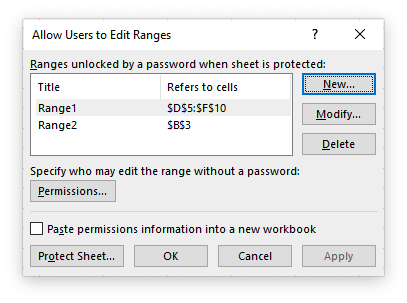
sourcepub fn unprotect_range_with_options(
&mut self,
first_row: RowNum,
first_col: ColNum,
last_row: RowNum,
last_col: ColNum,
name: &str,
password: &str
) -> Result<&mut Worksheet, XlsxError>
pub fn unprotect_range_with_options( &mut self, first_row: RowNum, first_col: ColNum, last_row: RowNum, last_col: ColNum, name: &str, password: &str ) -> Result<&mut Worksheet, XlsxError>
Unprotect a range of cells in a protected worksheet, with options.
This method is similar to
unprotect_range(), see above, expect that
it allows you to specify two additional parameters to set the name of
the range (instead of the default Range1 .. RangeN) and also a optional
weak password (see
protect_with_password() for an
explanation of what weak means here).
Parameters
first_row- The first row of the range. (All zero indexed.)first_col- The first row of the range.last_row- The last row of the range.last_col- The last row of the range.name- The name of the range instead ofRangeN. Can be blank if not required.password- The password to prevent modification of the range. Can be blank if not required.
Errors
XlsxError::RowColumnLimitError- Row or column exceeds Excel’s worksheet limits.XlsxError::RowColumnOrderError- First row larger than the last row.
Examples
The following example demonstrates unprotecting ranges in a protected worksheet, with additional options.
    // Protect the worksheet from modification.
    worksheet.protect();

    // Unprotect range D4:F10 and give it a user defined name.
    worksheet.unprotect_range_with_options(4, 3, 9, 5, "MyRange", "")?;
Dialog from the output file:
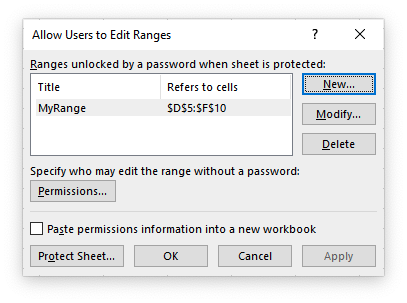
sourcepub fn set_selection(
&mut self,
first_row: RowNum,
first_col: ColNum,
last_row: RowNum,
last_col: ColNum
) -> Result<&mut Worksheet, XlsxError>
pub fn set_selection( &mut self, first_row: RowNum, first_col: ColNum, last_row: RowNum, last_col: ColNum ) -> Result<&mut Worksheet, XlsxError>
Set the selected cell or cells in a worksheet.
The set_selection() method can be used to specify which cell or range
of cells is selected in a worksheet. The most common requirement is to
select a single cell, in which case the first_ and last_ parameters
should be the same.
The active cell within a selected range is determined by the order in
which first_ and last_ are specified.
Only one range of cells can be selected. The default cell selection is (0, 0, 0, 0), “A1”.
Parameters
first_row- The first row of the range. (All zero indexed.)first_col- The first row of the range.last_row- The last row of the range.last_col- The last row of the range.
Errors
XlsxError::RowColumnLimitError- Row or column exceeds Excel’s worksheet limits.
Examples
The following example demonstrates selecting cells in worksheets. The order
of selection within the range depends on the order of first and last.
    let worksheet1 = workbook.add_worksheet();
    worksheet1.set_selection(3, 2, 3, 2)?; // Cell C4

    let worksheet2 = workbook.add_worksheet();
    worksheet2.set_selection(3, 2, 6, 6)?; // Cells C4 to G7.

    let worksheet3 = workbook.add_worksheet();
    worksheet3.set_selection(6, 6, 3, 2)?; // Cells G7 to C4.
Output file:
sourcepub fn set_top_left_cell(
&mut self,
row: RowNum,
col: ColNum
) -> Result<&mut Worksheet, XlsxError>
pub fn set_top_left_cell( &mut self, row: RowNum, col: ColNum ) -> Result<&mut Worksheet, XlsxError>
Set the first visible cell at the top left of a worksheet.
This set_top_left_cell() method can be used to set the top leftmost
visible cell in the worksheet.
Parameters
row- The zero indexed row number.col- The zero indexed column number.
Errors
XlsxError::RowColumnLimitError- Row or column exceeds Excel’s worksheet limits.
Examples
The following example demonstrates setting the top and leftmost visible
cell in the worksheet. Often used in conjunction with set_selection()
to activate the same cell.
    // Set top-left cell to AA32.
    worksheet.set_top_left_cell(31, 26)?;

    // Also make this the active/selected cell.
    worksheet.set_selection(31, 26, 31, 26)?;
Output file:
sourcepub fn set_formula_result(
&mut self,
row: RowNum,
col: ColNum,
result: impl Into<String>
) -> &mut Worksheet
pub fn set_formula_result( &mut self, row: RowNum, col: ColNum, result: impl Into<String> ) -> &mut Worksheet
Write a user defined result to a worksheet formula cell.
The rust_xlsxwriter library doesn’t calculate the result of a formula
written using write_formula_with_format() or
write_formula(). Instead it
stores the value 0 as the formula result. It then sets a global flag in
the xlsx file to say that all formulas and functions should be
recalculated when the file is opened.
This works fine with Excel and other spreadsheet applications. However, applications that don’t have a facility to calculate formulas will only display the 0 results.
If required, it is possible to specify the calculated result of a
formula using the set_formula_result() method.
Parameters
row- The zero indexed row number.col- The zero indexed column number.result- The formula result to write to the cell.
Warnings
You will get a warning if you try to set a formula result for a cell that doesn’t have a formula.
Examples
The following example demonstrates manually setting the result of a formula. Note, this is only required for non-Excel applications that don’t calculate formula results.
    // Using string syntax.
    worksheet
        .write_formula(0, 0, "1+1")?
        .set_formula_result(0, 0, "2");

    // Or using a Formula type.
worksheet.write_formula(1, 0, Formula::new("2+2").set_result("4"))?;sourcepub fn set_formula_result_default(
&mut self,
result: impl Into<String>
) -> &mut Worksheet
pub fn set_formula_result_default( &mut self, result: impl Into<String> ) -> &mut Worksheet
Write the default formula result for worksheet formulas.
The rust_xlsxwriter library doesn’t calculate the result of a formula
written using write_formula_with_format() or
write_formula(). Instead it
stores the value 0 as the formula result. It then sets a global flag in
the xlsx file to say that all formulas and functions should be
recalculated when the file is opened.
However, for LibreOffice the default formula result should be set to the
empty string literal "", via the set_formula_result_default()
method, to force calculation of the result.
Parameters
result- The default formula result to write to the cell.
Examples
The following example demonstrates manually setting the default result for all non-calculated formulas in a worksheet.
worksheet.set_formula_result_default("");
sourcepub fn use_future_functions(&mut self, enable: bool)
pub fn use_future_functions(&mut self, enable: bool)
Enable the use of newer Excel future functions.
Enable the use of newer Excel “future” functions without having to
prefix them with with _xlfn.
Excel 2010 and later versions added functions which weren’t defined in
the original file specification. These functions are referred to by
Microsoft as “Future Functions”. Examples of these functions are ACOT,
CHISQ.DIST.RT , CONFIDENCE.NORM, STDEV.P, STDEV.S and
WORKDAY.INTL.
When written using write_formula() these
functions need to be fully qualified with a prefix such as _xlfn.
Alternatively you can use the worksheet.use_future_functions()
function to have rust_xlsxwriter automatically handle future functions
for you, or use a Formula struct and the
Formula::use_future_functions()
method, see below.
Parameters
enable- Turn the property on/off. It is off by default.
Examples
The following example demonstrates different ways to handle writing Future Functions to a worksheet.
    // The following is a "Future" function and will generate a "#NAME?" warning
    // in Excel.
    worksheet.write_formula(0, 0, "=ISFORMULA($B$1)")?;

    // The following adds the required prefix. This will work without a warning.
    worksheet.write_formula(1, 0, "=_xlfn.ISFORMULA($B$1)")?;

    // The following uses a Formula object and expands out any future functions.
    // This also works without a warning.
    worksheet.write_formula(2, 0, Formula::new("=ISFORMULA($B$1)").use_future_functions())?;

    // The following expands out all future functions used in the worksheet from
    // this point forward. This also works without a warning.
    worksheet.use_future_functions(true);
    worksheet.write_formula(3, 0, "=ISFORMULA($B$1)")?;
Output file:
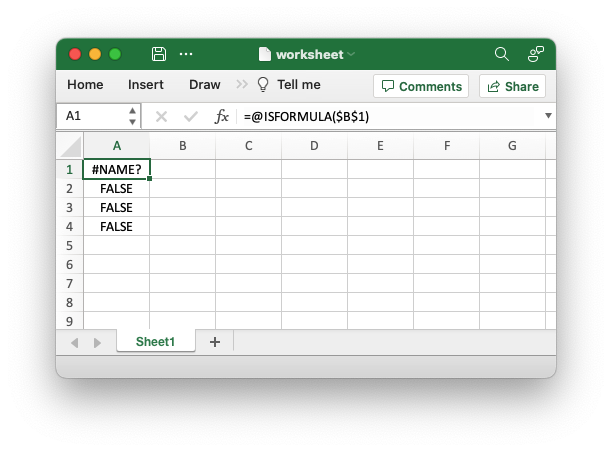
sourcepub fn set_right_to_left(&mut self, enable: bool) -> &mut Worksheet
pub fn set_right_to_left(&mut self, enable: bool) -> &mut Worksheet
Display the worksheet cells from right to left for some versions of Excel.
The set_right_to_left() method is used to change the default direction
of the worksheet from left-to-right, with the A1 cell in the top left,
to right-to-left, with the A1 cell in the top right.
This is useful when creating Arabic, Hebrew or other near or far eastern worksheets that use right-to-left as the default direction.
Depending on your use case, and text, you may also need to use the
Format::set_reading_direction()
method to set the direction of the text within the cells.
Parameters
enable- Turn the property on/off. It is off by default.
Examples
The following example demonstrates changing the default worksheet and cell text direction changed from left-to-right to right-to-left, as required by some middle eastern versions of Excel.
    // Add the cell formats.
    let format_left_to_right = Format::new().set_reading_direction(1);
    let format_right_to_left = Format::new().set_reading_direction(2);

    // Add a worksheet in the standard left to right direction.
    let worksheet1 = workbook.add_worksheet();

    // Make the column wider for clarity.
    worksheet1.set_column_width(0,25)?;

    // Standard direction:         | A1 | B1 | C1 | ...
    worksheet1.write_string(0, 0, "نص عربي / English text")?;
    worksheet1.write_string_with_format(1, 0, "نص عربي / English text", &format_left_to_right)?;
    worksheet1.write_string_with_format(2, 0, "نص عربي / English text", &format_right_to_left)?;

    // Add a worksheet and change it to right to left direction.
    let worksheet2 = workbook.add_worksheet();
    worksheet2.set_right_to_left(true);

    // Make the column wider for clarity.
    worksheet2.set_column_width(0, 25)?;

    // Right to left direction:    ... | C1 | B1 | A1 |
    worksheet2.write_string(0, 0, "نص عربي / English text")?;
    worksheet2.write_string_with_format(1, 0, "نص عربي / English text", &format_left_to_right)?;
    worksheet2.write_string_with_format(2, 0, "نص عربي / English text", &format_right_to_left)?;
Output file:
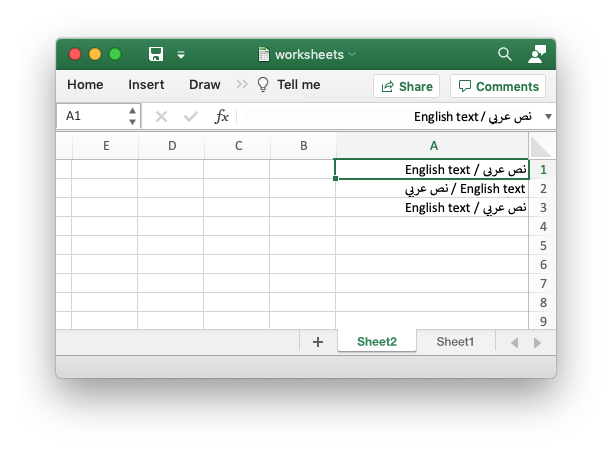
sourcepub fn set_active(&mut self, enable: bool) -> &mut Worksheet
pub fn set_active(&mut self, enable: bool) -> &mut Worksheet
Make a worksheet the active/initially visible worksheet in a workbook.
The set_active() method is used to specify which worksheet is
initially visible in a multi-sheet workbook. If no worksheet is set then
the first worksheet is made the active worksheet, like in Excel.
Parameters
enable- Turn the property on/off. It is off by default.
Examples
The following example demonstrates setting a worksheet as the visible worksheet when a file is opened.
    let worksheet1 = Worksheet::new();
    let worksheet3 = Worksheet::new();
    let mut worksheet2 = Worksheet::new();

    worksheet2.set_active(true);
Output file:
sourcepub fn set_selected(&mut self, enable: bool) -> &mut Worksheet
pub fn set_selected(&mut self, enable: bool) -> &mut Worksheet
Set a worksheet tab as selected.
The set_selected() method is used to indicate that a worksheet is
selected in a multi-sheet workbook.
A selected worksheet has its tab highlighted. Selecting worksheets is a
way of grouping them together so that, for example, several worksheets
could be printed in one go. A worksheet that has been activated via the
set_active() method will also appear as
selected.
Parameters
enable- Turn the property on/off. It is off by default.
Examples
The following example demonstrates selecting worksheet in a workbook. The active worksheet is selected by default so in this example the first two worksheets are selected.
    let worksheet1 = Worksheet::new();
    let worksheet3 = Worksheet::new();
    let mut worksheet2 = Worksheet::new();

    worksheet2.set_selected(true);
Output file:
Hide a worksheet.
The set_hidden() method is used to hide a worksheet. This can be used
to hide a worksheet in order to avoid confusing a user with intermediate
data or calculations.
In Excel a hidden worksheet can not be activated or selected so this
method is mutually exclusive with the
set_active() and
set_selected() methods. In addition, since
the first worksheet will default to being the active worksheet, you
cannot hide the first worksheet without activating another sheet.
Parameters
enable- Turn the property on/off. It is off by default.
Examples
The following example demonstrates hiding a worksheet.
    let worksheet1 = Worksheet::new();
    let worksheet3 = Worksheet::new();
    let mut worksheet2 = Worksheet::new();

    worksheet2.set_hidden(true);
Output file:
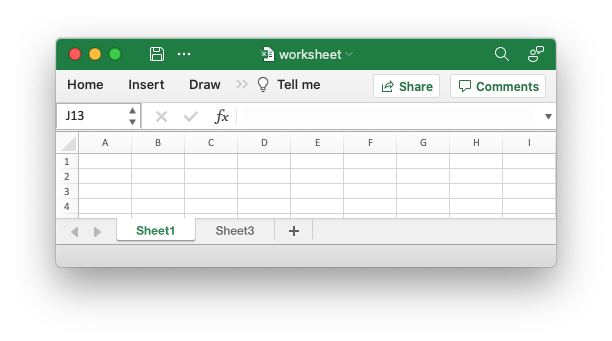
sourcepub fn set_first_tab(&mut self, enable: bool) -> &mut Worksheet
pub fn set_first_tab(&mut self, enable: bool) -> &mut Worksheet
Set current worksheet as the first visible sheet tab.
The set_active() method determines
which worksheet is initially selected. However, if there are a large
number of worksheets the selected worksheet may not appear on the
screen. To avoid this you can select which is the leftmost visible
worksheet tab using set_first_tab().
This method is not required very often. The default is the first worksheet.
Parameters
enable- Turn the property on/off. It is off by default.
sourcepub fn set_tab_color(&mut self, color: impl IntoColor) -> &mut Worksheet
pub fn set_tab_color(&mut self, color: impl IntoColor) -> &mut Worksheet
Set the color of the worksheet tab.
The set_tab_color() method can be used to change the color of the
worksheet tab. This is useful for highlighting the important tab in a
group of worksheets.
Parameters
color- The tab color property defined by aColorenum value.
Examples
The following example demonstrates set the tab color of worksheets.
    let mut worksheet1 = Worksheet::new();
    let mut worksheet2 = Worksheet::new();
    let mut worksheet3 = Worksheet::new();
    let mut worksheet4 = Worksheet::new();

    worksheet1.set_tab_color(Color::Red);
    worksheet2.set_tab_color(Color::Green);
    worksheet3.set_tab_color(Color::RGB(0xFF9900));

    // worksheet4 will have the default color.
    worksheet4.set_active(true);
Output file:
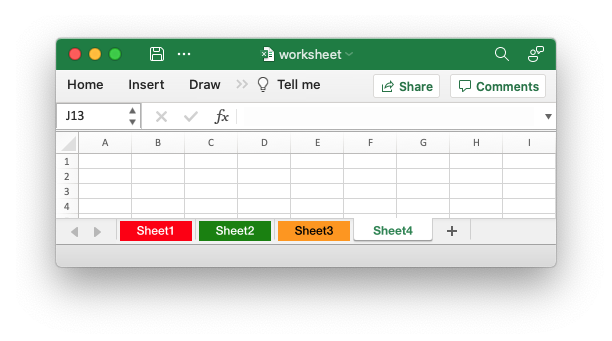
sourcepub fn set_paper_size(&mut self, paper_size: u8) -> &mut Worksheet
pub fn set_paper_size(&mut self, paper_size: u8) -> &mut Worksheet
Set the paper type/size when printing.
This method is used to set the paper format for the printed output of a worksheet. The following paper styles are available:
| Index | Paper format | Paper size |
|---|---|---|
| 0 | Printer default | Printer default |
| 1 | Letter | 8 1/2 x 11 in |
| 2 | Letter Small | 8 1/2 x 11 in |
| 3 | Tabloid | 11 x 17 in |
| 4 | Ledger | 17 x 11 in |
| 5 | Legal | 8 1/2 x 14 in |
| 6 | Statement | 5 1/2 x 8 1/2 in |
| 7 | Executive | 7 1/4 x 10 1/2 in |
| 8 | A3 | 297 x 420 mm |
| 9 | A4 | 210 x 297 mm |
| 10 | A4 Small | 210 x 297 mm |
| 11 | A5 | 148 x 210 mm |
| 12 | B4 | 250 x 354 mm |
| 13 | B5 | 182 x 257 mm |
| 14 | Folio | 8 1/2 x 13 in |
| 15 | Quarto | 215 x 275 mm |
| 16 | — | 10x14 in |
| 17 | — | 11x17 in |
| 18 | Note | 8 1/2 x 11 in |
| 19 | Envelope 9 | 3 7/8 x 8 7/8 |
| 20 | Envelope 10 | 4 1/8 x 9 1/2 |
| 21 | Envelope 11 | 4 1/2 x 10 3/8 |
| 22 | Envelope 12 | 4 3/4 x 11 |
| 23 | Envelope 14 | 5 x 11 1/2 |
| 24 | C size sheet | — |
| 25 | D size sheet | — |
| 26 | E size sheet | — |
| 27 | Envelope DL | 110 x 220 mm |
| 28 | Envelope C3 | 324 x 458 mm |
| 29 | Envelope C4 | 229 x 324 mm |
| 30 | Envelope C5 | 162 x 229 mm |
| 31 | Envelope C6 | 114 x 162 mm |
| 32 | Envelope C65 | 114 x 229 mm |
| 33 | Envelope B4 | 250 x 353 mm |
| 34 | Envelope B5 | 176 x 250 mm |
| 35 | Envelope B6 | 176 x 125 mm |
| 36 | Envelope | 110 x 230 mm |
| 37 | Monarch | 3.875 x 7.5 in |
| 38 | Envelope | 3 5/8 x 6 1/2 in |
| 39 | Fanfold | 14 7/8 x 11 in |
| 40 | German Std Fanfold | 8 1/2 x 12 in |
| 41 | German Legal Fanfold | 8 1/2 x 13 in |
Note, it is likely that not all of these paper types will be available to the end user since it will depend on the paper formats that the user’s printer supports. Therefore, it is best to stick to standard paper types of 1 for US Letter and 9 for A4.
If you do not specify a paper type the worksheet will print using the printer’s default paper style.
Parameters
paper_size- The paper size index from the list above .
Examples
The following example demonstrates setting the worksheet paper size/type for the printed output.
    // Set the printer paper size.
    worksheet.set_paper_size(9); // A4 paper size.
sourcepub fn set_page_order(&mut self, enable: bool) -> &mut Worksheet
pub fn set_page_order(&mut self, enable: bool) -> &mut Worksheet
Set the order in which pages are printed.
The set_page_order() method is used to change the default print
direction. This is referred to by Excel as the sheet “page order”:
The default page order is shown below for a worksheet that extends over 4 pages. The order is called “down then over”:

However, by using set_page_order(false) the print order will be
changed to “over then down”.
Parameters
enable- Turn the property on/off. Settrueto get “Down, then over” (the default) andfalseto get “Over, then down”.
Examples
The following example demonstrates setting the worksheet printed page order.
    // Set the page print to "over then down"
worksheet.set_page_order(false);sourcepub fn set_landscape(&mut self) -> &mut Worksheet
pub fn set_landscape(&mut self) -> &mut Worksheet
Set the page orientation to landscape.
The set_landscape() method is used to set the orientation of a
worksheet’s printed page to landscape.
Examples
The following example demonstrates setting the worksheet page orientation to landscape.
worksheet.set_landscape();
sourcepub fn set_portrait(&mut self) -> &mut Worksheet
pub fn set_portrait(&mut self) -> &mut Worksheet
Set the page orientation to portrait.
This set_portrait() method is used to set the orientation of a
worksheet’s printed page to portrait. The default worksheet orientation
is portrait, so this function is rarely required.
sourcepub fn set_view_normal(&mut self) -> &mut Worksheet
pub fn set_view_normal(&mut self) -> &mut Worksheet
Set the page view mode to normal layout.
This method is used to display the worksheet in “View -> Normal” mode. This is the default.
sourcepub fn set_view_page_layout(&mut self) -> &mut Worksheet
pub fn set_view_page_layout(&mut self) -> &mut Worksheet
Set the page view mode to page layout.
This method is used to display the worksheet in “View -> Page Layout” mode.
sourcepub fn set_view_page_break_preview(&mut self) -> &mut Worksheet
pub fn set_view_page_break_preview(&mut self) -> &mut Worksheet
Set the page view mode to page break preview.
This method is used to display the worksheet in “View -> Page Break Preview” mode.
sourcepub fn set_page_breaks(
&mut self,
breaks: &[RowNum]
) -> Result<&mut Worksheet, XlsxError>
pub fn set_page_breaks( &mut self, breaks: &[RowNum] ) -> Result<&mut Worksheet, XlsxError>
Set the horizontal page breaks on a worksheet.
The set_page_breaks() method adds horizontal page breaks to a
worksheet. A page break causes all the data that follows it to be
printed on the next page. Horizontal page breaks act between rows.
Parameters
breaks- A list of one or more row numbers where the page breaks occur. To create a page break between rows 20 and 21 you must specify the break at row 21. However in zero index notation this is actually row 20. So you can pretend for a small while that you are using 1 index notation.
Errors
XlsxError::RowColumnLimitError- Row or column exceeds Excel’s worksheet limits.XlsxError::ParameterError- The number of page breaks exceeds Excel’s limit of 1023 page breaks.
Examples
The following example demonstrates setting page breaks for a worksheet.
    // Set a page break at rows 20, 40 and 60.
    worksheet.set_page_breaks(&[20, 40, 60])?;
Output file:
sourcepub fn set_vertical_page_breaks(
&mut self,
breaks: &[u32]
) -> Result<&mut Worksheet, XlsxError>
pub fn set_vertical_page_breaks( &mut self, breaks: &[u32] ) -> Result<&mut Worksheet, XlsxError>
Set the vertical page breaks on a worksheet.
The set_vertical_page_breaks() method adds vertical page breaks to a
worksheet. This is much less common than the
set_page_breaks() method shown above.
Parameters
breaks- A list of one or more column numbers where the page breaks occur.
Errors
XlsxError::RowColumnLimitError- Row or column exceeds Excel’s worksheet limits.XlsxError::ParameterError- The number of page breaks exceeds Excel’s limit of 1023 page breaks.
sourcepub fn set_zoom(&mut self, zoom: u16) -> &mut Worksheet
pub fn set_zoom(&mut self, zoom: u16) -> &mut Worksheet
Set the worksheet zoom factor.
Set the worksheet zoom factor in the range 10 <= zoom <= 400.
The default zoom level is 100. The set_zoom() method does not affect
the scale of the printed page in Excel. For that you should use
set_print_scale().
Parameters
zoom- The worksheet zoom level.
Examples
The following example demonstrates setting the worksheet zoom level.
    worksheet.write_string(0, 0, "Hello")?;
    worksheet.set_zoom(200);
Output file:
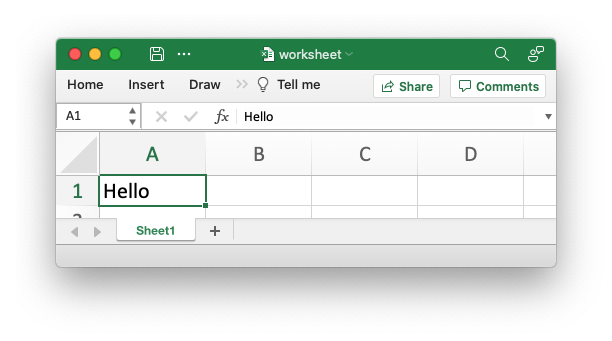
sourcepub fn set_freeze_panes(
&mut self,
row: RowNum,
col: ColNum
) -> Result<&mut Worksheet, XlsxError>
pub fn set_freeze_panes( &mut self, row: RowNum, col: ColNum ) -> Result<&mut Worksheet, XlsxError>
Freeze panes in a worksheet.
The set_freeze_panes() method can be used to divide a worksheet into
horizontal or vertical regions known as panes and to “freeze” these
panes so that the splitter bars are not visible.
As with Excel the split is to the top and left of the cell. So to freeze
the top row and leftmost column you would use (1, 1) (zero-indexed).
Also, you can set one of the row and col parameters as 0 if you do not
want either the vertical or horizontal split. See the example below.
In Excel it is also possible to set “split” panes without freezing them.
That feature isn’t currently supported by rust_xlsxwriter.
Parameters
row- The zero indexed row number.col- The zero indexed column number.
Errors
XlsxError::RowColumnLimitError- Row or column exceeds Excel’s worksheet limits.
Examples
The following example demonstrates setting the worksheet panes.
    // Freeze the top row only.
    worksheet1.set_freeze_panes(1, 0)?;

    // Freeze the leftmost column only.
    worksheet2.set_freeze_panes(0, 1)?;

    // Freeze the top row and leftmost column.
    worksheet3.set_freeze_panes(1, 1)?;
Output file:
sourcepub fn set_freeze_panes_top_cell(
&mut self,
row: RowNum,
col: ColNum
) -> Result<&mut Worksheet, XlsxError>
pub fn set_freeze_panes_top_cell( &mut self, row: RowNum, col: ColNum ) -> Result<&mut Worksheet, XlsxError>
Set the top most cell in the scrolling area of a freeze pane.
This method is used in conjunction with the
set_freeze_panes() method to set the
top most visible cell in the scrolling range. For example you may want
to freeze the top row a but have the worksheet pre-scrolled so that cell
A20 is visible in the scrolled area. See the example below.
Parameters
row- The zero indexed row number.col- The zero indexed column number.
Errors
XlsxError::RowColumnLimitError- Row or column exceeds Excel’s worksheet limits.
Examples
The following example demonstrates setting the worksheet panes and also setting the topmost visible cell in the scrolled area.
    // Freeze the top row only.
    worksheet.set_freeze_panes(1, 0)?;

    // Pre-scroll to the row 20.
    worksheet.set_freeze_panes_top_cell(19, 0)?;
Output file:
sourcepub fn set_header(&mut self, header: impl Into<String>) -> &mut Worksheet
pub fn set_header(&mut self, header: impl Into<String>) -> &mut Worksheet
Set the printed page header caption.
The set_header() method can be used to set the header for a worksheet.
Headers and footers are generated using a string which is a combination of plain text and optional control characters.
The available control characters are:
| Control | Category | Description |
|---|---|---|
&L | Alignment | Left |
&C | Center | |
&R | Right | |
&[Page] or &P | Information | Page number |
&[Pages] or &N | Total number of pages | |
&[Date] or &D | Date | |
&[Time] or &T | Time | |
&[File] or &F | File name | |
&[Tab] or &A | Worksheet name | |
&[Path] or &Z | Workbook path | |
&fontsize | Font | Font size |
&"font,style" | Font name and style | |
&U | Single underline | |
&E | Double underline | |
&S | Strikethrough | |
&X | Superscript | |
&Y | Subscript | |
&[Picture] or &G | Images | Picture/image |
&& | Miscellaneous | Literal ampersand & |
Some of the placeholder variables have a long version like &[Page] and
a short version like &P. The longer version is displayed in the Excel
interface but the shorter version is the way that it is stored in the
file format. Either version is okay since rust_xlsxwriter will
translate as required.
Headers and footers have 3 edit areas to the left, center and right.
Text can be aligned to these areas by prefixing the text with the
control characters &L, &C and &R.
For example:
worksheet.set_header("&LHello");

 ---------------------------------------------------------------
|                                                               |
| Hello                                                         |
|                                                               |

worksheet.set_header("&CHello");

 ---------------------------------------------------------------
|                                                               |
|                          Hello                                |
|                                                               |

worksheet.set_header("&RHello");

 ---------------------------------------------------------------
|                                                               |
|                                                         Hello |
|                                                               |
You can also have text in each of the alignment areas:
worksheet.set_header("&LCiao&CBello&RCielo");

 ---------------------------------------------------------------
|                                                               |
| Ciao                     Bello                          Cielo |
|                                                               |
The information control characters act as variables/templates that Excel will update/expand as the workbook or worksheet changes.
worksheet.set_header("&CPage &[Page] of &[Pages]");

 ---------------------------------------------------------------
|                                                               |
|                        Page 1 of 6                            |
|                                                               |
Times and dates are in the user’s default format:
worksheet.set_header("&CUpdated at &[Time]");

 ---------------------------------------------------------------
|                                                               |
|                    Updated at 12:30 PM                        |
|                                                               |
To include a single literal ampersand & in a header or footer you
should use a double ampersand &&:
worksheet.set_header("&CCuriouser && Curiouser - Attorneys at Law");

 ---------------------------------------------------------------
|                                                               |
|                   Curiouser & Curiouser                       |
|                                                               |
You can specify the font size of a section of the text by prefixing it
with the control character &n where n is the font size:
worksheet1.set_header("&C&30Hello Big");
worksheet2.set_header("&C&10Hello Small");
You can specify the font of a section of the text by prefixing it with
the control sequence &"font,style" where fontname is a font name
such as Windows font descriptions: “Regular”, “Italic”, “Bold” or “Bold
Italic”: “Courier New” or “Times New Roman” and style is one of the
standard Windows font descriptions like “Regular”, “Italic”, “Bold” or
“Bold Italic”:
worksheet1.set_header(r#"&C&"Courier New,Italic"Hello"#);
worksheet2.set_header(r#"&C&"Courier New,Bold Italic"Hello"#);
worksheet3.set_header(r#"&C&"Times New Roman,Regular"Hello"#);
It is possible to combine all of these features together to create
complex headers and footers. If you set up a complex header in Excel you
can transfer it to rust_xlsxwriter by inspecting the string in the
Excel file. For example the following shows how unzip and grep the Excel
XML sub-files on a Linux system. The example uses libxml’s xmllint to
format the XML for clarity:
$ unzip myfile.xlsm -d myfile
$ xmllint --format `find myfile -name "*.xml" | xargs` | \
    egrep "Header|Footer" | sed 's/&/\&/g'

 <headerFooter scaleWithDoc="0">
   <oddHeader>&L&P</oddHeader>
 </headerFooter>
Note: Excel requires that the header or footer string be less than 256 characters, including the control characters. Strings longer than this will not be written, and a warning will be output.
Parameters
header- The header string with optional control characters.
Examples
The following example demonstrates setting the worksheet header.
worksheet.set_header("&CPage &P of &N");
Output file:
Set the printed page footer caption.
The set_footer() method can be used to set the footer for a worksheet.
See the documentation for set_header() for
more details on the syntax of the header/footer string.
Parameters
footer- The footer string with optional control characters.
sourcepub fn set_header_image(
&mut self,
image: &Image,
position: HeaderImagePosition
) -> Result<&mut Worksheet, XlsxError>
pub fn set_header_image( &mut self, image: &Image, position: HeaderImagePosition ) -> Result<&mut Worksheet, XlsxError>
Insert an image in a worksheet header.
Insert an image in a worksheet header in one of the 3 sections supported
by Excel: Left, Center and Right. This needs to be preceded by a call to
worksheet.set_header() where a corresponding
&[Picture] element is added to the header formatting string such as
"&L&[Picture]".
Parameters
position- The image position as defined by theHeaderImagePositionenum.
Errors
XlsxError::ParameterError- Parameter error if there isn’t a corresponding&[Picture]/&[G]variable in the header string.
Examples
The following example demonstrates adding a header image to a worksheet.
    let mut image = Image::new("examples/rust_logo.png")?;
    // Insert the watermark image in the header.
    worksheet.set_header("&C&[Picture]");
    worksheet.set_header_image(&image, HeaderImagePosition::Center)?;
Output file:
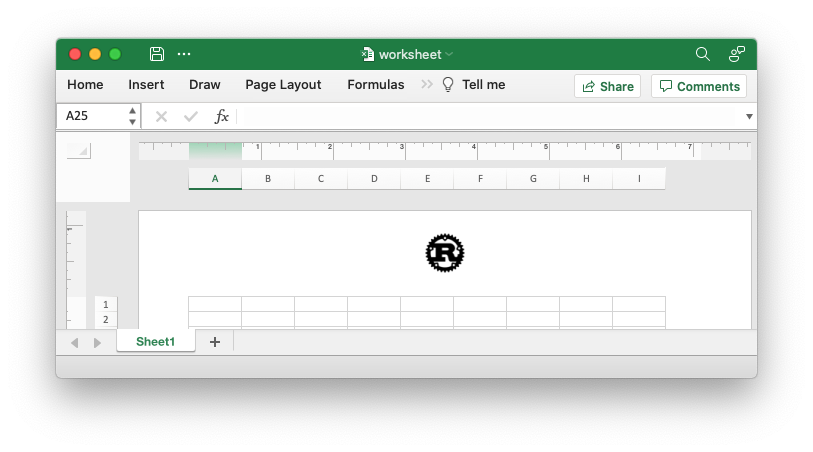
An example of adding a worksheet watermark image using the
rust_xlsxwriter library. This is based on the method of putting an image
in the worksheet header as suggested in the Microsoft documentation.
    let image = Image::new("examples/watermark.png")?;

    // Insert the watermark image in the header.
    worksheet.set_header("&C&[Picture]");
    worksheet.set_header_image(&image, HeaderImagePosition::Center)?;
Output file:
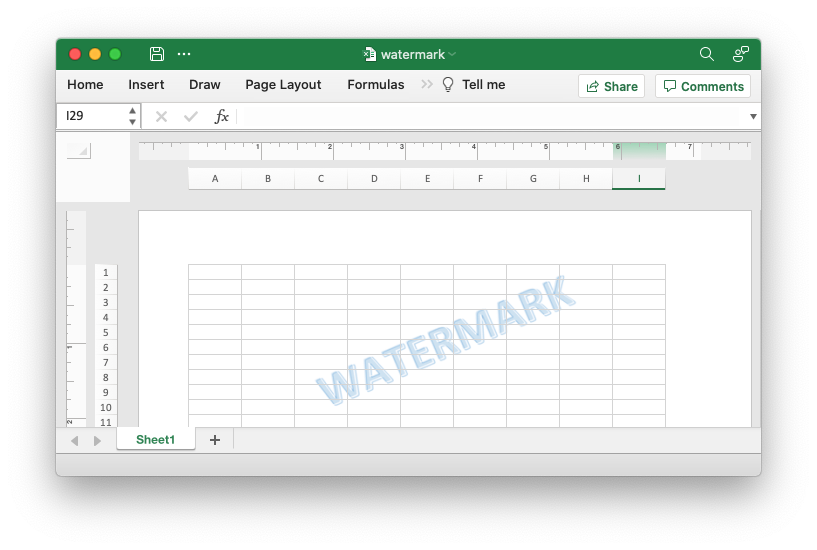
Insert an image in a worksheet footer.
See the documentation for
set_header_image() for more details.
Parameters
position- The image position as defined by theHeaderImagePositionenum.
Errors
XlsxError::ParameterError- Parameter error if there isn’t a corresponding&[Picture]/&[G]variable in the header string.
Set the page setup option to scale the header/footer with the document.
This option determines whether the headers and footers use the same scaling as the worksheet. This defaults to “on” in Excel.
See also the rust_xlsxwriter documentation on Worksheet - Page
Setup.
Parameters
enable- Turn the property on/off. It is on by default.
Set the page setup option to align the header/footer with the margins.
This option determines whether the headers and footers align with the left and right margins of the worksheet. This defaults to “on” in Excel.
See also the rust_xlsxwriter documentation on Worksheet - Page
Setup.
Parameters
enable- Turn the property on/off. It is on by default. S
sourcepub fn set_margins(
&mut self,
left: f64,
right: f64,
top: f64,
bottom: f64,
header: f64,
footer: f64
) -> &mut Worksheet
pub fn set_margins( &mut self, left: f64, right: f64, top: f64, bottom: f64, header: f64, footer: f64 ) -> &mut Worksheet
Set the page margins.
The set_margins() method is used to set the margins of the worksheet
when it is printed. The units are in inches. Specifying -1.0 for any
parameter will give the default Excel value. The defaults are shown
below.
Parameters
left- Left margin in inches. Excel default is 0.7.right- Right margin in inches. Excel default is 0.7.top- Top margin in inches. Excel default is 0.75.bottom- Bottom margin in inches. Excel default is 0.75.header- Header margin in inches. Excel default is 0.3.footer- Footer margin in inches. Excel default is 0.3.
Examples
The following example demonstrates setting the worksheet margins.
worksheet.set_margins(1.0, 1.25, 1.5, 1.75, 0.75, 0.25);
Output file:

sourcepub fn set_print_first_page_number(
&mut self,
page_number: u16
) -> &mut Worksheet
pub fn set_print_first_page_number( &mut self, page_number: u16 ) -> &mut Worksheet
Set the first page number when printing.
The set_print_first_page_number() method is used to set the page
number of the first page when the worksheet is printed out. This option
will only have and effect if you have a header/footer with the &[Page]
control character, see set_header().
See also the rust_xlsxwriter documentation on Worksheet - Page
Setup.
Parameters
page_number- The page number of the first printed page.
Examples
The following example demonstrates setting the page number on the printed page.
    worksheet.set_header("&CPage &P of &N");
    worksheet.set_print_first_page_number(2);
sourcepub fn set_print_scale(&mut self, scale: u16) -> &mut Worksheet
pub fn set_print_scale(&mut self, scale: u16) -> &mut Worksheet
Set the page setup option to set the print scale.
Set the scale factor of the printed page, in the range 10 <= scale <= 400.
The default scale factor is 100. The set_print_scale() method
does not affect the scale of the visible page in Excel. For that you
should use set_zoom().
See also the rust_xlsxwriter documentation on Worksheet - Page
Setup.
Parameters
scale- The print scale factor.
Examples
The following example demonstrates setting the scale of the worksheet page when printed.
    // Scale the printed worksheet to 50%.
    worksheet.set_print_scale(50);
sourcepub fn set_print_fit_to_pages(
&mut self,
width: u16,
height: u16
) -> &mut Worksheet
pub fn set_print_fit_to_pages( &mut self, width: u16, height: u16 ) -> &mut Worksheet
Fit the printed area to a specific number of pages both vertically and horizontally.
The set_print_fit_to_pages() method is used to fit the printed area to
a specific number of pages both vertically and horizontally. If the
printed area exceeds the specified number of pages it will be scaled
down to fit. This ensures that the printed area will always appear on
the specified number of pages even if the page size or margins change:
    worksheet1.set_print_fit_to_pages(1, 1); // Fit to 1x1 pages.
    worksheet2.set_print_fit_to_pages(2, 1); // Fit to 2x1 pages.
    worksheet3.set_print_fit_to_pages(1, 2); // Fit to 1x2 pages.
The print area can be defined using the set_print_area() method.
A common requirement is to fit the printed output to n pages wide but
have the height be as long as necessary. To achieve this set the
height to 0, see the example below.
Notes:
-
The
set_print_fit_to_pages()will override any manual page breaks that are defined in the worksheet. -
When using
set_print_fit_to_pages()it may also be required to set the printer paper size usingset_paper_size()or else Excel will default to “US Letter”.
See also the rust_xlsxwriter documentation on Worksheet - Page
Setup.
Parameters
width- Number of pages horizontally.height- Number of pages vertically.
Examples
The following example demonstrates setting the scale of the worksheet to fit a defined number of pages vertically and horizontally. This example shows a common use case which is to fit the printed output to 1 page wide but have the height be as long as necessary.
    // Set the printed output to fit 1 page wide and as long as necessary.
    worksheet.set_print_fit_to_pages(1, 0);
Output:
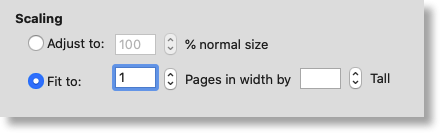
sourcepub fn set_print_center_horizontally(&mut self, enable: bool) -> &mut Worksheet
pub fn set_print_center_horizontally(&mut self, enable: bool) -> &mut Worksheet
Center the printed page horizontally.
Center the worksheet data horizontally between the margins on the printed page
See also the rust_xlsxwriter documentation on Worksheet - Page
Setup.
Parameters
enable- Turn the property on/off. It is off by default.
sourcepub fn set_print_center_vertically(&mut self, enable: bool) -> &mut Worksheet
pub fn set_print_center_vertically(&mut self, enable: bool) -> &mut Worksheet
Center the printed page vertically.
Center the worksheet data vertically between the margins on the printed page
See also the rust_xlsxwriter documentation on Worksheet - Page
Setup.
Parameters
enable- Turn the property on/off. It is off by default.
sourcepub fn set_print_gridlines(&mut self, enable: bool) -> &mut Worksheet
pub fn set_print_gridlines(&mut self, enable: bool) -> &mut Worksheet
Set the page setup option to turn on printed gridlines.
The set_print_gridlines() method is use to turn on/off gridlines on
the printed pages. It is off by default.
See also the rust_xlsxwriter documentation on Worksheet - Page
Setup.
Parameters
enable- Turn the property on/off. It is off by default.
sourcepub fn set_print_black_and_white(&mut self, enable: bool) -> &mut Worksheet
pub fn set_print_black_and_white(&mut self, enable: bool) -> &mut Worksheet
Set the page setup option to print in black and white.
This set_print_black_and_white() method can be used to force printing
in black and white only. It is off by default.
See also the rust_xlsxwriter documentation on Worksheet - Page
Setup.
Parameters
enable- Turn the property on/off. It is off by default.
sourcepub fn set_print_draft(&mut self, enable: bool) -> &mut Worksheet
pub fn set_print_draft(&mut self, enable: bool) -> &mut Worksheet
Set the page setup option to print in draft quality.
See also the rust_xlsxwriter documentation on Worksheet - Page Setup.
Parameters
enable- Turn the property on/off. It is off by default.
sourcepub fn set_print_headings(&mut self, enable: bool) -> &mut Worksheet
pub fn set_print_headings(&mut self, enable: bool) -> &mut Worksheet
Set the page setup option to print the row and column headers on the printed page.
The set_print_headings() method turns on the row and column headers
when printing a worksheet. This option is off by default.
See also the rust_xlsxwriter documentation on Worksheet - Page
Setup.
Parameters
enable- Turn the property on/off. It is off by default.
sourcepub fn set_print_area(
&mut self,
first_row: RowNum,
first_col: ColNum,
last_row: RowNum,
last_col: ColNum
) -> Result<&mut Worksheet, XlsxError>
pub fn set_print_area( &mut self, first_row: RowNum, first_col: ColNum, last_row: RowNum, last_col: ColNum ) -> Result<&mut Worksheet, XlsxError>
Set the print area for the worksheet.
This method is used to specify the area of the worksheet that will be printed.
In order to specify an entire row or column range such as 1:20 or
A:H you must specify the corresponding maximum column or row range.
For example:
(0, 0, 31, 16_383) == 1:32.(0, 0, 1_048_575, 12) == A:M.
In these examples 16,383 is the maximum column and 1,048,575 is the maximum row (zero indexed).
See also the example below and the rust_xlsxwriter documentation on
Worksheet - Page Setup.
Parameters
first_row- The first row of the range. (All zero indexed.)first_col- The first row of the range.last_row- The last row of the range.last_col- The last row of the range.
Errors
XlsxError::RowColumnLimitError- Row or column exceeds Excel’s worksheet limits.XlsxError::RowColumnOrderError- First row or column is larger than the last row or column.
Examples
The following example demonstrates setting the print area for several worksheets.
    let worksheet1 = workbook.add_worksheet();
    // Set the print area to "A1:M32"
    worksheet1.set_print_area(0, 0, 31, 12)?;

    let worksheet2 = workbook.add_worksheet();
    // Set the print area to "1:32"
    worksheet2.set_print_area(0, 0, 31, 16_383)?;

    let worksheet3 = workbook.add_worksheet();
    // Set the print area to "A:M"
    worksheet3.set_print_area(0, 0, 1_048_575, 12)?;
Output file, page setup dialog for worksheet1:
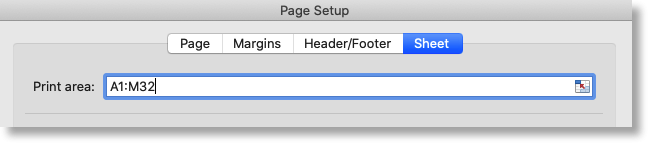
sourcepub fn set_repeat_rows(
&mut self,
first_row: RowNum,
last_row: RowNum
) -> Result<&mut Worksheet, XlsxError>
pub fn set_repeat_rows( &mut self, first_row: RowNum, last_row: RowNum ) -> Result<&mut Worksheet, XlsxError>
Set the number of rows to repeat at the top of each printed page.
For large Excel documents it is often desirable to have the first row or rows of the worksheet print out at the top of each page.
See the example below and the rust_xlsxwriter documentation on
Worksheet - Page Setup.
Parameters
first_row- The first row of the range. (Zero indexed.)last_row- The last row of the range.
Errors
XlsxError::RowColumnLimitError- Row or column exceeds Excel’s worksheet limits.XlsxError::RowColumnOrderError- First row larger than the last row.
Examples
The following example demonstrates setting the rows to repeat on each printed page.
    let worksheet1 = workbook.add_worksheet();
    // Repeat the first row in the printed output.
    worksheet1.set_repeat_rows(0, 0)?;

    let worksheet2 = workbook.add_worksheet();
    // Repeat the first 2 rows in the printed output.
    worksheet2.set_repeat_rows(0, 1)?;
Output file, page setup dialog for worksheet2:
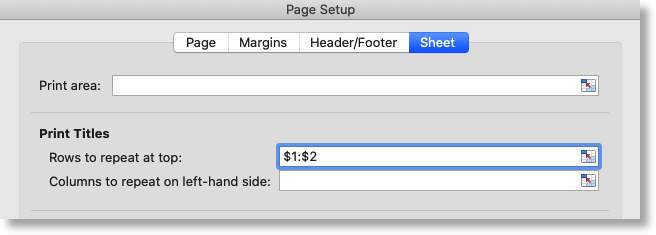
sourcepub fn set_repeat_columns(
&mut self,
first_col: ColNum,
last_col: ColNum
) -> Result<&mut Worksheet, XlsxError>
pub fn set_repeat_columns( &mut self, first_col: ColNum, last_col: ColNum ) -> Result<&mut Worksheet, XlsxError>
Set the columns to repeat at the left hand side of each printed page.
For large Excel documents it is often desirable to have the first column or columns of the worksheet print out at the left hand side of each page.
See the example below and the rust_xlsxwriter documentation on
Worksheet - Page Setup.
Parameters
first_col- The first row of the range. (Zero indexed.)last_col- The last row of the range.
Errors
XlsxError::RowColumnLimitError- Row or column exceeds Excel’s worksheet limits.XlsxError::RowColumnOrderError- First row or column is larger than the last row or column.
Examples
The following example demonstrates setting the columns to repeat on each printed page.
    let worksheet1 = workbook.add_worksheet();
    // Repeat the first column in the printed output.
    worksheet1.set_repeat_columns(0, 0)?;

    let worksheet2 = workbook.add_worksheet();
    // Repeat the first 2 columns in the printed output.
    worksheet2.set_repeat_columns(0, 1)?;
Output file, page setup dialog for worksheet2:

sourcepub fn autofit(&mut self) -> &mut Worksheet
pub fn autofit(&mut self) -> &mut Worksheet
Autofit the worksheet column widths, approximately.
There is no option in the xlsx file format that can be used to say “autofit columns on loading”. Auto-fitting of columns is something that Excel does at runtime when it has access to all of the worksheet information as well as the Windows functions for calculating display areas based on fonts and formatting.
The rust_xlsxwriter library doesn’t have access to the Windows
functions that Excel has so it simulates autofit by calculating string
widths using metrics taken from Excel.
As such, there are some limitations to be aware of when using this method:
- It is a simulated method and may not be accurate in all cases.
- It is based on the default Excel font type and size of Calibri 11. It will not give accurate results for other fonts or font sizes.
- It doesn’t take number or date formatting into account, although it may try to in a later version.
- It iterates over all the cells in a worksheet that have been populated with data and performs a length calculation on each one, so it can have a performance overhead for larger worksheets. See Note 1 below.
This isn’t perfect but for most cases it should be sufficient and if not
you can adjust or prompt it by setting your own column widths via
set_column_width() or
set_column_width_pixels().
The autofit() method ignores columns that have already been explicitly
set if the width is greater than the calculated autofit width.
Alternatively, setting the column width explicitly after calling
autofit() will override the autofit value.
Note 1: As a performance optimization when dealing with large data
sets you can call autofit() after writing the first 50 or 100 rows.
This will produce a reasonably accurate autofit for the first visible
page of data without incurring the performance penalty of autofitting
thousands of non-visible rows.
Examples
The following example demonstrates auto-fitting the worksheet column widths based on the data in the columns. See all the Autofitting Columns example in the user guide/examples directory.
    // Add some data
    worksheet.write_string(0, 0, "Hello")?;
    worksheet.write_string(0, 1, "Hello")?;
    worksheet.write_string(1, 1, "Hello World")?;
    worksheet.write_number(0, 2, 123)?;
    worksheet.write_number(0, 3, 123456)?;

    // Autofit the columns.
    worksheet.autofit();
Output file: