Module rust_xlsxwriter::serializer
source · serde only.Expand description
§Working with Serde
Serialization is the process of converting data from one format to another
using rules shared between the data and the serializer. The
Serde crate allow you to attach these type of rules to
data and it also provides traits that can be implemented by serializers to
convert that data into different formats. The rust_xlsxwriter crate
implements the Serde serde::Serializer trait for Worksheet structs
which allows you to serialize data directly to a worksheet.
The following sections explains how to serialize Serde enabled data to an
Excel worksheet using rust_xlsxwriter.
Contents:
- How serialization works in
rust_xlsxwriter - Setting serialization headers
- Renaming fields when serializing
- Skipping fields when serializing
- Setting serialization formatting
- Serializing dates and times
- Controlling Excel output via
XlsxSerializeand struct attributes - Limitations of serializing to Excel
Note: This functionality requires the use of the serde feature flag
with rust_xlsxwriter:
cargo add rust_xlsxwriter -F serde
§How serialization works in rust_xlsxwriter
Serialization with rust_xlsxwriter needs to take into consideration
that the target output is a 2D grid of cells into which the data can be
serialized. As such the focus is on serializing data types that map to this
2D grid such as structs or compound collections of structs such as vectors
or tuples and it (currently) ignores compound types like maps.
The image below shows the basic scheme for mapping a struct to a worksheet: fields are mapped to a header and values are mapped to sequential cells below the header.
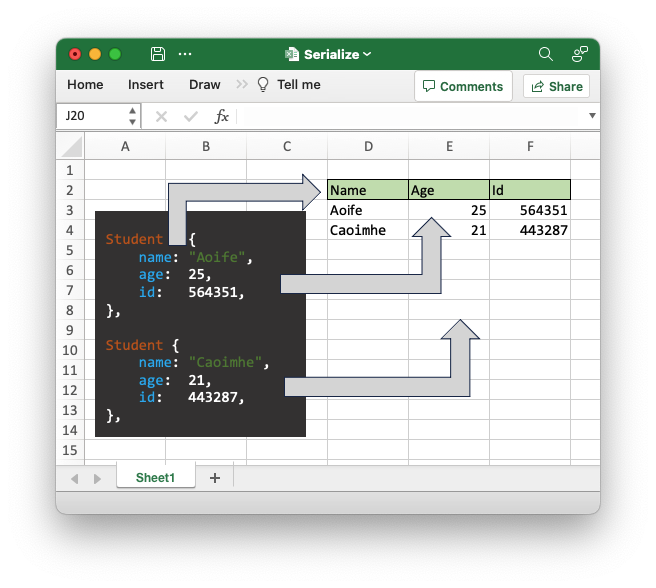
This scheme needs an initial (row, col) location from which to start serializing to allow the data to be positioned anywhere on the worksheet. Subsequent serializations will be in the same columns (for the target struct type) but will be one row lower in the worksheet.
The type name and fields of the struct being serialized is also required information. We will look at that in more detail in the next section.
Here is an example program that demonstrates the basic steps for serializing data to an Excel worksheet:
use rust_xlsxwriter::{Format, FormatBorder, Workbook, XlsxError};
use serde::{Serialize, Deserialize};
fn main() -> Result<(), XlsxError> {
let mut workbook = Workbook::new();
// Add a worksheet to the workbook.
let worksheet = workbook.add_worksheet();
// Add some formats to use with the serialization data.
let header_format = Format::new()
.set_bold()
.set_border(FormatBorder::Thin)
.set_background_color("C6E0B4");
// Create a serializable struct.
#[derive(Deserialize, Serialize)]
#[serde(rename_all = "PascalCase")]
struct Student<'a> {
name: &'a str,
age: u8,
id: u32,
}
let students = [
Student {
name: "Aoife",
age: 25,
id: 564351,
},
Student {
name: "Caoimhe",
age: 21,
id: 443287,
},
];
// Set up the start location and headers of the data to be serialized.
worksheet.deserialize_headers_with_format::<Student>(1, 3, &header_format)?;
// Serialize the data.
worksheet.serialize(&students)?;
// Save the file.
workbook.save("serialize.xlsx")?;
Ok(())
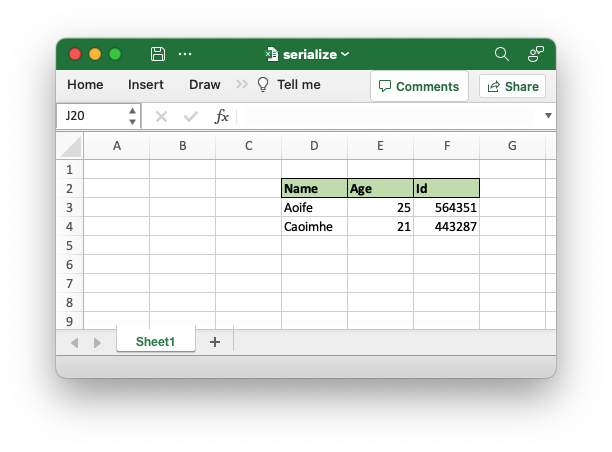
}Output file:
§Setting serialization headers
When serializing structs rust_xlsxwriter needs to know the location where
the serialization starts and also the type and field names of the struct
being serialized. The field names are used as headers and the type name
allows for several distinct structs to be serialized to the same worksheet.
The worksheet methods that perform this function fall into three types:
-
For structs that only derive
Serializerust_xlsxwriterwill use the same serialization it uses to write data to figure out the required fields and headers. This has the minor disadvantage that it needs an instance of the type (and not just the type itself) in order to work.The following methods are available for this approach:
-
Worksheet::serialize_headers(): Requires a concrete instance of the type of struct that you wish to serialize. The library uses this to infer the struct name and fields. -
Worksheet::serialize_headers_with_format(): This is similar to the previous method but it allows you to add a cell format for the headers. -
Worksheet::serialize_headers_with_options(): Similar to the previous methods but also allows configuration of the headers and fields viaSerializeFieldOptions.
-
-
For structs that derive
SerializeandDeserializerust_xlsxwritercan use deserialization to figure out the required fields and headers. This has the minor advantage that it only needs the type and doesn’t require an instance of the type.The following methods are available for this approach:
-
Worksheet::deserialize_headers(): This only requires the type of struct that you wish to serialize and that it derives theDeserializeandSerializetraits. The library uses this to infer the struct name and fields (via deserialization). -
Worksheet::deserialize_headers_with_format(): This is similar to the previous method but it allows you to add a cell format for the headers. -
Worksheet::deserialize_headers_with_options(): Similar to the previous methods but also allows configuration of the headers and fields viaSerializeFieldOptions.
-
-
For structs that derive
SerializeandXlsxSerialize(arust_xlsxwriterprovided trait) the library uses proc macros associated withXlsxSerializeto figure out the required fields and headers. This has the advantage of allowing the user to specify header and field formatting via struct attributes. See Controlling Excel output viaXlsxSerializeand struct attributes for details on how this works.Since the formatting can be encoded in struct attributes this approach only requires one worksheet method:
Worksheet::set_serialize_headers(): This only requires the type of struct that you wish to serialize and that it derives theXlsxSerializeandSerializetraits.
The availability of 3 different approaches (and associated methods) will
probably cause mild anxiety in the reader as they will sense that they are
required to make a choice without knowing which is the best approach. In
general you can decide as follows: if your struct derives only have
Serialize and changing it is outside your control you must use the
serialization method (Approach 1); if you struct also supports
Deserialize you can save yourself the step of requiring a concrete
instance type and use the deserialization method (Approach 2); finally, if
the definition of the struct is under your control and you can add
XlsxSerialize then can define the formatting along with the struct and
also save yourself a lot of additional structural code to set up formatting
(Approach 3). The XlsxSerialize approach does, however, limit you to
having a fixed set of formatting per struct.
The two examples below should help inform your decision. If not then note
that the author mainly uses XlsxSerialize but you can use whichever
method works for you without fear of judgment.
The first example below shows the usage of some of the serialization and deserialization methods.
use rust_xlsxwriter::{
CustomSerializeField, Format, FormatBorder, SerializeFieldOptions, Workbook, XlsxError,
};
use serde::{Deserialize, Serialize};
fn main() -> Result<(), XlsxError> {
let mut workbook = Workbook::new();
// Add a worksheet to the workbook.
let worksheet = workbook.add_worksheet();
// Set some column widths for clarity.
worksheet.set_column_width(2, 4)?;
worksheet.set_column_width(5, 4)?;
worksheet.set_column_width(8, 4)?;
// Add some formats to use with the serialization data.
let header_format = Format::new()
.set_bold()
.set_border(FormatBorder::Thin)
.set_background_color("C6EFCE");
let currency_format = Format::new().set_num_format("$0.00");
// Create a serializable struct.
#[derive(Deserialize, Serialize)]
struct Produce {
fruit: &'static str,
cost: f64,
}
// Create some data instances.
let item1 = Produce {
fruit: "Peach",
cost: 1.05,
};
let item2 = Produce {
fruit: "Plum",
cost: 0.15,
};
let item3 = Produce {
fruit: "Pear",
cost: 0.75,
};
// 1. Set the serialization location and headers with `deserialize_headers()`
// and serialize some data.
worksheet.deserialize_headers::<Produce>(0, 0)?;
worksheet.serialize(&item1)?;
worksheet.serialize(&item2)?;
worksheet.serialize(&item3)?;
// 2. Set the serialization location and formatted headers with
// `serialize_headers_with_format()` and serialize some data.
worksheet.serialize_headers_with_format(0, 3, &item1, &header_format)?;
worksheet.serialize(&item1)?;
worksheet.serialize(&item2)?;
worksheet.serialize(&item3)?;
// 3. Set the serialization location and headers with custom headers. We use
// the customization to set the header format and also rename the cell format
// for the number values.
let custom_headers = [
CustomSerializeField::new("fruit").rename("Item"),
CustomSerializeField::new("cost")
.rename("Price")
.set_value_format(currency_format),
];
let header_options = SerializeFieldOptions::new()
.set_header_format(header_format)
.set_custom_headers(&custom_headers);
// Set the serialization location and custom headers.
worksheet.deserialize_headers_with_options::<Produce>(0, 6, &header_options)?;
worksheet.serialize(&item1)?;
worksheet.serialize(&item2)?;
worksheet.serialize(&item3)?;
// 4. Set the serialization location and headers with custom options. We use
// the customization to turn off the headers.
let header_options = SerializeFieldOptions::new().hide_headers(true);
// Set the serialization location and custom headers.
worksheet.serialize_headers_with_options(0, 9, &item1, &header_options)?;
worksheet.serialize(&item1)?;
worksheet.serialize(&item2)?;
worksheet.serialize(&item3)?;
// Save the file.
workbook.save("serialize.xlsx")?;
Ok(())
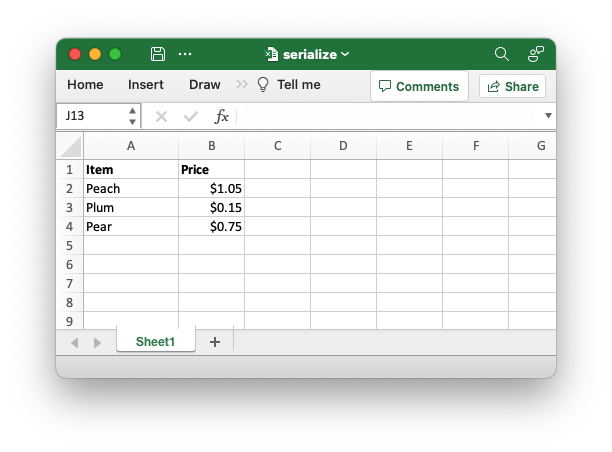
}Output file:

The second example uses XlsxSerialize and struct attributes to define the
output. Note that there is a lot less structural code in comparison to the
previous examples and that the formatting definitions are inline with the
struct. On the other hand you should also note that the previous example
where four different outputs are obtained for the same struct isn’t possible
with this approach since the format definition is locked to the struct.
use rust_xlsxwriter::{Workbook, XlsxError, XlsxSerialize};
use serde::Serialize;
fn main() -> Result<(), XlsxError> {
let mut workbook = Workbook::new();
// Add a worksheet to the workbook.
let worksheet = workbook.add_worksheet();
// Create a serializable struct.
#[derive(XlsxSerialize, Serialize)]
#[xlsx(header_format = Format::new().set_bold())]
struct Produce {
#[xlsx(rename = "Item")]
#[xlsx(column_width = 12.0)]
fruit: &'static str,
#[xlsx(rename = "Price", num_format = "$0.00")]
cost: f64,
}
// Create some data instances.
let item1 = Produce {
fruit: "Peach",
cost: 1.05,
};
let item2 = Produce {
fruit: "Plum",
cost: 0.15,
};
let item3 = Produce {
fruit: "Pear",
cost: 0.75,
};
// Set the serialization location and headers.
worksheet.set_serialize_headers::<Produce>(0, 0)?;
// Serialize the data.
worksheet.serialize(&item1)?;
worksheet.serialize(&item2)?;
worksheet.serialize(&item3)?;
// Save the file to disk.
workbook.save("serialize.xlsx")?;
Ok(())
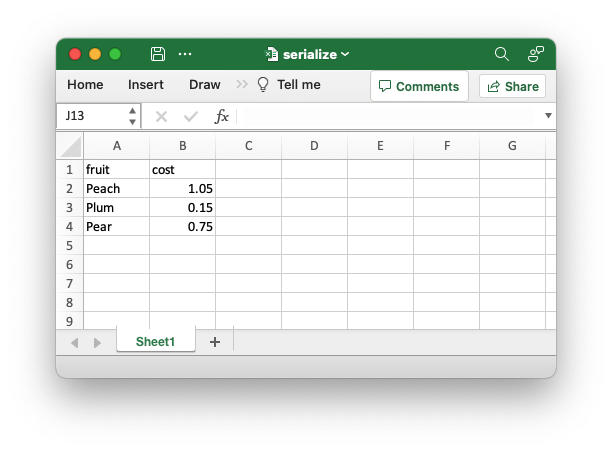
}Output file:
§Renaming fields when serializing
As explained above serialization converts the field names of structs to column headers at the top of serialized data. The default field names are generally lowercase and snake case and may not be the way you want the header names displayed in Excel. In which case you can use one of the three main methods to rename the fields/headers:
- Rename the field during serialization using the Serde:
- field attribute:
#[serde(rename = "name")or - container attribute:
#[serde(rename_all = "...")].
- field attribute:
- Rename the header (not field) when setting up custom serialization
headers via
Worksheet::deserialize_headers_with_options()orWorksheet::serialize_headers_with_options()andCustomSerializeField::rename(). - Rename the field using the
XlsxSerializefield attribute#[xlsx(rename = "name"). This is effectively the same as the Serde attribute but allows you to specify a different name for the Excel serialization. See Fieldxlsxattributes for details.
Examples of these methods are shown below.
§Examples of field renaming
The following example demonstrates renaming fields during serialization by using Serde field attributes.
    // Create a serializable struct. Note the serde attributes.
    #[derive(Deserialize, Serialize)]
    struct Produce {
        #[serde(rename = "Item")]
        fruit: &'static str,

        #[serde(rename = "Price")]
        cost: f64,
    }

    // Create some data instances.
    let items = [
        Produce {
            fruit: "Peach",
            cost: 1.05,
        },
        Produce {
            fruit: "Plum",
            cost: 0.15,
        },
        Produce {
            fruit: "Pear",
            cost: 0.75,
        },
    ];

    // Set the serialization location and headers.
    worksheet.deserialize_headers::<Produce>(0, 0)?;

    // Serialize the data.
    worksheet.serialize(&items)?;
Output file:

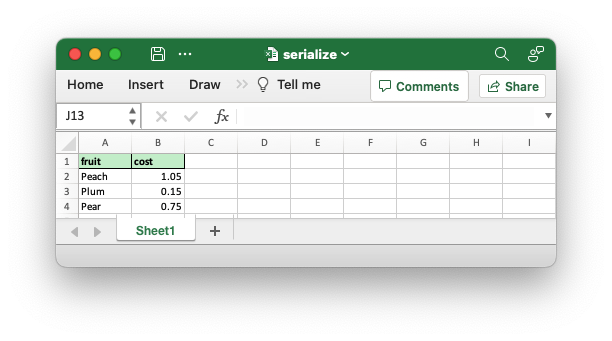
The following example demonstrates renaming fields during serialization by specifying custom headers and renaming them there. The output is the same as the image above.
    // Create a serializable struct.
    #[derive(Deserialize, Serialize)]
    struct Produce {
        fruit: &'static str,
        cost: f64,
    }

    // Create some data instances.
    let items = [
        Produce {
            fruit: "Peach",
            cost: 1.05,
        },
        Produce {
            fruit: "Plum",
            cost: 0.15,
        },
        Produce {
            fruit: "Pear",
            cost: 0.75,
        },
    ];

    // Set up the custom headers.
    let custom_headers = [
        CustomSerializeField::new("fruit").rename("Item"),
        CustomSerializeField::new("cost").rename("Price"),
    ];
    let header_options = SerializeFieldOptions::new().set_custom_headers(&custom_headers);

    // Set the serialization location and custom headers.
    worksheet.deserialize_headers_with_options::<Produce>(0, 0, &header_options)?;

    // Serialize the data.
    worksheet.serialize(&items)?;
The following example demonstrates renaming fields during serialization by
using XlsxSerialize xlsx field attributes. The output is the same as the
image above.
    // Create a serializable struct.
    #[derive(XlsxSerialize, Serialize)]
    struct Produce {
        #[xlsx(rename = "Item")]
        fruit: &'static str,

        #[xlsx(rename = "Price")]
        cost: f64,
    }

    // Create some data instances.
    let items = [
        Produce {
            fruit: "Peach",
            cost: 1.05,
        },
        Produce {
            fruit: "Plum",
            cost: 0.15,
        },
        Produce {
            fruit: "Pear",
            cost: 0.75,
        },
    ];

    // Set the serialization location and headers.
    worksheet.set_serialize_headers::<Produce>(0, 0)?;

    // Serialize the data.
worksheet.serialize(&items)?;§Skipping fields when serializing
When serializing a struct you may not want all of the fields to be serialized. For example the struct may contain internal fields that aren’t of interest to the end user. There are several ways to skip fields:
- Using the Serde field attributes
#[serde(skip)]. This is the simplest and best method. - Explicitly omitting the field by setting up custom serialization headers This method is useful when you can’t add any additional attributes on the struct.
- Marking the field as skippable via custom headers and the
CustomSerializeField::skip()method. This is only required in a few edge cases where other methods won’t work. - Skip the field using the
XlsxSerializefield attribute#[xlsx(skip)]. This is effectively the same as the Serde attribute but allows you to specify a different behavior for the Excel serialization. See Fieldxlsxattributes for details.
Examples of all four methods are shown below.
§Examples of field skipping
The following example demonstrates skipping fields during serialization by
using Serde field attributes. Since the field is no longer used we also need
to tell rustc not to emit a dead_code warning.
use rust_xlsxwriter::{Workbook, XlsxError};
use serde::{Deserialize, Serialize};

fn main() -> Result<(), XlsxError> {
    let mut workbook = Workbook::new();

    // Add a worksheet to the workbook.
    let worksheet = workbook.add_worksheet();

    // Create a serializable struct. Note the serde attribute.
    #[derive(Deserialize, Serialize)]
    struct Produce {
        fruit: &'static str,
        cost: f64,

        #[serde(skip)]
        #[allow(dead_code)]
        in_stock: bool,
    }

    // Create some data instances.
    let item1 = Produce {
        fruit: "Peach",
        cost: 1.05,
        in_stock: true,
    };

    let item2 = Produce {
        fruit: "Plum",
        cost: 0.15,
        in_stock: true,
    };

    let item3 = Produce {
        fruit: "Pear",
        cost: 0.75,
        in_stock: false,
    };

    // Set the serialization location and headers.
    worksheet.deserialize_headers::<Produce>(0, 0)?;

    // Serialize the data.
    worksheet.serialize(&item1)?;
    worksheet.serialize(&item2)?;
    worksheet.serialize(&item3)?;

    // Save the file.
    workbook.save("serialize.xlsx")?;

    Ok(())
}
Output file:
The following example demonstrates skipping fields during serialization by
omitting them from the serialization headers. To do this we need to specify
custom headers and set SerializeFieldOptions::use_custom_headers_only().
The output is the same as the image above.
    // Create a serializable struct.
    #[derive(Deserialize, Serialize)]
    struct Produce {
        fruit: &'static str,
        cost: f64,
        in_stock: bool,
    }

    // Create some data instances.
    let item1 = Produce {
        fruit: "Peach",
        cost: 1.05,
        in_stock: true,
    };

    let item2 = Produce {
        fruit: "Plum",
        cost: 0.15,
        in_stock: true,
    };

    let item3 = Produce {
        fruit: "Pear",
        cost: 0.75,
        in_stock: false,
    };

    // Set up only the custom headers we want and omit "in_stock".
    let custom_headers = [
        CustomSerializeField::new("fruit"),
        CustomSerializeField::new("cost"),
    ];

    // Note the use of "use_custom_headers_only" to only serialize the named
    // custom headers.
    let header_options = SerializeFieldOptions::new()
        .use_custom_headers_only(true)
        .set_custom_headers(&custom_headers);

    // Set the serialization location and custom headers.
    worksheet.deserialize_headers_with_options::<Produce>(0, 0, &header_options)?;

    // Serialize the data.
    worksheet.serialize(&item1)?;
    worksheet.serialize(&item2)?;
    worksheet.serialize(&item3)?;
The following example is similar in setup to the previous example but demonstrates skipping fields by explicitly skipping them in the custom headers. This method should only be required in a few edge cases. The output is the same as the image above.
    // We only need to set a custom header for the field we want to skip.
    let header_options = SerializeFieldOptions::new()
        .set_custom_headers(&[CustomSerializeField::new("in_stock").skip(true)]);

    // Set the serialization location and custom headers.
    worksheet.deserialize_headers_with_options::<Produce>(0, 0, &header_options)?;
The following example demonstrates skipping fields during serialization by
using XlsxSerialize field attributes. Since the field is no longer used we
also need to tell rustc not to emit a dead_code warning.
    // Create a serializable struct.
    #[derive(XlsxSerialize, Serialize)]
    struct Produce {
        fruit: &'static str,
        cost: f64,

        #[xlsx(skip)]
        #[allow(dead_code)]
        in_stock: bool,
}§Setting serialization formatting
Serialization will transfer your data to a worksheet but it won’t format it without a few additional steps.
The most common requirement is to format the header/fields at the top of the
serialized data. The simplest way to do this is to use the
Worksheet::deserialize_headers_with_format() or
Worksheet::serialize_headers_with_format() methods as shown in the
Setting serialization headers section
above. Alternatively you can use the #[xlsx(header_format = Format)]
attribute (see Container xlsx attributes).
The other common requirement is to format values that are serialized below the headers such as numeric data where you need to control the number of decimal places or make it appear as a currency.
There are a few ways of formatting the values for a field:
- Use
Worksheet::set_column_format()to format the entire column. - Use
CustomSerializeField::set_column_format()to format the entire column. This is the same as the worksheet method but it has the advantage of having the column number calculated automatically based on the field name. - Use
CustomSerializeField::set_value_format()to format just the serialized data (and not the entire column). - Using
XlsxSerializeattributes. This is explained in detail in the section below on Controlling Excel output viaXlsxSerializeand struct attributes.
Examples of the first three methods are shown below. Examples of
XlsxSerialize attributes are shown in a subsequent section below.
§Examples of formatting
The following example demonstrates serializing instances of a Serde derived data structure to a worksheet with header and cell formatting.
use rust_xlsxwriter::{Format, FormatBorder, Workbook, XlsxError};
use serde::{Deserialize, Serialize};
fn main() -> Result<(), XlsxError> {
let mut workbook = Workbook::new();
// Add a worksheet to the workbook.
let worksheet = workbook.add_worksheet();
// Add some formats to use with the serialization data.
let header_format = Format::new()
.set_bold()
.set_border(FormatBorder::Thin)
.set_background_color("C6EFCE");
let currency_format = Format::new().set_num_format("$0.00");
// Create a serializable struct.
#[derive(Deserialize, Serialize)]
struct Produce {
#[serde(rename = "Item")]
fruit: &'static str,
#[serde(rename = "Price")]
cost: f64,
}
// Create some data instances.
let item1 = Produce {
fruit: "Peach",
cost: 1.05,
};
let item2 = Produce {
fruit: "Plum",
cost: 0.15,
};
let item3 = Produce {
fruit: "Pear",
cost: 0.75,
};
// Set a column format for the column. This is added to cell data that
// doesn't have any other format so it doesn't affect the headers.
worksheet.set_column_format(2, ¤cy_format)?;
// Set the serialization location and headers.
worksheet.deserialize_headers_with_format::<Produce>(1, 1, &header_format)?;
// Serialize the data.
worksheet.serialize(&item1)?;
worksheet.serialize(&item2)?;
worksheet.serialize(&item3)?;
// Save the file.
workbook.save("serialize.xlsx")?;
Ok(())
}Output file:

The following variation on the example demonstrates setting formatting via custom headers. This produces the same output as the previous example but doesn’t require you to manually, or programmatically, calculate the column number.
    // Set up the custom headers.
    let custom_headers =
        [CustomSerializeField::new("Price").set_column_format(currency_format)];

    let header_options = SerializeFieldOptions::new()
        .set_header_format(header_format)
        .set_custom_headers(&custom_headers);

    // Set the serialization location and headers.
    worksheet.deserialize_headers_with_options::<Produce>(1, 1, &header_options)?;
The following variation on the example demonstrates setting formatting for the serialized values, rather than the entire column. This allows a little bit more precision on cell formatting.
    // Set up the custom headers.
    let custom_headers =
        [CustomSerializeField::new("Price").set_value_format(currency_format)];

    let header_options = SerializeFieldOptions::new()
        .set_header_format(header_format)
        .set_custom_headers(&custom_headers);

    // Set the serialization location and headers.
worksheet.deserialize_headers_with_options::<Produce>(1, 1, &header_options)?;§Serializing dates and times
Dates and times can be serialized to Excel from one of the following types:
ExcelDateTime: The inbuiltrust_xlsxwriterdatetime type.Chrononaive (i.e., timezone unaware) types:
The ExcelDateTime type is serialized automatically since it implements
the Serialize trait. The Chrono types also implements Serialize
but they will serialize to an Excel string in RFC3339 format. To serialize
them to an Excel number/datetime format requires a serializing function like
Utility::serialize_chrono_naive_to_excel()
(as shown in the example below) or
Utility::serialize_chrono_option_naive_to_excel().
Excel datetimes also need a number format to display them as a date/time
since they are stored as f64 values. See Datetimes in
Excel and the previous section on
adding formatting.
Note, Excel doesn’t use timezones or try to convert or encode timezone
information in any way so they aren’t supported by rust_xlsxwriter.
§Examples of serializing dates
The following example demonstrates serializing instances of a Serde derived
data structure with ExcelDateTime fields.
use rust_xlsxwriter::{
    CustomSerializeField, ExcelDateTime, Format, FormatBorder,
    SerializeFieldOptions, Workbook, XlsxError,
};
use serde::{Deserialize, Serialize};

fn main() -> Result<(), XlsxError> {
    let mut workbook = Workbook::new();

    // Add a worksheet to the workbook.
    let worksheet = workbook.add_worksheet();

    // Widen the date column for clarity.
    worksheet.set_column_width(1, 12)?;

    // Add some formats to use with the serialization data.
    let header_format = Format::new()
        .set_bold()
        .set_border(FormatBorder::Thin)
        .set_background_color("C6E0B4");

    let date_format = Format::new().set_num_format("yyyy/mm/dd");

    // Create a serializable struct.
    #[derive(Deserialize, Serialize)]
    struct Student<'a> {
        name: &'a str,
        dob: ExcelDateTime,
        id: u32,
    }

    let students = [
        Student {
            name: "Aoife",
            dob: ExcelDateTime::from_ymd(1998, 1, 12)?,
            id: 564351,
        },
        Student {
            name: "Caoimhe",
            dob: ExcelDateTime::from_ymd(2000, 5, 1)?,
            id: 443287,
        },
    ];

    // Set up the start location and headers of the data to be serialized. Note,
    // we need to add a cell format for the datetime data.
    let custom_headers = [
        CustomSerializeField::new("name").rename("Student"),
        CustomSerializeField::new("dob")
            .rename("Birthday")
            .set_value_format(date_format),
        CustomSerializeField::new("id").rename("ID"),
    ];
    let header_options = SerializeFieldOptions::new()
        .set_header_format(header_format)
        .set_custom_headers(&custom_headers);

    worksheet.deserialize_headers_with_options::<Student>(0, 0, &header_options)?;

    // Serialize the data.
    worksheet.serialize(&students)?;

    // Save the file.
    workbook.save("serialize.xlsx")?;

    Ok(())
}
Output file:

Here is an example which serializes a struct with a NaiveDate field. The
output is the same as the previous example.
use rust_xlsxwriter::utility::serialize_chrono_naive_to_excel;

fn main() -> Result<(), XlsxError> {
    let mut workbook = Workbook::new();

    // Add a worksheet to the workbook.
    let worksheet = workbook.add_worksheet();

    // Widen the date column for clarity.
    worksheet.set_column_width(1, 12)?;

    // Add some formats to use with the serialization data.
    let header_format = Format::new()
        .set_bold()
        .set_border(FormatBorder::Thin)
        .set_background_color("C6E0B4");

    let date_format = Format::new().set_num_format("yyyy/mm/dd");

    // Create a serializable struct.
    #[derive(Deserialize, Serialize)]
    struct Student<'a> {
        name: &'a str,

        // Note, we add a `rust_xlsxwriter` function to serialize the date.
        #[serde(serialize_with = "serialize_chrono_naive_to_excel")]
        dob: NaiveDate,

        id: u32,
    }

    // ...

    Ok(())
}§Controlling Excel output via XlsxSerialize and struct attributes
In the sections above we saw how to use Serde Attributes to control some aspects for the serialization output.
It is also possible to use the XlsxSerialize derive trait and associate
attributes to set rust_xlsxwriter specific formatting and options. For
example:
use rust_xlsxwriter::{Workbook, XlsxError, XlsxSerialize};
use serde::Serialize;

fn main() -> Result<(), XlsxError> {
    let mut workbook = Workbook::new();

    // Add a worksheet to the workbook.
    let worksheet = workbook.add_worksheet();

    // Create a serializable struct.
    #[derive(XlsxSerialize, Serialize)]
    #[xlsx(header_format = Format::new().set_bold())]
    struct Produce {
        #[xlsx(rename = "Item")]
        #[xlsx(column_width = 12.0)]
        fruit: &'static str,

        #[xlsx(rename = "Price", num_format = "$0.00")]
        cost: f64,
    }

    // Create some data instances.
    let item1 = Produce {
        fruit: "Peach",
        cost: 1.05,
    };

    let item2 = Produce {
        fruit: "Plum",
        cost: 0.15,
    };

    let item3 = Produce {
        fruit: "Pear",
        cost: 0.75,
    };

    // Set the serialization location and headers.
    worksheet.set_serialize_headers::<Produce>(0, 0)?;

    // Serialize the data.
    worksheet.serialize(&item1)?;
    worksheet.serialize(&item2)?;
    worksheet.serialize(&item3)?;

    // Save the file to disk.
    workbook.save("serialize.xlsx")?;

    Ok(())
}
Note the change of column width in Column A, the renamed headers and the currency format in Column B numbers.
XlsxSerializer provides the same formatting functionality as
SerializeFieldOptions and CustomSerializeField (in fact it used them
in the background). The advantage of using XlsxSerializer is that the
formatting output can be kept with the data format and seen in the same
context. Some users may find this to be a cleaner abstraction.
§The XlsxSerializer attributes
The XlsxSerializer derived trait adds a wrapper around a Serde
serializable struct to add rust_xlsxwriter specific formatting options. It
achieves this via the rust_xlsxwriter SerializeFieldOptions and
CustomSerializeField serialization configuration structs. It is
available when you enable the serde feature.
As in Serde the attributes are divided into “Container Attributes” which apply to the entire struct and “Field Attributes” which apply to individuals fields. In an Excel context the container attributes apply to all headers and field attributes apply to the individual headers and the data below them.
In order to demonstrate each attribute and its effect we will use variations of the following example with the relevant attribute applied in the next sections.
§Base example (without attributes applied)
use rust_xlsxwriter::{Workbook, XlsxError, XlsxSerialize};
use serde::Serialize;

fn main() -> Result<(), XlsxError> {
    let mut workbook = Workbook::new();

    // Add a worksheet to the workbook.
    let worksheet = workbook.add_worksheet();

    // Create a serializable struct.
    #[derive(XlsxSerialize, Serialize)]
    struct Produce {
        fruit: &'static str,
        cost: f64,
    }

    // Create some data instances.
    let items = [
        Produce {
            fruit: "Peach",
            cost: 1.05,
        },
        Produce {
            fruit: "Plum",
            cost: 0.15,
        },
        Produce {
            fruit: "Pear",
            cost: 0.75,
        },
    ];

    // Set the serialization location and headers.
    worksheet.set_serialize_headers::<Produce>(0, 0)?;

    // Serialize the data.
    worksheet.serialize(&items)?;

    // Save the file to disk.
    workbook.save("serialize.xlsx")?;

    Ok(())
}§Container xlsx attributes
The following are the “Container” attributes supported by XlsxSerializer:
-
#[xlsx(header_format = Format)The
header_formatcontainer attribute sets theFormatproperty for headers. See the Working with attribute Formats section below for information on handling formats.#[derive(XlsxSerialize, Serialize)] #[xlsx(header_format = Format::new() .set_bold() .set_border(FormatBorder::Thin) .set_background_color("C6EFCE"))] struct Produce { fruit: &'static str, cost: f64, }
-
#[xlsx(hide_headers)The
hide_headerscontainer attribute hides the serialization headers:#[derive(XlsxSerialize, Serialize)] #[xlsx(hide_headers)] struct Produce { fruit: &'static str, cost: f64, }
-
#[xlsx(table_default)The
table_defaultcontainer attribute adds a worksheetTablestructure with default formatting to the serialized area:#[derive(XlsxSerialize, Serialize)] #[xlsx(table_default)] struct Produce { fruit: &'static str, cost: f64, }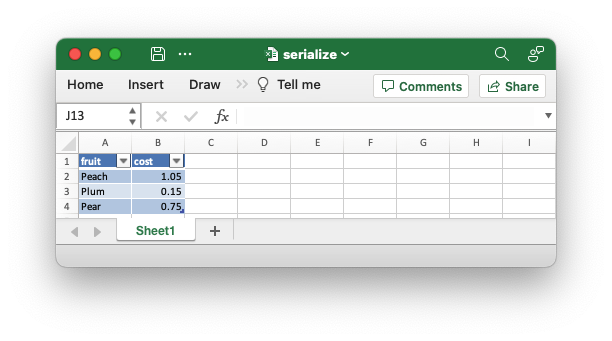
-
#[xlsx(table_style)The
table_stylecontainer attribute adds a worksheetTablestructure with a user specifiedTableStyleto the serialized area:#[derive(XlsxSerialize, Serialize)] #[xlsx(table_style = TableStyle::Medium10)] struct Produce { fruit: &'static str, cost: f64, }
-
#[xlsx(table = Table)The
tablecontainer attribute adds a user defined worksheetTablestructure to the serialized area:#[derive(XlsxSerialize, Serialize)] #[xlsx(table = Table::new())] struct Produce { fruit: &'static str, cost: f64, }See the Working with attribute Formats section below for information on how to wrap complex objects like
FormatorTablein a function so it can be used as an attribute parameter.
§Field xlsx attributes
The following are the “Field” attributes supported by XlsxSerializer:
-
#[xlsx(rename = "")The
renamefield attribute renames the Excel header. This is similar to the#[serde(rename = "")field attribute except that it doesn’t rename the field for other types of serialization.#[derive(XlsxSerialize, Serialize)] struct Produce { #[xlsx(rename = "Item")] fruit: &'static str, #[xlsx(rename = "Price")] cost: f64, }
-
#[xlsx(num_format = "")The
num_formatfield attribute sets the property to change the number formatting of the output. It is a syntactic shortcut forFormat::set_num_format().#[derive(XlsxSerialize, Serialize)] struct Produce { fruit: &'static str, #[xlsx(num_format = "$0.00")] cost: f64, }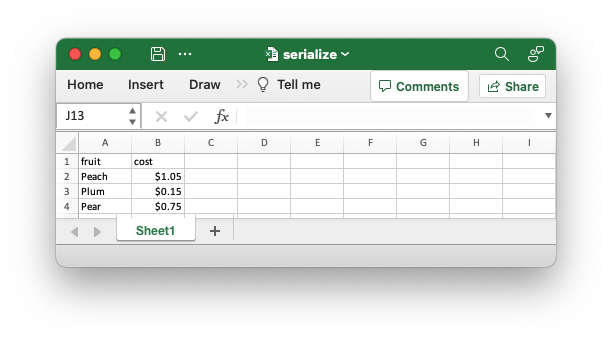
-
#[xlsx(value_format = Format)The
value_formatfield attribute sets theFormatproperty for the fields below the header.See the Working with attribute Formats section below for information on handling formats.
#[derive(XlsxSerialize, Serialize)] struct Produce { #[xlsx(value_format = Format::new().set_font_color("#FF0000"))] fruit: &'static str, cost: f64, }
-
#[xlsx(column_format = Format)The
column_formatfield attribute is similar to the previousvalue_formatattribute except that it sets the format for the entire column, including any data added manually below the serialized data.
-
#[xlsx(header_format = Format)The
header_formatfield attribute sets theFormatproperty for the the header. It is similar to the container method of the same name except it only sets the format or one header:#[derive(XlsxSerialize, Serialize)] struct Produce { fruit: &'static str, #[xlsx(header_format = Format::new().set_bold().set_font_color("#FF0000"))] cost: f64, }
-
#[xlsx(column_width = float)The
column_widthfield attribute sets the column width in character units.#[derive(XlsxSerialize, Serialize)] struct Produce { fruit: &'static str, #[xlsx(column_width = 20.0)] cost: f64, }
-
#[xlsx(column_width_pixels = int)The
column_width_pixelsfield attribute field attribute is similar to the previouscolumn_widthattribute except that the width is specified in integer pixel units.
-
#[xlsx(skip)The
skipfield attribute skips writing the field to the target Excel file. This is similar to the#[serde(skip)field attribute except that it doesn’t skip the field for other types of serialization.#[derive(XlsxSerialize, Serialize)] struct Produce { fruit: &'static str, #[xlsx(skip)] cost: f64, }
Note, if required you can group more than one attribute
#[xlsx(rename = "Item", column_width = 20.0)]
§Working with attribute Formats
When working with XlsxSerialize attributes that deal with Format
objects the definition can become quite long for an attribute value:
      #[derive(XlsxSerialize, Serialize)]
      #[xlsx(header_format = Format::new()
             .set_bold()
             .set_border(FormatBorder::Thin)
             .set_background_color("C6EFCE"))]
      struct Produce {
          fruit: &'static str,
          cost: f64,
}You might in this case be tempted to define the format in another part of your code and use a variable to define the format:
    let my_header_format = Format::new()
        .set_bold()
        .set_border(FormatBorder::Thin)
        .set_background_color("C6EFCE");

    #[derive(XlsxSerialize, Serialize)]
    #[xlsx(header_format = &my_header_format)] // Wont' work.
    struct Produce {
        fruit: &'static str,
        cost: f64,
    }
However, this won’t work because Rust derive/proc macros are compiled
statically and &header_format is a dynamic variable.
A workaround for this it to define any formats you wish to use in functions:
    fn my_header_format() -> Format {
        Format::new()
            .set_bold()
            .set_border(FormatBorder::Thin)
            .set_background_color("C6EFCE")
    }

    #[derive(XlsxSerialize, Serialize)]
    #[xlsx(header_format = my_header_format())]
    struct Produce {
        fruit: &'static str,
        cost: f64,
    }
Output file:

§Limitations of serializing to Excel
The cell/grid format of Excel sets a physical limitation on what can be
serialized to a worksheet. Unlike other formats such as JSON or XML you
cannot serialize arbitrary nested data to Excel without making some
concessions to either the format or the contents of the data. When
serializing data to Excel via rust_xlsxwriter it is best to consider what
that data will look like while designing your serialization.
Another limitation is that currently you can only serialize structs or struct values in compound containers such as vectors. Not all of the supported types in the Serde data model make sense in the context of Excel. In upcoming releases I will try to add support for additional types where it makes sense. If you have a valid use case please open a GitHub issue to discuss it with an example data structure. Also Serde sub-struct flattening is not currently supported.
Finally if you hit some serialization limitation using rust_xlsxwriter
remember that there are other non-serialization options available to use in
the standard Worksheet API to write scalar, vector and matrix data
types:
Worksheet::write()Worksheet::write_row()Worksheet::write_column()Worksheet::write_row_matrix()Worksheet::write_column_matrix()
Magic is great but the direct approach will also work. Remember Terry Pratchett’s witches.
Structs§
- The
CustomSerializeFieldstruct represents a custom serializer field/header. - The
SerializeFieldOptionsstruct represents custom field/header options.
Traits§
- Trait to map
#[xlsx()]attributes toSerializeFieldOptionsoptions.